Terminal File
C-3 from the main menu
Objective
Set up one terminal record for each PC that will be using FocalPoint.
The terminal file allows you to define locations of workstations. While you can log in as any terminal from any location, the terminal file will define which printers are used for printing, along with cash drawer and other peripheral definitions.
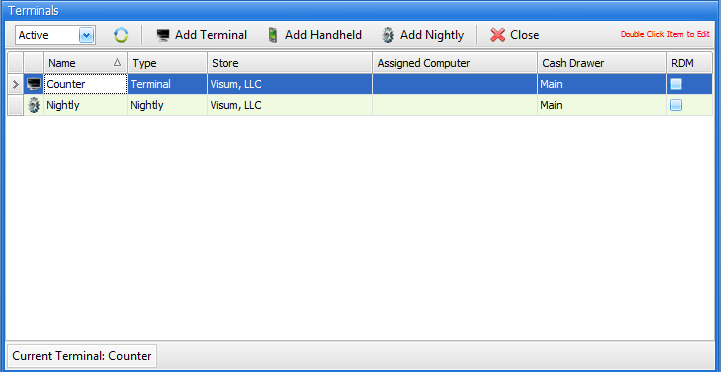
When entering this program, you will see a list of all existing terminals. On the bottom of this screen, you will see the terminal you are currently logged in to. While logged in to this terminal you may only change printer assignments for that terminal. This is due to Windows printer naming conventions.
Active/De-Active/All
In the upper left corner, you may choose to see "active", "de-activated" or "all" Terminal records.
Add Terminal
To add a new terminal, click on Add Terminal. In the end you will want to have a terminal record exist for each PC that has FocalPoint installed.
Add Handheld
To add a terminal record for a supported hand held device, click on Add Handheld.
Add Nightly
To add a terminal record for a for a nightly terminal used for nightly reporting and monthly biling, click on Add Nightly. For more information on this, see Multi Store Nightly Functions.
To edit a terminal record simply double click on any of the existing terminal records on the list screen.
Terminal Configuration screen tabs
There are 5 tabs/screens available to set up a terminal. Please click on the appropriate link to view desired information. If you are adding a new terminal, start with the General tab and work your way through all of the tabs.
When adding a new terminal, go to the PC that will represent the terminal you wish to add.
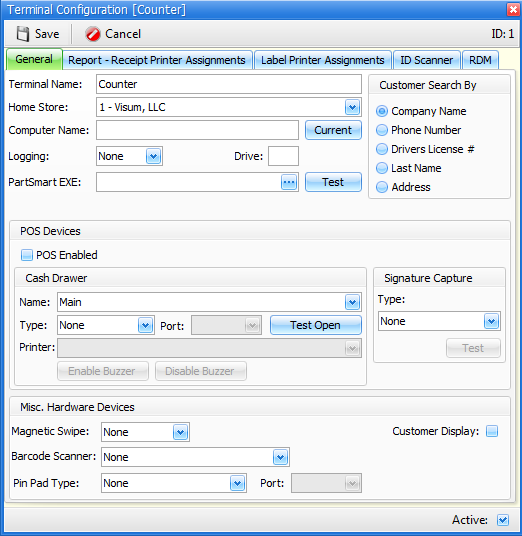
Terminal Name Enter a Terminal Name. Try to use one or two words to describe this terminal. Terminal names could describe the location of the PC (like "Counter Left, Office, etc) or primary user of the PC (Amy, Accountant, etc).
Home Store Use the drop-down to select the store where this terminal is located.
Computer Name Click on Current to assign the physical computer name to this terminal record.
Logging Set Logging to Standard
Drive Leave the Drive set to defaulted value
PartSmart EXEIf you are using the FocalPoint / Partsmart integration, this field will normally be set to C:\Program Files (x86)\ARI\PartSmart\PS8\Ari.PartSmart.UI.exe. See PartSmart documentation for further details.
Customer Search By In the Customer Search By area, decide (now or later) what field should the cursor default to when searching for customers. To word this another way, when you search for customers, what do you want to search by most often?
In the POS Devices section:
POS Enabled If you are using integrated credit card services with FocalPoint, enable the POS Enabled check box.
Cash Drawer Name Select the Cash Drawer Name that will be used with this terminal. When you take money at this terminal, which cash drawer will you be putting the money in to?
Cash Drawer Type If you purchased the cash drawer from Visum, we will help you install and network the cash drawer so that multiple terminals can control it. Most likely, the Type of cash drawer will be "Printer" and the Printer Name will be "CashDrw"
To confirm that you have it set up correctly, click on Test Open and make sure if opens. If it does not, and you purchased the cash drawer from Visum, please call Visum.
Signature Capture Type If you have a signature capture device attached to this PC, select the type you are using.
Magnetic Swipe If you are using a magnetic swipe reader (for swiping credit cards or driver's licenses) choose "Keyboard" for the Magnetic Swipe field.
Barcode Scanner If you are using a barcode scanner, check the Barcode Scanner check box
PIN Pad Port Select Verifone 1000SE if you are using Mercury integrated credit card processing for debit card transactions. Select "Paylink" if using Paylink integrated credit card processing. Visum will help you with the Port once the PIN Pad is set up, and if you purchase the PIN Pad from Visum, we will assist you with the installation. See Pin Pads for Debit Card Processing documentation for further details.
Active Make sure that the Active check box is checked in the lower right hand corner of the screen if you wish to use this terminal. |
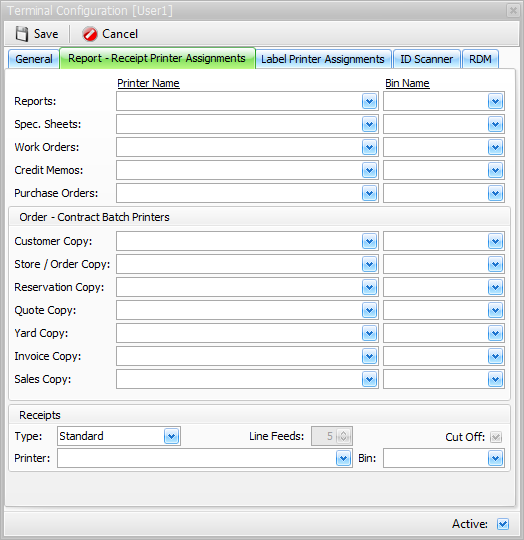
For all of the different document types ("Reports" - "Sales Copy") select the printer and bin name that represents the printer that you wish the document to print to, and the bin (or "tray") that the document should print from. By default, if a printer field is left blank, then FocalPoint will utilize your default Windows printer. For the document choices listed in this section, set printers as appropriate. Again, you may only modify printer choices for the terminal that you are logged in to, so if you see "greyed out" fields in the section, confirm that the terminal record that you are editing is the same as the terminal you are logged in to.
For the Receipt printer: There are 3 Types of Receipt Printers that FocalPoint works with and depending on how the Receipt type is set depends on how the receipt is printed •Standard – Use this setting when printing to a standard laser or ink jet type printer. This changes the receipt page layout to use standard paper size •Generic – Use this setting when printing to a different type of receipt printer other than the iTherm280. This keeps the page layout to be used with 3 1/8 width paper on a continues roll •iTherm280 – This does the same as Generic but also sends the line feed and paper cut per settings set instead of setting this in the properties. This also should not require any special settings in the printer driver properties to be set from a standard driver install. This also only works on the latest drivers provided by iTherm and not the special drivers we use to use in the past. |
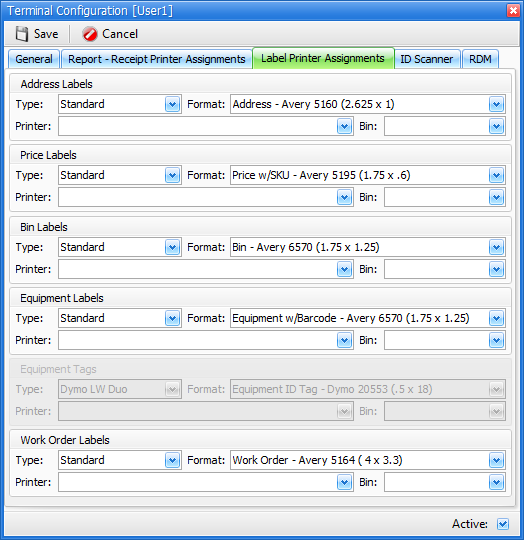
There are 6 different types of labels that you create in FocalPoint. For each of these labels, you may choose to print to either a standard printer using labels, or you may print to 3 different models of Dymo printers. |
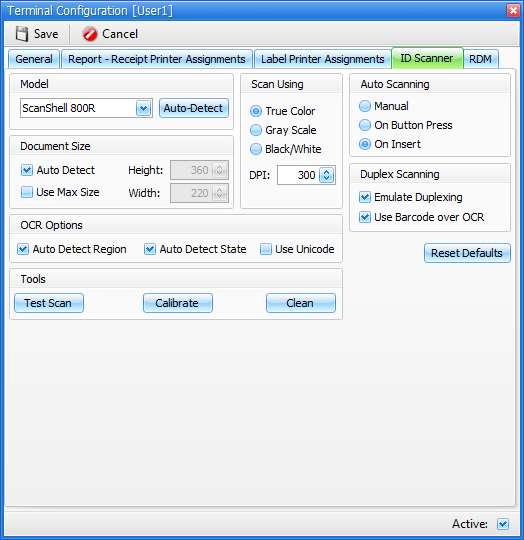
After you have plugged in your driver's license scanner, click on Auto-Detect. If the scanner is properly installed, the model will change to the correct model.
•The "Scan Using" section of the screen should be left as defaulted unless otherwise instructed. •The "Document Size" section of the screen should be left as defaulted unless otherwise instructed. •The "OCE Options" section of this screen should be left as defaulted unless otherwise instructed. •In the Auto Scanning section, set the radio button to "On Insert" unless otherwise directed. •If you are using a Drivers License scanner that can scan both sides of a driver's license at once, or if you wish to optionally scan each side of a driver's license, adjust the Duplex Scanning section of this screen as needed. •If this is the first time you are setting up this scanner, click on the Calibrate button and follow the screen prompts. A calibration sheet is included with each scanner, and you should have it ready before clicking this button. •To test scanning, click on the Test Scan button and follow the screen prompts to see if the scanner is scanning accurately. •To clean the scanner, click on the clean button and follow the prompts. A cleaning sheet and instructions are included with each scanner. |
If you are using Remote Desktop Protocol, this screen applies to you.
Remote Address If connecting to a work station instead of terminal server, then you may need to set a Manual address, otherwise leave this field set to Auto.
Leave all port set as defaulted unless otherwise instructed.
Leave the Remote Keep Alive section as default unless otherwise instructed.
Pop up signature on Capture When you capture a signature, you normally get a pop up window. when this is enabled you will get this on both the rdp session screen and another box in the lower right hand corner of your local desktop. |

