IN THIS CHAPTER
1.1 Battery ........................................................................ 9
1.2 Memory ..................................................................... 11
1.3 Keypad ...................................................................... 12
1.4 LCD ........................................................................... 16
1.5 Notifications ............................................................... 17
1.6 Data Capture .............................................................. 19
1.7 Charging & Communications ......................................... 21
1.8 SD Card ..................................................................... 28
1.1 BATTERY
1.1.1 MAIN BATTERY
The mobile computer is powered by a rechargeable 3.7 V/1200 mAh Li-ion battery pack.
When the mobile computer is turned on, it takes approx. 2.5 hours to charge it to full
from the power adaptor (using RS-232 cable or cradle) or approx. 4 hours from the USB
cable (at 500 mA).
For power-saving purpose, always turn off the backlight while working in a well-lit area.
When the backlight is on for extended periods of time, the main battery will become low
sooner than expected.
The smart battery icon on the LCD screen shows the status of power consumption. There
are two ways to monitor a low battery charge or discharged battery from the screen.
Examine the level of the 4-bar battery icon
Monitor voltage level (see 3.5 Power)
1.1.2 BACKUP BATTERY
The backup battery on the main board takes charge when the main battery is removed or
drained out. When fully charged, the 3.0 V/18 mAh rechargeable Lithium button cell
helps retain data in SRAM and maintain the running of the real-time clock and calendar
for at least 25 days without the main battery. In the meantime, you have to replace the
main battery as soon as possible. It takes at least 72 hours to fully charge the backup
battery. However, it is not necessary to fully charge the backup battery for the mobile
computer to work.
Monitor voltage level (see 3.5 Power)
1.1.3 CAUTION OF LOW BATTERY CHARGE
The battery pack is the only power source for the mobile computer to work. It also
charges the backup battery on the main board so that the data stored in SRAM can be
retained properly. Therefore, when the main battery charge goes low, you need to
replace the battery pack with a charged one or charge it as soon as possible. Most of all,
you should upload important data on a regular basis.
Warning: Data loss may occur with SRAM during low battery condition. Always save
data before running out of power or keep a fresh battery for replacement.
1.2 MEMORY
The collected data can be sent back to a host computer immediately over wireless
networks, or stored in memory (SRAM) and upload later. The mobile computer is
equipped with a calendar chip for accurate time/date logging. When the main battery is
removed or drained, the backup battery on the main board is to retain the contents of
SRAM and maintain the running of real-time clock and calendar for at least 25 days, on
condition that the backup battery has already been fully charged.
If you want to put away the mobile computer for a couple of days, you should be aware
that data loss occurs when both the main and backup batteries discharge completely.
Therefore, it is necessary to upload data and files before putting away the mobile
computer!
1.2.1 READ-ONLY MEMORY (ROM)
8 megabytes flash memory for storing core, OS, application programs, font, etc.
1.2.2 RANDOM-ACCESS MEMORY (RAM)
Options include 4 or 8 megabytes SRAM for storing data. Its contents will be retained by
the backup battery.
1.2.3 SD CARD
Secure Digital (SD) card is a flash memory data storage device. High capacity memory
card (microSDHC) is supported. Refer to Inserting Battery & Memory Card for how to
insert the microSD or microSDHC card. For more details, refer to 1.8 SD Card.
Note: (1) When SD card is present, the card icon will appear on the screen and flash
while being accessed.
(2) For an SD card that has never been used on 8200, a message like “Found New
SD Card” will be displayed allowing users to scan the card for memory check. If
the action is canceled then, memory check can still be performed via System
Menu — 3.8 SD Card Menu.
1.3 KEYPAD
The mobile computer is equipped with a keypad of 24 keys for system setup, user entry
and so on. The keypad comes with programmable LED backlight, like the screen. Refer to
1.4 LCD for screen & backlight settings.
Silicon rubber has been chosen for their durability and prompt feedback. The key click
can be configured through programming or via System Menu. Refer to 3.2.6 Key Click.
1.3.1 24-KEY LAYOUT
The layout of the 24-key keypad is similar to that of a telephone, which includes
alphanumeric, navigation and function keys, as well as assorted characters. Refer to
Appendix III — Key Reference Table for color-coded keys
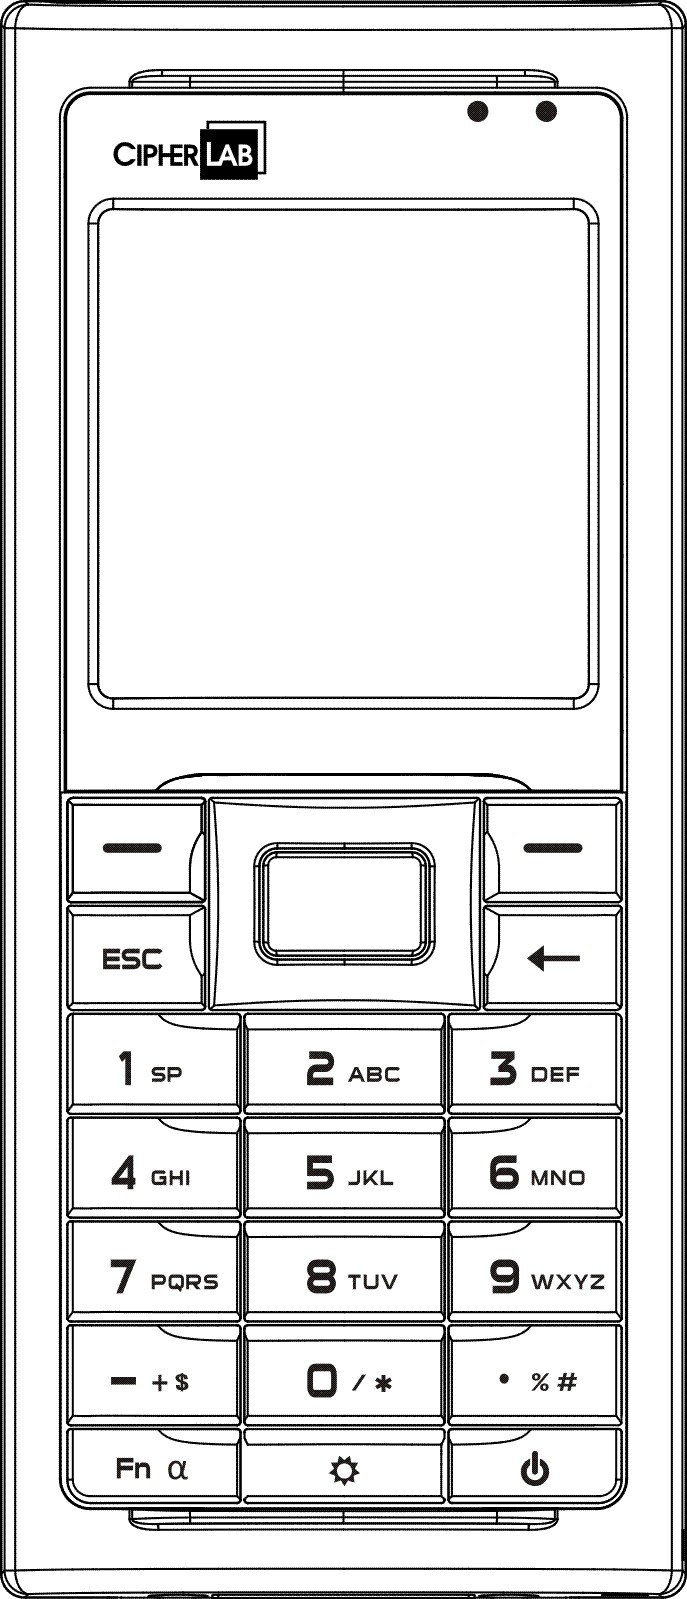
This alphanumeric keypad is set to numeric mode by default. The [Fn α] key serves as a
toggle among numeric, alpha (lower-case alphabetic), and ALPHA (upper-case alphabetic)
input modes, as well as function mode.
Note: It is not necessary to hold down the [Fn α] key.
The associated icon will appear on the lower-left corner of the screen in a sequence as
shown below.
Status Icon |
Function/Alpha Key |
Input Mode |
(none) |
N/A |
Numbers |
A |
Press [Fn α] one time |
Upper-case alphabetic |
a |
Press [Fn α] two times |
Lower-case alphabetic |
F |
Press [Fn α] three times |
Function Mode |
When in alpha mode, it takes turns to show alphabets and number when you keep
pressing the same key; each press must not exceed one second. For example, keep
pressing the number key [2], it will take turns to show “A”, “B”, “C” or “2” for upper-case,
and “a”, “b”, “c” or “2” for lower-case.
When you first press the number key [2], it will produce the letter “A” or “a”.
When you press the number key [2] twice (the time interval must not exceed one
second), it will produce the letter “B” or “b”.
When you press the number key [2] three times (the time interval between each
press must not exceed one second), it will produce the letter “C” or “c”.
When you press the number key [2] four times (the time interval between each press
must not exceed one second), it will produce the number “2”.
In order to get the desired character, you will need to press the same key, one to four
times (the time interval between each press must not exceed one second). Only when
you stop pressing the same key for longer than one second or you press another key, will
the system send the real key code to the application program.
When in function mode, the [Fn α] key works with a number key. Press the [Fn α] key
three times, and its associated icon F will be displayed on the screen. Press the second
key, say [5], to complete the key combination and access the function [F5]. Press [Fn α]
again and the icon F will go off.
Below briefly describes the functions of common keys on the mobile computer.
SCAN
The yellow key is used to work as the ENTER key by default.
When the reader function is enabled, this yellow key is set to trigger the scan engine so that it
can read a barcode.
ENTER
The two keys on each upper side of the SCAN key are user-friendly and convenient for either
right-handed or left-handed operator. Normally, it is used for command execution or input
confirmation.
ESC (Escape)
This key is on the left lower side of the SCAN key. Normally, it is used to stop and exit the current
operation.
Navigation Pad
The 4-way navigation pad around the SCAN key is used to move the cursor left, up, down, or
right.
While pressing [ ], they can be used to adjust the luminosity and contrast of the screen
backlight.
Backspace
This key is Backspace by default. If this key is being held down for more than one second, a
clear code will be sent.
Function/Alpha Key
This key is a modifier key that requires pressing a second key to get the yellow-coded letter (A~Z)
or symbol printed above the second key, or the function (F0~F9) of the second key.
Icon |
Description |
A |
This icon appears when you press the [Fn α] key one time, indicating it is set to alphabetic mode for typing upper-case alphabetic letters. |
a |
This icon appears when you press the [Fn α] key two times, indicating it is set to alphabetic mode for typing lower-case alphabetic letters. |
F |
This icon appears when you press the [Fn α] key three times, indicating it is set to the function mode. Then, press another key ([0] ~ [9]) to get the desired function. To get the value of another key combination modified by the function key, keep pressing another key ([0] ~ [9]) to produce the result. To exit the function mode, press [Fn α] again and the icon will go off. |
Backlight Configuration Key
This key is used to turn ON/OFF the backlight of the LCD and keypad. Also, while pressing [ ],
the navigation keys can be used to adjust the luminosity and contrast of the screen backlight
Key |
Description |
[ ] + [Right] |
Press these keys at the same time to increase the contrast. |
[ ] + [Left] |
Press these keys at the same time to decrease the contrast. |
[ ] + [Up] |
Press these keys at the same time to increase the luminosity. |
[ ] + [Down] |
Press these keys at the same time to decrease the luminosity. |
Power Key
In order to prevent an accidental press of the POWER key, you need to hold down this key for
approximately 1.5 seconds to turn ON/OFF the mobile computer.
Note: (1) Functionality of keys is application-dependent. The system will send the
associated key code to the application program, and it is up to the application
program to interpret the key code.
(2) When a status icon appears on the screen, it indicates a certain mode is
activated and it is not necessary to hold down the modifier key.