2-3 from the Main Menu
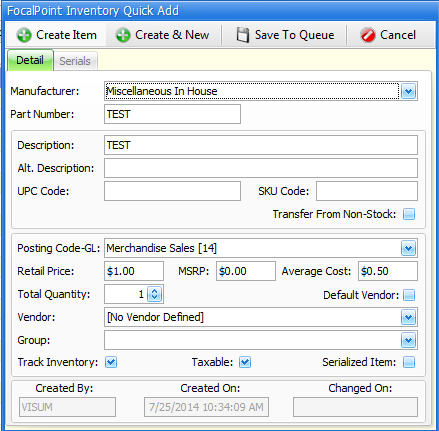
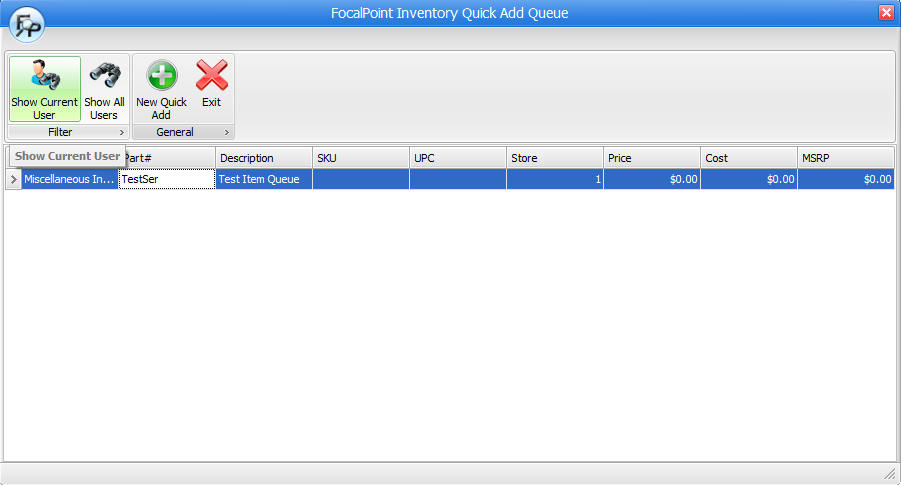
Using the quick add function will allow you to quickly add merchandise by presenting you with only the most common fields needed to add a merchandise item. once you have filled in the appropriate fields on this screen, you may either save the item or save it to a quick add queue, which is like a holding area for new merchandise additions that can be reviewed for consistency and accuracy before actually adding the merchandise items to the merchandise file. the quick add screen and quick add queue screen are shown below. You may hover your mouse over any area on either of these screens to view specific field information.
Create Item
Click on this button to immediately save the merchandise item.
Create & New
Click here to immediately say if the new item and begin the creation process again.
Save to Queue
Click here to save the item to the Quick Add Queue, where the addition can be reviewed for accuracy and consistency before actually adding the item to the merchandise file
There are two TABS in this function. The "Serials" tab is only available if you have flagged this item as a "Serialized Item" using the check box in the lower right-hand area of the Detail screen.
Details

Manufacturer
Each merchandise item should have a manufacturer and part number. The appropriate manufacturer for this item. If you need to add a new manufacture, go to the Manufacturer File, 2-8 from the main menu.
Part Number
Each merchandise item should have a manufacturer and part number. Enter the part number for this item in this field.
Description / Alt Description
There are two description fields for a merchandise item. The first "Description" field can be used for searching and will also be the field that is displayed on transaction documents. The "Alt. Description" field is used for searching purposes only.
UPC Code
Enter a UPC code for the merchandise item by scanning a barcode on the merchandise item using a barcode scanner or by typing in the UPC code manually. Please note that all UPC codes must follow the Universal Product Code Standard as explained here:
http://en.wikipedia.org/wiki/Universal_Product_Code
If your Vender does not adhere to this standard or does not provide one, you can generate your own internal UPC within FocalPoint to be used and it will not conflict with an actual product UPC that has been registered with The Global Language of Business. These standards are in place to confirm proper barcode printing within the size restrictions of Price and Bin labels along with increase the reliability of reading UPC codes and preventing duplicate UPC codes being used by multiple vendors.
SKU Code
A SKU is another high identifying code that is used in many high - retail or hardware store environments. This field may be used at your discretion.
Transfer from Non-Stock
This field is used when transferring nonstock items to your merchandise file. It is not accessible by end-users.
Post Code-GL
Select the posting code that will be used for tracking revenue, inventory, and the cost of goods sold information.
Retail Price
Enter the retail (selling) price of the item in this field.
MSRP
You may use this field to optionally track the suggested retail price from the manufacture for this item.
Average Cost
Enter the appropriate average cost for this item in this field.
Total Quantity
You may enter a quantity on hand in this field if desired.
Default Vendor
If you check the default vendor check box, the vendor you select in the next field will be used for the "Preferred Vendor" in a merchandise record. If you leave this check box unchecked, the vendor you select in the next field will be used for the "Vendor 1" in a merchandise record.
Vendor
Select a vendor for this merchandise item. Vendors can be added to FocalPoint via #7 from the main menu.
Group
Select a group for this merchandise item. Groups can be added in the Group File, 2-6 from the main menu.
Track inventory
Normally this field will be enabled, but for inventory that you do not track inventory on (LP Gas, Safety Sheets, Labor, etc), uncheck the box associated with this option. When you sell this item, the inventory will not be relieved. This field is normally an alternative to setting your quantity level to 99999 so that you don't get overbooked messages.
Taxable
If this merchandise item is normally taxable, enable this flag. If the customer you are selling this item to is tax exempt, no tax will be calculated.
Quick Add Queue
Use the Quick Add Queue as a holding area for new quick add merchandise items to be reviewed for consistency and accuracy before adding the merchandise to the merchandise file.

Show Current User
Serialized merchandise records are "whole goods" that are for sale only (like chain saws, for example). If you track serialized items that are normally only SOLD from your merchandise file, enable this field. You will be prompted to add your serial numbers in the "Serials" tab of the screen. Your quantity on hand for this merchandise item will adjust as you add serial numbers.
Show All Users
This button will show all items in the queue from all users.
New Quick Add
Use this button to create a new merchandise item via "Quick Add".
Quick Add List Screen
This list screen will show all of the merchandise items currently in the Quick Add Queue. Double-click on any of these items to modify the item. After you double-click on an item, you can save your work for later, click on a "Create Item" button to move the item from the queue to the merchandise file, cancel your changes, or delete the item from the queue.