Store Manager File
C-4 from the main menu
Objectives:
Review every tab in this file
Change settings as needed.
Keep a list of questions for your trainer.
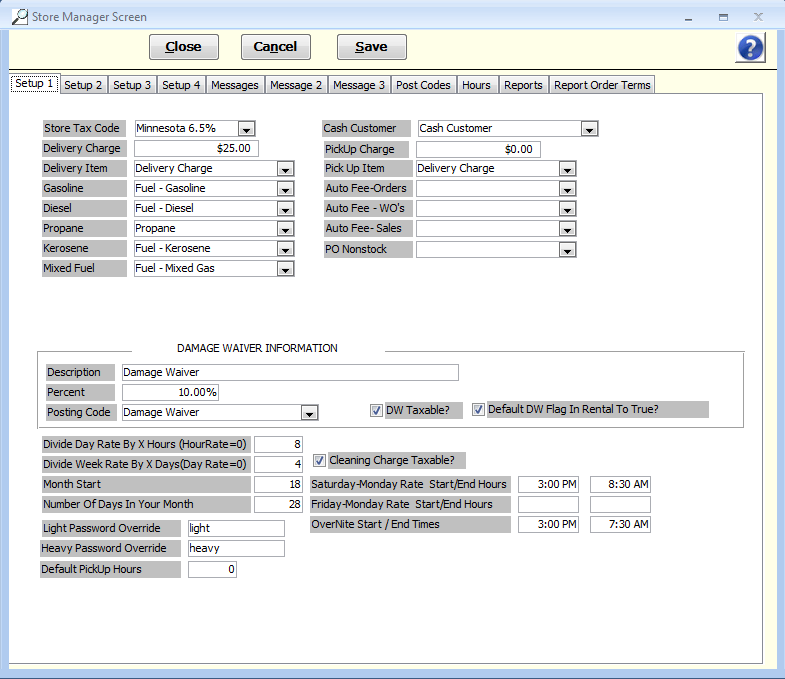
Store operation defaults are defined in this area. In most cases, the information here is the default if nothing else overrides it. Tax rates, fuel setups, delivery charges, posting codes, contract messages, store hours, holidays, and many other items use this data if not specifically overridden elsewhere within the system.
Please review all of the tab's in this file. Field definitions for all of the fields in each tab are listed below. Any fields that are that start with an asterisk (*) should be considered mandatory for initial setup. All other fields are optional. If you do not understand how to fill in a certain field or the intention of the field, please make note of this. You can review the store manager file with your trainer after this setup is complete.
*Store Tax Code The primary tax code you created from the AR setup section (prior to these setups) should be selected here. This is the tax rate structure the system will use if nothing is overriding it. A contract with a delivery or use in another ZIP code that has a different tax rate created, is an example of when this default rate will be overridden. Otherwise, all taxes will be based on this setting.
*Cash Customer FocalPoint provides a "Cash Customer" record in the customer file. You should change the street address, city, state, ZIP code, and phone number of this record to that of your own store, to help identify that record. You can do this in the Customer Master File.
*Delivery Charge This is a flat amount the system will assign if you select the "Delivery" check-box in the Order Header section when creating a new order. If choose not to use this default, you can override that amount directly in the Order Header itself, OR, you can "sell" this Merchandise item used for delivery, directly into the order, adjusting its price accordingly. Also, "Ship To" address records, created for a customer, can contain a Delivery Charge amount that will be used (and if not $0.00, will override any other Delivery charge) within the order, if that "Ship To" address is selected for that customer's order.
*Delivery Item This is the main Mfg and Part number you wish to use for Delivery Charge above, that is created as a Merchandise Item in the Merchandise file. FocalPoint provides this in your startup data.
*Pickup Item This is the main Mfg and Part number you wish to use for the Pickup Charge, that is created as a Merchandise Item in the Merchandise file. FocalPoint provides this in your startup data.
*Gasoline, Diesel, Propane, Kerosene, and Mixed Fuel Select from the pre-entered fuel types that FocalPoint provides. You can edit these Merchandise Items through the Merchandise file, as well as create your own to use in this area. These are the Merchandise part numbers that are used to assign costs and revenues to an order if a rental item is configured to require one of these fuel types.
What if we don't sell fuel? Especially if you are a special events store, you probably don't sell a lot of diesel fuel. Leave these fields filled in anyway, please.
Auto Fee-Orders, WO's and Sales With any of these fields, you may select a merchandise item that will automatically be added to orders, work orders and sales only transactions (not including "Quick Sales")
Damage Waiver Description Whatever you enter here is the wording that shows on the rental contract when printed. This allows you the option to choose how you want to say "Damage Waiver" to your customers.
Percent Any amount entered here is the default percentage used to calculate any Damage Waiver amounts. You can enter ".01" or "10%", for example, to indicate the percentage to use of ten percent. "0" (zero) must be entered here if no damage waiver is to be charged throughout the system. Any value greater than zero can be overridden by an individual rental item if that item is set up to charge a flat damage waiver amount.
What if we don't charge a damage waiver on everything? There are flags in the rental file and customer file that make rental items and customers eligible for a damage waiver.
Posting Code Select the posting code that will collect all damage waiver revenues for grouping. If you wish to lump all damage waiver revenues into Rental revenues, then you would select your "Rental Revenue" posting code here, for example. Otherwise, choose the posting code that will keep these revenues separate from other sources of income.
DW Taxable? Allows you to control whether or not damage waiver is taxable for this store.
Divide Day Rate By X Hours (HourRate=0) If you have a rental rate table for a rental item that does not provide an hourly rate for this item ($0), but you DO have a daily rate defined, the system needs to know how many hours to divide the day rate by, in order to come up with an hourly, or partial day rate. If you would consider a 6 hour rental the same as a full day, then you would enter 6 here. That way, if there was no hourly charge, and the rental was out for 1 day, 4 hours, the system would charge the daily rate (first day), plus it would divide the daily rate by 6, and multiply that answer by the number of hours over the day (4 hours in this case.) This ONLY comes into play if the rental rate table for any rental item DOES NOT contain a specific hourly rate.
Divide Week Rate By X Days(Day Rate=0) This ONLY applies if the rental rate table for a rental item's DAILY rate is zero. If a Daily Rate exists, its value will be used to calculate any days less than one week. For example, if the rental item's rate table does not contain a Daily Rate and the rental period is for one week and 3 days, by what number should the Weekly Rate be divided, in order to calculate the rate for those 3 remaining days? A formula would look like this: (Weekly Rate / X) * Days Rented = This Rental Charge.
Remember, this ONLY applies if there is no actual daily rate defined.
NOTE: If a rental item's rate table has BOTH hourly and daily rates set to zero, the system will not try to divide anything. It will go strictly by the weekly/monthly rates only. A typical example for this is scaffolding that has a weekly rate only. It may never go out for hours or days less than a week. If Hourly AND Daily rates are zero, the system will calculate rentals based on full weeks or months only. The system will not break it down by day or hour. For example, if the monthly rate is less than three weeks multiplied by the weekly rate, the system will use the monthly rate instead of 3 weeks multiplied by the weekly rate.
Another Note: Many Visum customers do not want FocalPoint to calculate rates for them. You went through the effort to set up rate tables the way you wanted them, and they're good as is. If you're one of these customers, then simply put a "1" in both of the fields listed above.
Month Start This is the number of days considered for billing purposes, when a "month" is reached. During our automatic billing procedure, any contract that is open for this number of days is closed, invoiced, and re-opened for a new month's billing cycle. This allows the automatic billing to get a "head start" in the billing process just before the actual month's end. Entering "20" here would mean that the billing process would start 10 days or so prior to the real end of month.
Number of Days in Your Month This is the number of days that define the length of a "month" of a rental period. For example, if after 28 days, a rental is no longer considered 3 weeks of rental, but one month, you would enter "28" here.
Cleaning Charge Taxable Allows you to control whether or not defaulted cleaning charges are taxable for this store.
Saturday-Monday Rate Start/End Hours Enter the afternoon cut-off hour for Saturday, followed by the "opening" hour for Monday. If you enter hours here, anything rented after this hour on Saturday, will not be considered due back until the Monday morning hour entered here, or later (if the rental length is a 1 day or over) These values are used to determine "Due Back by" times to print on rental contracts, and are used to determine if the rental rates for "Sat-Mon" pricing qualify for this rental. If the rental duration does not fall into this "boundary", then regular hourly/daily rates will apply.
OverNite Start / End Times This time structure is used when you start a rental using the "ON" OverNight Rental duration code. Typically, you can "quick start" a rental with a code of 2H (for 2 hours), "1D" (for 1 day), etc. Using "ON" to start a rental will cause the system to set the rental start/end times to those found here for an "Over Night" rental period. The times here will be used to calculate rates (and rates found in the OverNite rate section in the Rate Tables) instead of standard times and rate calculation.
Friday-Monday Rate Start/End Hours Enter the afternoon cut-off hour for Friday, followed by the "opening" hour for Monday. If you enter hours here, anything rented after this hour on Friday will not be considered due back until the Monday morning hour entered here, or later (if the rental length is a 1 day or over) These values are used to determine "Due Back by" times to print on rental contracts, and are used to determine if the rental rates for "Friday-Monday" pricing qualify for this rental. If the rental duration does not fall into this "boundary", then regular hourly/daily rates will apply.
Light and Heavy Password Override The FocalPoint system uses four levels of "customer hold" status: Good, Bad, Light, and Heavy. The Light and Heavy settings on a customer's record require password authorization at the time of a rental (to this customer) to allow the transaction to continue. The passwords entered here must be entered during the transaction based on the customer's light or heavy status. The FocalPoint defaults are "light" and "heavy".
Default Pickup Hours On the "header page of an order, you can set a range for your estimated pickup date and time. The number of hours you put in the field will define the range. You can change the range on the order as needed. |
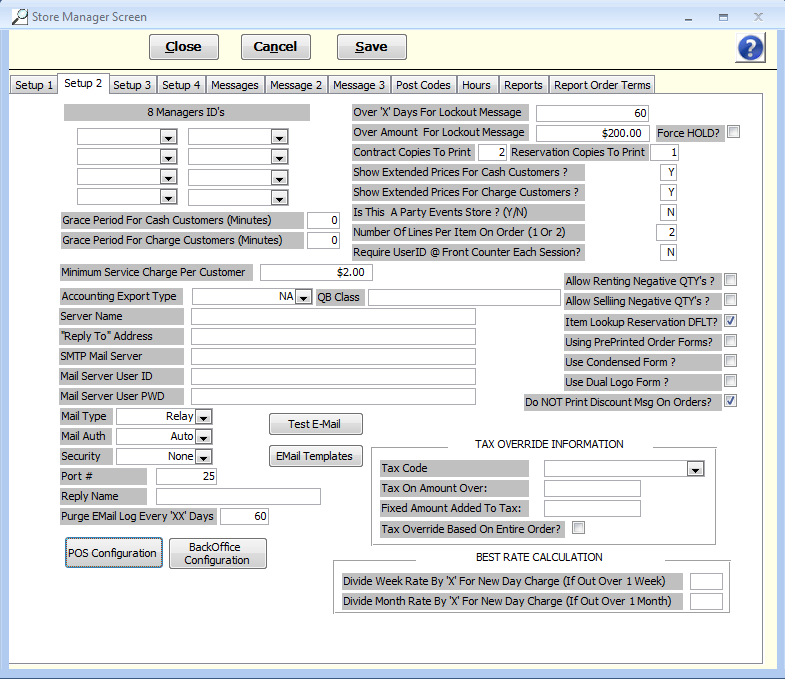
8 Managers ID's These fields maintain some control over who can make changes to a customer record or a rental item record, and also controls who can change what in a multi-store environment. Of the users you set up, enter the user ID's that represent people who should be given flexibility to make changes in the customer and rental item areas.
Grace Period For Cash Customers (Minutes) Enter the number of minutes allowed for a grace period for cash customers. This is an internal grace period. It essentially allows for in-house activity required to get the returned equipment checked-in. For example, if the customer was waiting in line at 9:00 am, his/her due time, but it took 20 minutes before you could enter their transaction as "returned", a 30 minute grace period would cause the system to not charge any extra charges beyond the 9:00 am due time, and the employee would not have to be concerned with entering the exact time they were here.
Grace Period For Charge Customers (Minutes) This is the same as the Grace Period for Cash Customers, but for Charge Customers. This allows you more flexibility between your "good" and "better" customers regarding grace periods.
How do Grace Periods work? If you put in a 30 minute grace period in one of the two grace period fields, FocalPoint will subtract 30 minutes from every order for rate calculation purposes. Often times it's easier to control grace periods when closing an order. If a customer is 5 minutes late, you can certainly adjust for this when closing an order. If you would like to control this at the "order level" instead of controlling it in the store manager file, ZERO out these grace period fields.
Minimum Service Charge Per Customer The dollar amount entered here will be used in place of any finance charge that is calculated for any cash or charge customer with an AR balance, if the calculated finance charge is less than this amount.
Accounting Export Type This field is used to determine the various export routines FocalPoint will use to format FocalPoint's data to be used by other accounting software packages.
Server Name Enter the name of the computer that hosts the FocalPoint data (MSDE or SQL Server data). This name is the one you see when this computer is listed in Network Neighborhood, and other network related listings. It may be "SERVER" or "OFFICE", for example. (Enter your server's name without the quotation marks: SERVERNAME ) Leave this field blank if you have only one workstation/server being used, and you have no other networked stations. A single-user system without a network should leave this field empty.
"Reply To" Address If you have e-mail access, and will be e-mailing statements to your customers, enter the "Reply To" e-mail address here. The system will use this address as the email address your customers can reply to when reading the e-mail that FocalPoint will send to them. It must be a properly formatted address, such as: info@visum-corp.com
SMTP Mail Server This is the e-mail server name through which all out-going e-mail must pass. Typically, you can find this setting in your Microsoft Outlook e-mail program, in which you send/receive e-mail. Sometimes the send/receive e-mail servers have the same name (mail.myemail.com) or they may be separate (smtp.mymail.net and pop3.mymail.net). Be sure to enter the one for SENDING e-mail, or the SMTP mail server name. FocalPoint needs this to be able to send e-mail statements.
Mail Server User ID If your SMTP mail server provider requires a valid user ID and password for you to SEND e-mail as well as receive e-mail, then provide that user ID here.
Mail Server User PWD If your SMTP mail server provider requires a valid user ID and password for you to SEND e-mail as well as receive e-mail, then provide that password here.
Mail Type Leave as defaulted unless otherwise directed by your email service provider or Visum Relay: Sends message through a smarthost (The way you used to doing it) Direct: Looks up the email server of the recipient and sends it direct to their server
Mail Auth Sets the Authentication used when logging into the SMTP Server. Leave as defaulted unless otherwise directed by your email service provider or Visum
Security Leave as defaulted unless otherwise directed by your email service provider or Visum Sets the security communication used between FocalPoint and the SMTP Server
Port # Leave as defaulted unless otherwise directed by your email service provider or Visum Port number the relay server uses to receive SMTP traffic e.g. 25
Reply Name When this is set the receiver sees the senders email as ‘ReplyName’ <ReplyAddress> instead of just the email address
Test Email (button) Use this to verify that the entries regarding "Reply To" address, and SMTP mail server settings are correct. If they are, and you have internet e-mail access and are connected to the internet, a test e-mail will be sent to your own "Reply To" address. If your email provider requires the Mail Server User ID and Password, these will be tested as well if you entered them. If you do not receive the test e-mail within a few minutes or you receive a rather large error message on your screen, then some or all of your settings are incorrect, or you are not connected to the internet when you hit the "test" button. Contact Visum when the test is unsuccessful.
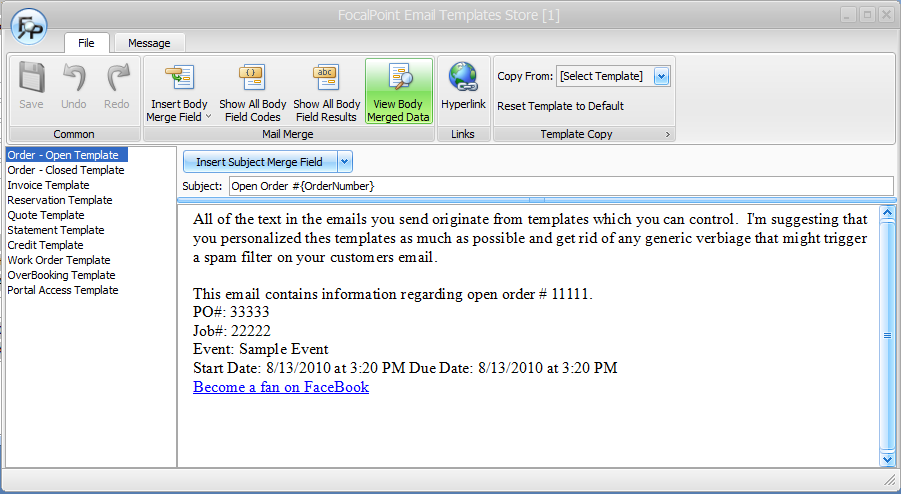
Email Templates (button) Along with adding the ability to edit the email before it is sent, you also have the ability to have templates so customer can change the default text on emails. Click on Email Templates and change the default verbiage for any type of email listed on the template screen.
Purge Email Log Every 'XX' Days Use this field to purge the email log every so often.
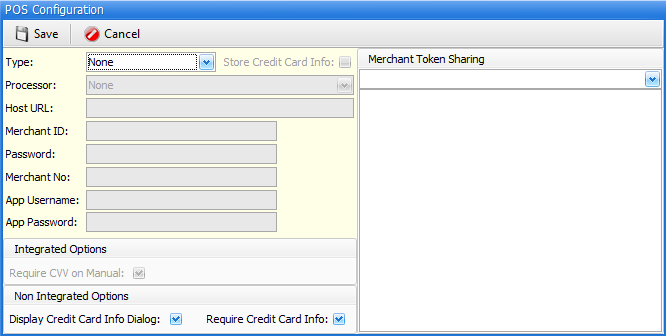
POS Configuration
If you process credit cards through FocalPoint (or intend to), this configuration screen will need to be filled with information that is provided by your credit card processor. Visum usually assists with this set up step.
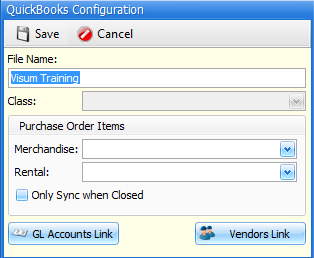
Back Office Configuration
If you export Purchase Orders from FocalPoint to QuickBooks, this screen is used to "link" a QuickBooks company to a Focalpoint company. Visum usually assists with this set up step.
Over 'X' Days For Lockout Message and Over Amount for Lockout Message Any customer, charge or cash, that has an AR balance older than the number of days you enter here, AND has an AR balance greater that the amount you enter here, will cause a system pop-up message to be displayed, as a reminder, when a transaction is started for this customer.
Force Hold If the customer is not already on hold, and this checkbox is checked, during FocalPoint’s overnight process, any customer who has a balance over the amount specified in the field to the left and the over X days field to the left of this check box is greater than 0, the customer will automatically be put on “Heavy Hold”
Contract Copies to Print When using the "legacy contract form", when printing each rental contract, the number entered here will determine how many copies of each contract will print.
Reservation Copies to Print When using the "legacy contract form", when printing each rental reservation, the number entered here will determine how many copies of each contract will print.
Show Extended Prices For Cash Customers ? "Y" or "N" can be entered here. Extended prices are a calculation of the rental amount multiplied by the hour/day/week/month charges. It can be printed on the contract or not, based on your entry here.
Show Extended Prices For Charge Customers ? "Y" or "N" can be entered here. Extended prices are a calculation of the rental amount multiplied by the hour/day/week/month charges. It can be printed on the contract or not, based on your entry here.
Is This A Party Events Store ? (Y/N) If your rental store is entirely focused on special event rentals (party rentals), check this box, otherwise leave it unchecked.
Number Of Lines Per Item On Order (1 Or 2) This field is no longer used and may be ignored.
Require UserID @ Front Counter Each Session? Set this to "Y" or "N". "Y" will force each user to enter their ID/Password at the start of each transaction. This is useful when you are using "Generic" logins to start up the workstation, but you may have several employees who share the same workstation. Entering an ID for each transaction will ensure the audit trail remains useful by tying the ID to each transaction. Setting this to "N" will tie the original login ID on this workstation to each transaction following the initial log in. When set to "Y", any user trying to enter a Generic Login to start a transaction will be denied. Generic Logins cannot be used for transaction processing when this field is set to "Y".
Note: There is another flag further down here that you can trigger to prompt for simply a User ID at the END of a transaction (right before you Exit and/or Print). If you find that entering a user ID and password every time you want to start a contract to be cumbersome, consider leaving this field un-checked and catch the other flag further down in this setup section.
Allow Renting Negative QTY's ? Checking this box will allow you to rent something that which may presently show a negative quantity, or not yet returned. Sometimes your returns may not be processed yet, or cleaned, but you need to rent it. The system may show it as not available or negative. You can rent it anyway if this field is checked.
Allow Selling Negative QTY's ? This is the same as renting negative quantities, only it pertains to selling.
Item Lookup Reservation DFLT This check-box is normally checked. If the check-box for this field is checked, when searching for items in Item Lookup Order Creation, the order "TYPE" will automatically change from "Order" to "Reservation". Also If the check-box for this field is checked, an item will be considered available when it is DUE back. Otherwise an item will only be considered available when it IS back.
Using PrePrinted Order Forms? If you are using the "legacy" order form, check this box if you use\ (FocalPoint approved) pre-printed contract forms. Checking this box will cause certain column headings, labels, and gray shading to not be printed on forms that already contain this information.
Use Condensed Form ? If you are using the "legacy" order form, when this flag is checked, the contract or reservation will print less detail lines on each page of the contract, but allow more room for the terms message.
Use Dual Logo Form This field is no longer used and may be ignored.
Do Not Print Discount Message on Orders Check this box if you wish to NOT print any discount messages on orders.
Tax Code (Override Tax Information) If you are subject to override taxes, where sales for over X amount are taxed differently, specify the tax code that would be used for such transactions. (hint: If you're not in Tennessee, odds are this field means nothing to you).
Tax on Amount Over (Override Tax Information) If you are subject to override taxes, where sales for over X amount are taxed differently, specify the amount of the sale that would "trigger" this special tax consideration. (hint: If you're not in Tennessee, odds are this field means nothing to you).
Fixed Amount Added to Tax (Override Tax Information) If you are subject to override taxes, where sales for over X amount are taxed differently, specify the amount of the sale that would "trigger" this special tax consideration. (hint: If you're not in Tennessee, odds are this field means nothing to you).
Best Rate Calculations - Divide Week Rate By 'X' For New Day Charge (If Out Over 1 Week) If an item is out for over one week, and you would rather charge your customer a modified day charge based on a division of the week charge instead of charging the customer a full day charge for each day out over a week, enter the number to divide into the weekly rate to calculate the new daily rate.
Best Rate Calculations - Divide Month Rate By 'X' For New Day Charge (If Out Over 1 Month) If an item is out for over one month, and you would rather charge your customer a modified day charge based on a division of the month charge instead of charging the customer a full day charge for each day out over a month, enter the number to divide into the monthly rate to calculate the new daily rate.
|
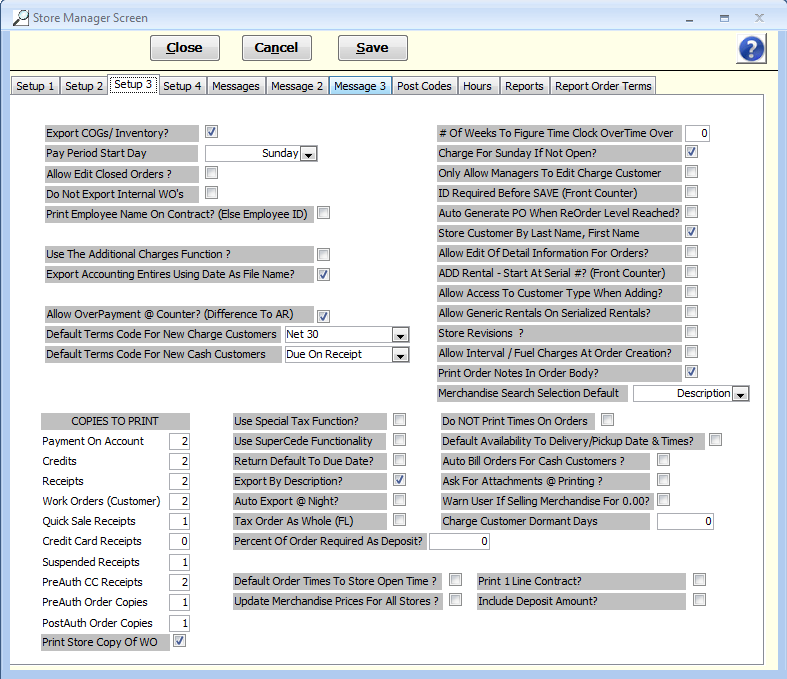
Export COGs/ Inventory? With this field enabled, inventory and COGS accounts will be exported to external accounting packages along with revenue information.
Pay Period Start Day Used in conjunction with Time Clock functionality. Choose the beginning day of your pay period from the drop down list.
Allow Edit Closed Orders ? There are much better ways to change orders after they are closed. Leave this flag unchecked.
Do not export internal work orders Enabling this flag will for financial exporting to NOT export COGS/Inventory entries on internal work orders.
Print Employee Name on Contract (Else Employee ID) Check this box if you want the employee name from the user file to print on documents. Uncheck this box if only the ID should print.
Use the Additional Charges Function? If you are using additional charges functionality, enable this checkbox.
Export Accounting Entries Using Date as File Name? When you export your financial data, a file will be created. With this box unchecked, the file name will always be "fpexport", and every time you export, this file will be over-written. Enabling this check box will "date-stamp" the export file so that it will not be overwritten every time you export.
Allow Overpayment @ Counter? (Difference to A/R) When you are closing a contract, and if you have been paid more than the amount due on the contract, you may opt to send the remaining customer "credit" to the customers account by checking this box. If you un-check this box you will not be able to take overpayments.
Default Terms Code for New Charge Customers Choose from the drop down list which terms code should be assigned to new charge customers when they are being set up.
Default Terms Code for New Cash Customers Choose from the drop down list which terms code should be assigned to new cash customers when they are being set up.
Copies To Print Enter the number of copies to print for the various documents listed.
# of Weeks to Figure Time Clock Overtime Over If you pay overtime based on a 40 hour week, enter a "1" in this field. If overtime is based on an 80 hour, 2-week period, enter a 2 in this field.
Charge for Sunday if not Open Normally, Friday-Monday rates and Saturday-Monday rates allow you the best control over how you charge for Sunday if you are not open. However, if you do not use these special rate structures, and you do not want to charge for Sundays, then disable this check box.
Only Allow Managers to Edit Charge Customer If this field is enabled, only users with ID's in one of the 8 manager ID fields in the setup 2 tab of this Store Manager file will be able to edit charge customers in the customer file.
ID Required before Save (Front Counter) This field was explained briefly as an alternative to the "Require UserID @ Front Counter Each Session?" field in the setup 2 tab. If enabled, you will be prompted for ONLY your user ID when exiting a quote, reservation, or contract.
Auto Generate PO When Order Level Reached? When selling Merchandise, if you go below the order level for that item, FocalPoint will create a PO for the item automatically.
A brief note about Auto PO's - If the auto PO function is enabled in the store manager file, when you're selling an item, FocalPoint acts like this: •If the merchandise item you are selling is already on an open PO, the Auto PO functionality is skipped •If there is a vendor in the Vendor 1 field, this vendor will be used to create the auto PO •If the Vendor 1 field is blank, the Preferred Vendor is used to create the auto PO •If both of these vendor fields are blank, the Auto PO functionality is skipped. •If the Maximum Quantity OR the Minimum Quantity is set to 0, the Auto PO functionality is skipped. •If you made it this far, then when selling an item, FocalPoint compares the current quantity on hand (adjusted for the current sale) against the Minimum Quantity. If the quantity on hand is less than the Minimum Quantity, then a PO is created for the appropriate vendor, and the Maximum Quantity is added to the PO.
Store Customer by Last Name, First Name In the customer file, a customer's first name is stored in one field, last name in another. The "full name" of a customer is also stored in the "company name" field in the customer file. Decide if the Fred Jones should be store in the company name as "Fred Jones" or "Jones, Fred".
Allow Edit of Detail Information for Orders This box should be checked during installation. If this box is not checked, please check it.
Add Rental-Start at Serial # (Front Counter) For the few customers who want to search by part or all of a serial number of an item by default, check this box.
Allow Access to Customer Type when Adding When adding a new customer "on the fly" while creating an order, decide here if the person adding the customer should be able to decide if the customer is a charge or cash customer. If checked, the person adding the customer can make this decision. Unchecked, the customer will always be added as a cash customer.
Allow Generic Rentals on Serialized Rentals The method of adding a serialized rental item on to a reservation or quote without picking a serial number (you'll need to pick the specific item when the customer shows up) is covered during front counter training. If you are interested in being able to do this, check this box.
Store Revisions If you want to store revisions of orders every time you edit an order, check this box. Graphical "snapshots" will be stored every time you exit the order. Be warned, this will use up a little more hard drive space.
Allow Interval/Fuel Charges At Order Creation If you wish to bill for fuel, miles, hours, etc, at the time you are CREATING an order, check this box. Otherwise, you will be prompted for these items when you are CLOSING an order.
Print Order Notes in Order Body If using "legacy" order form, this box should be checked by default. It forces order notes to print in the body of an order. Un-checking this box will for order notes to print at the footer of an order in a much smaller font.
Merchandise Search Selection Default Use the drop-down list to decide the primary way in which you search for an item. Whatever selection you make will not limit your ability to search by other means. This flag simply controls the default search field to start at.
Use Special Tax Function If you rent special events items in Maryland, Virginia or Washington DC, check this box. This functionality controls special use-taxes, food taxes and entertainment taxes.
User Supersede Functionality You may store superseded part numbers in the merchandise file. Enable this function if you want to be able to search for superceded part numbers.
Return Default to Due Date When returning rental or sales items (closing an order), the return date (which is used to calculate rental charges) defaults to today. You may change this date and time to whatever you wish. If you check this box, the return date and time will default to the date and time you speculated it would be returned when you created the order.
Export by Description This check box should be checked if you are exporting to QuickBooks using general ledger account descriptions instead of general ledger account number. Often times the account number is not used in QuickBooks, and the means to "match up" accounts in FocalPoint to accounts in QuickBooks is by account description. If you use account numbers in your third party software package and the identical part numbers are also in FocalPoint, you may un-check this box.
Auto Export at Night The exporting process is a normally a manual process. However, if you enable this check box, you can have FocalPoint do it for you over night. If you are just starting to set up FocalPoint, the best bet here would be to leave this check box disabled for the first 30 days, and once you are comfortable with the process and how you have FocalPoint set up, enable this function.
Tax Order as Whole (FL) Some FocalPoint users in Florida use a special tax table that dictates how much to charge for tax for low dollar amounts. Yet others in Florida choose not to use this tax table. Check this box if you would like FocalPoint to use this tax table when calculating taxes.
Percent of Order Required at Deposit If you would like to have deposits calculated on a per order basis, enter the default deposit percent in this field.
Default Order Start Time to Store Open Time When you first create an order, the default start time is the current date and time. If you want FocalPoint to default the start time to the time that your store opens, check this box. You can still change it if you want to while you're creating the order.
Update Merchandise Prices for All Stores When you update merchandise prices on Purchase Orders, enabling this field will update the merchandise item for all stores.
Do NOT Print Times On Orders Normally, start dates, estimated return dates, delivery and pickup dates and times will print on quotes. Check this box if you only want dates to show. You will still enter start/due/deliver/pick-up times. They just won't print anywhere.
Default Availability to Delivery/Pickup Dates and Times You may choose to deliver an item long before the rental will officially start. The delivery/pick-up dates and times are completely independent of the rental start/due dates and times. Checking this box will force FocalPoint to show items unavailable between the delivery/pick-up dates and times. Un-checking this box will force FocalPoint to show items unavailable between the rental start/due dates and times.
Auto Bill for Cash Customers? This flag is only valid if you allow cash customers to charge (See Hours Tab, "Allow Customers Assigned as Type CASH to Charge?").
If an order is for a cash customer, and the end of the billing cycle (28 days, or whatever number of days you chose) has been reached, should FocalPoint automatically monthly bill the order? With this box checked, and if the customer is a cash customer and there are no payments on the order, FocalPoint will automatically monthly bill the order. If this box is not checked, you will need to use the manually monthly billing process.
What is manual monthly billing? Manual Monthly Billing (A-4 from the main menu) will allow you to process orders due for monthly billing. When you double click on an order due for monthly billing, several scenarios could occur if the customer is a cash customer or if there are payments on the order:
If you DO NOT allow cash customers to charge (See Hours Tab, "Allow Customers Assigned as Type CASH to Charge?")...
If the monthly bill amount > than what has been paid then you can go no further without taking additional payments. You may edit the open order from this screen and apply payments directly to the order. Once the order has been paid in full you may then double click on the order from the manual monthly billing screen and monthly bill the order.
If you allow cash customers to charge OR if the order is for a charge customer (but the order has payments on it)...
If deposits exist, you will be notified as such. You may edit the open order from this screen and convert deposits into payments, save the order, and attempt to monthly bill the order again.
If there are any payments on an order, you will get a message "Payments exist, do you want to proceed with billing".
If you choose to proceed, FocalPoint will monthly bill the order. Any unpaid balance of the order will force FocalPoint to create an A/R invoice. Essentially, you will be given the opportunity to get additional payments from your customer (if needed) prior to monthly billing the order, but you will not be forced to do so.
If you choose not to proceed, you may the open order from this screen and apply additional payments directly to the order, then save the order, then attempt to monthly bill the order again.
Of course, if the order is for a CHARGE customer and there are no payments on the order, you will be able to monthly bill the order without interruption.
Automatic monthly billings occur over night on orders that have no payments, no pick up tickets (where the rent has been stopped but you haven’t picked the items up yet), no deposits, and depending on how you responded to the field “Auto Bill Orders With Payments Attached”, may or may not occur for orders that have payments on them.
Ask For Attachments @ Printing You can set up document attachments that will print immediately after an order prints. Enable this check box if you wish to have the ability to select which attachments you would like to print after the order prints.
Warn User if Selling Merchandise for 0.00? When selling merchandise on an order, if the selling price is $0.00, you will receive an additional warning if this check box is checked.
Charge Customer Dormant Days This field is used in association with a Dormant Days field in the customer file. Enabling this field will enable "dormant days" functionality. Dormant days functionality will set a CHARGE customer as dormant if the charge customer is inactive for XXX days.
Print 1 Line Contract Commonly as the special event format. If you would like it to print for all of your orders in this one-line format then check this box. The one-line form will also print if you enable a check box on an order labeled "event order".
Include Deposit Amount If you want FocalPoint to add any calculated or flat deposits into the "amount due" on an order, check this box. Otherwise, deposits will be simply "suggested deposits" that you can collect or not collect as you see fit. |
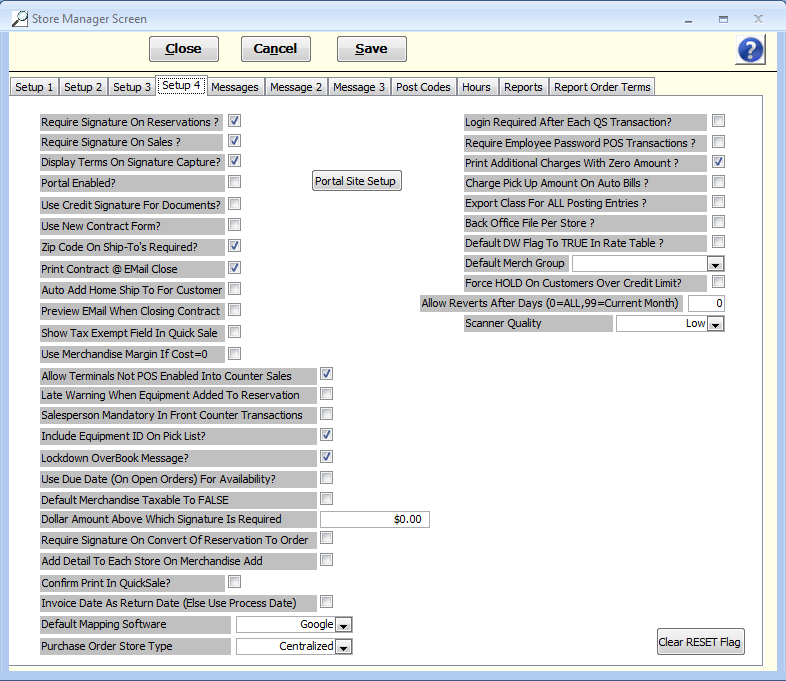
Require Signature on Reservations Ability to control whether or not a signature on reservations is required.
Require Signature on Sales Ability so control whether or not a signature on sales is required.
Display Terms on Signature Capture Ability to control whether or not terms are displayed on signature capture devices.
Portal Enable and the Portal Site Setup button If you have purchased any online Customer Portal, eRental Catalog or eRentalQuote, this field and button are used during the initial setup process.
Use Credit Signature for Documents Ability to use/not use credit card signature for documents, eliminating the need to sign twice.
Use New Contract Form Ability to use/not use new 2-line Contract Form available beginning in version 2.49.
Zip Codes on Ship-To's Required? Ability to require/not require zip codes on ship-to’s
Print Contract at Email Close If you email at time of close, enable this flag if you wish to also print a closed contract at the time you email. This flag is also valid for emailing auto monthly bills.
Auto Add Home Ship To For Customer Enable this flag if you want a Ship To address added automatically when you add a new customer. The Ship To Address will mirror the new customers address information
Preview Email When Closing Contract Enable this flag if you want to be presented with the email dialog box before the email is sent when you email at time of close.
Show Tax Exempt Field in Quick Sale Enable this field if you want to allow tax exempt sales in the Quick Sale function. Remember, Quick Sales only use the "Cash Customer"
Use Merchandise Margin if Cost = 0 Enable this flag if you have FocalPoint set up to calculate price based on a margin of cost and you want the price of an item calculated EVEN IF the cost is 0.
Allow Terminals Not POS Enabled Into Counter Sales Enable this flag if you want to allow terminals into Counter Sales in an environment where you are using integrated credit card processing but some of your terminals cannot process credit cards online.
Late Warning When Equipment Added To Reservation Enable this flag if you want to be warned if you are creating a reservation for an item that is currently late (past due).
Salesperson Mandatory In Front Counter Transactions Enable this flag if you want the salesperson flag to be mandatory on the order header screen.
Include Equipment ID On Pick List If you want the equipment ID to print on Pick Lists, enable this flag.
Lockdown Overbook Message if you enable this flag, you will not be able to change dates on orders if the change will conflict and cause overbooking. Also, with this flag enabled, if you convert a reservation to an order you will not be prompted for the option to change the order date to the current date and time.
Default Merchandise Taxable to FALSE When adding merchandise, the "taxable flag will be enabled by default unless you check this check box.
Dollar Amount Above Which Signature Is Required If you wish to only be prompted for a signature based on a dollar amount, enter the dollar amount in this field.
Require Signature On Convert of Reservation to Order Enable this field if you wish to be prompted for a signature when converting a reservation to an order
Add Detail To Each Store On Merchandise Add When creating a merchandise item, enable this field if you want the merchandise item set up in all stores (quantity will be 0 for stores other than the store you are in)
Confirm Print In Quicksale Enable this flag if you wish to be given the choice of printing/not printing a receipt in QuickSale
Invoice Date As Return Date (Else Use Process Date) When an invoice is created in A/R, should the invoice date be the date the order was closed, or the return date of the order. Use this field to choose.
Default Mapping Software Choose which mapping should be used when generating maps from an order.
Purchase Order Store Type Centralized - All PO's will be logged as "store 1" PO's Per Store - Each store creates their own PO's and you cannot modify PO's from other stores. Open - Each store creates their own PO's and you can modify PO's from other stores.
Login Required After Each QS Transaction Enable this flag if you wish to be prompted for your login after each QuickSale transaction
Require Employee Password POS Transactions Enable this flag if you wish to be prompted for your password when processing a credit card transaction.
Print Additional Charges With Zero Amount If you use additional charges, and they are sometimes calculated for $0, enable this flag if you wish to print the $0 charge
Export Class For All Posting Entries If exporting financial information to QuickBooks, and you have set up "Classes" for use in QuickBooks, enable this flag if you want the "Class" to be exported for all entries. Disabling this field would only export classes for certain GL entries, typically revenue/expense related.
Back Office File Per Store Enable this flag if you export PO's and use multiple QuickBooks companies
Default Merch Group Select a group to be used for new merchandise by default. Of course, you can change the group when adding merchandise as needed.
Force Hold on Customers Over Credit Limit If customer not already on hold and if this box is checked and the customer balance is over their credit limit, the overnight process will set the customer to "Heavy Hold" if it is a cash customer, "Light hold" if it is a charge customer.
Clear RESET Flag To be used for times when one of the processes that would lock the reset process is abnormally aborted (closing down FocalPoint in the middle of running the revenue details report, for example). Use at your own risk. |
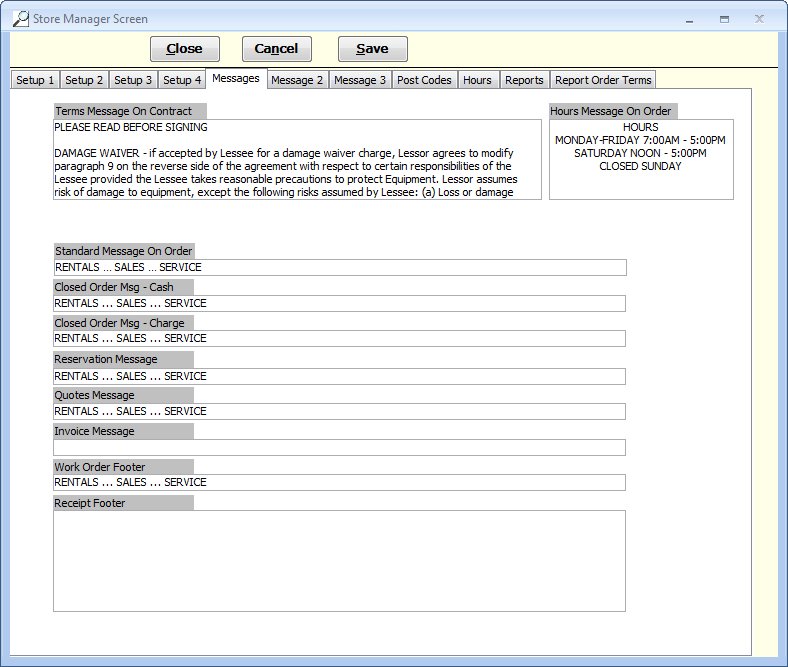
The various messages that print on the contracts are entered here. Store hours message, along with some short store terms, as well as reservation, quote, and sales messages can be configured. Not every message prints on each contract in regards to reservations, quotes, and sales.
Terms Message on Contract This text Prints in the Terms area of the contract (all contracts). This field is only valid for the legacy order form.
Hours Message on Order This text prints in the Hours area of the contract.
Standard Message on Order The text prints at the bottom of an Open contract
Closed Order Msg - Cash The text prints at the bottom of an Closed contract if the customer is a Cash Customer
Closed Order Msg - Charge The text prints at the bottom of an Closed contract if the customer is a Charge Customer
Reservation Message The text prints at the bottom of a Reservation
Quotes Message The text prints at the bottom of a Quote
Invoice Message The text prints at the bottom of a Quote
Work Order Footer This text prints at the bottom of work orders
Receipt Footer This text prints at the bottom of receipts |
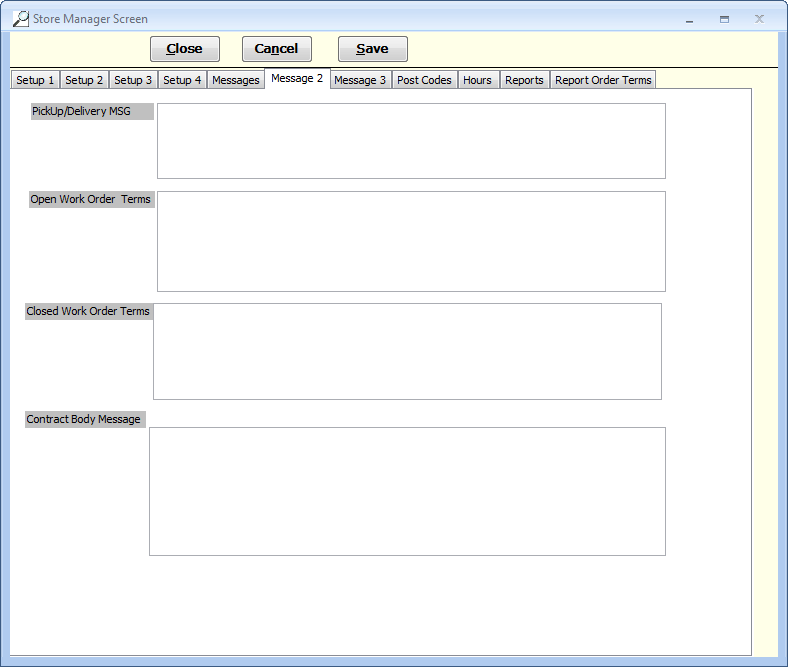
PickUp/Delivery MSG Any orders that are flagged for delivery/pickup will have this message added to it when printed.
Open Work Order Terms This field is no longer used.
Closed Work Order Terms This field is no longer used.
Contract Body Message This text prints within the body of a contract, below the last item on a contract. |
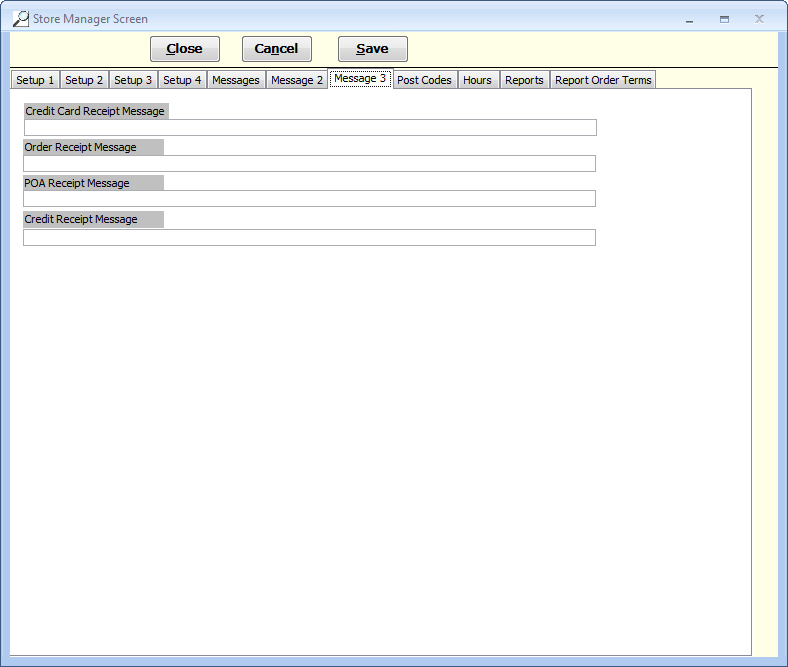
Credit Card Receipt Message One line message that will print at the bottom of a credit card receipt.
Order Receipt Message One line message that will print at the bottom of a receipt for an order.
POA Receipt Message One line message that will print at the bottom of a pay-on-account receipt.
Credit Receipt Message One line message that will print at the bottom of a receipt generated by a credit (refund).
|
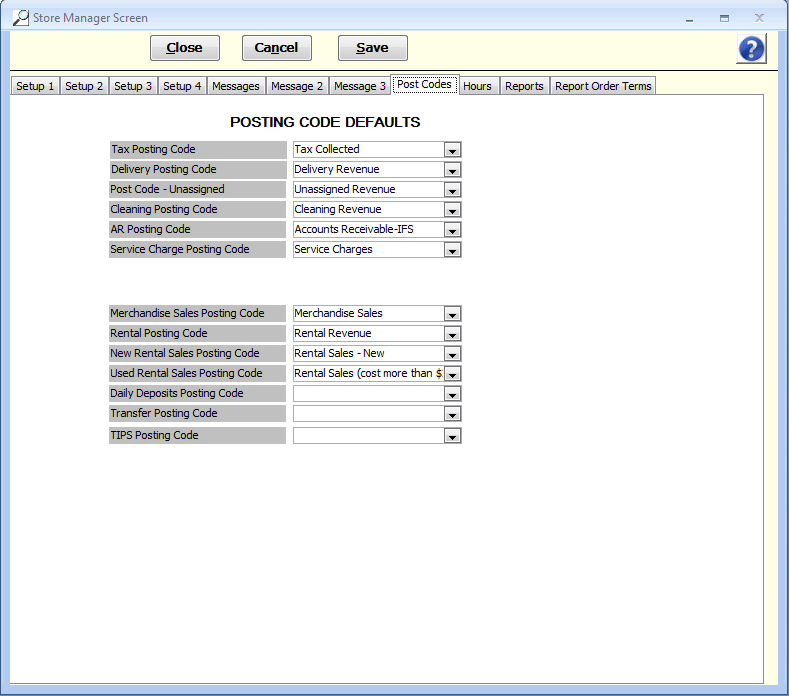
This page of the Store Manager file contains all the default Posting Codes (revenue buckets) for certain items that need separate posting codes. These posting codes are used when a specific posting code is not specifically set within a rental item record, merchandise record, or other. Normally, all rental items are assigned a posting code when you create them, but if for some reason a posting code is absent in a rental item, that item's revenue will fall into the posting code for "Rental Posting Code" assigned here in the Store Manger file. All of these posting codes need to be defined so the system knows where to post revenues for these categories.
Posting codes need to be set for all of the below fields:
•Tax Posting Code - Tells FocalPoint which posting code to use for tracking and exporting sales tax liability •Delivery Posting Code - Tells FocalPoint which posting code to use for tracking and exporting delivery revenue. •Cleaning Posting Code - Tells FocalPoint which posting code to use for tracking and exporting cleaning revenue. •AR Posting Code - Tells FocalPoint which posting code to use for tracking and exporting Accounts Receivable debits and credits (invoices and payments). •Service Charge Posting Code - Tells FocalPoint which posting code to use for tracking and exporting finance charge revenue. •Merchandise Sales Posting Code - Tells FocalPoint which posting code to default to when adding merchandise either directly into the merchandise file or from a purchase order. •Rental Posting Code - Tells FocalPoint which posting code to default to adding rental items either directly into the rental file or from a purchase order. •New Rental Sales Posting Code - Tells FocalPoint which posting code to use for tracking and exporting revenue from the sale of new rental items. •Used Rental Sales Posting Code - Tells FocalPoint which posting code to use for tracking and exporting revenue from the sale of used rental items. •Daily Deposits Posting Code - Reserved for future development. •Transfer Posting Code - Allows you to set a posting code to be used when you bill another store for merchandise that you transferred to that store. See Billing Stores for Transfers for more information. •TIPS Posting Code - If you accept "tips", enter the posting code that will be used to track tip receipts.
During initial setup you most likely can leave these fields set as they are. Any fields on this screen that need adjusting will be addressed during back office training
|
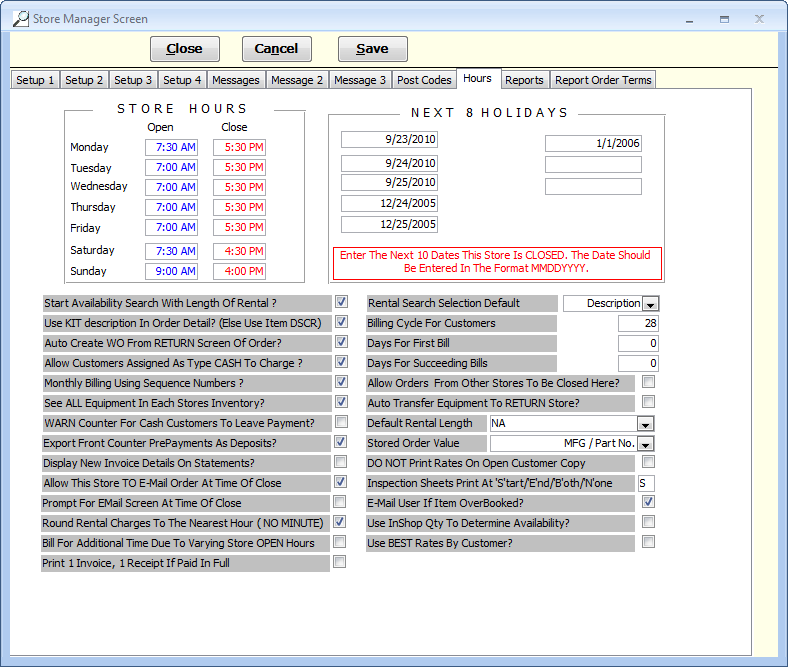
You can set your store hours here. If you are closed on Sunday, for example, leave the Open and Close times blank for Sunday. The "Close" times listed here will be defaulted to the "Due Time" for rentals whose calculated due time may fall after closing. The system will adjust that calculated due time to match the store closing time and will print this on the contract for the customer. For example, if a four hour rental would say it was due one hour past your store's closing time, the system will change that to be due at closing instead.
Store Hours Enter the store hours for your store in these fields. These fields will affect due times on rental contracts and calculation of rental charges.
Next 8 Holidays These fields can be filled in with what you consider to be your next 8 holidays. Maintaining these fields are your responsibility, as what people consider holidays varies from person to person, store to store. When these fields are filled in, these dates will show as red in calendars, and warning messages will be given if a return date or out date of an order defaults to one of these dates. You may certainly over-ride a return date to a holiday at the order level.
Start Availability Search With Length Of Rental ? Enable this function is you want your cursor to start at the length of rental when searching for inventory using any of the availability search screens. If this function is not enabled, the default cursor starting point will be "description".
Use KIT description In Order Detail? (Else Use Item DSCR) With this field enabled, the description of the kit being used will replace the description of the primary item on the kit when printing on contracts or invoices.
Auto Create WO From RETURN Screen Of Order? With this field enabled, work orders will automatically be created while closing a rental contract if the repair code interval dictates that a work order should be opened.
Allow Customers Assigned As Type CASH To Charge ? With this field enabled, contracts for your cash customers will allowed to be closed without accepting payment. For these occasions, invoices will be created in Accounts Receivable.
Monthly Billing Using Sequence Numbers ? With this field enabled, contracts closed and re-opened will be numbered with a sequence suffice. For example, if contract 12345 is "monthly billed", a new contract will open numbered 12345-01. Otherwise, an entirely new contract number will be assigned to the new contract.
See ALL Equipment In Each Stores Inventory? For multi store applications, this field will allow or dis-allow all stores to see other stores inventory. Further control of this functionality can be set up in the Company File and the User File.
WARN Counter For Cash Customers To Leave Payment? With this field enabled, an additional warning will be given when exiting a contract stating that you are not taking payment for items being rented by a cash customer.
Export Front Counter Pre-Payments As Deposits? With this field enabled, money collected on OPEN contracts will be exported to external accounting packages using a customer deposits liability account set up in the Posting Codes file. Without this field enabled, the cash will not be exported until the contract is closed. If you have some receipt posting codes that you wish to track PrePayments on, and others that you don't, enable this flag. You can control individual receipt accounts in the Posting Codes file.
Display New Invoice Details On Statements? With this field enabled, invoice detail lines will print directly below the standard invoice information (amount due, amount paid, date due) etc on a statement. These detail lines will only print on the first statement that the invoice prints on.
Allow This Store TO E-Mail Order At Time Of Close With this field enabled, emails are allowed to be sent manually at the time of closing a contract. This field does not affect the field on the Setup 2 Tab in the store manager file "Auto E-Mail Copy Of Order When 'Finished'? ". However, further setup is required within the Customer File with respect to email addresses. See Set Up Email for more information.
Round Rental Charges To The Nearest Hour ( NO MINUTE) With this field enabled, rental charges will round UP to the nearest hour when closing a contract. Otherwise, rental charges will be calculated to the nearest minute.
Bill For Additional Time Due To Varying Store OPEN Hours With this field enabled, customers will be charged for varying store hours. For example, if your store opens at 7am on Saturday and 9am on Sunday, and your customer rents an item for 1 day starting at 7am on Saturday, your customer will be billed for 1 day and 2 hours if the item is returned at 9am on Sunday. With this field NOT enabled, your customer will be billed for 1 day.
Print 1 Invoice, 1 Receipt If Paid In Full With this field enabled, one receipt from the receipt printer and 1 full size sheet invoice will print upon closing a contract that is paid in full. This field is only relevant if you are using a receipt printer. With this field disabled, two receipts from the receipt printer will print.
Rental Search Selection Default Choose from the drop down list provided to default at which field your cursor should start at when search for inventory.
Billing Cycle For Customers Enter the number of days that should be billed for on a monthly invoice.
Days For First Bill Enter the number of days that should pass before the first monthly invoice for a rental contract should automatically be created, or should be available for monthly billing if you manually monthly bill contracts.
Days For Succeeding Bills Enter the number of days that should pass before the invoices after first monthly invoice for a rental contract should automatically be created, or should be available for monthly billing if you manually monthly bill contracts.
Click here for more information on how billing cycle settings work with cycle bills
Allow Orders From Other Stores To Be Closed Here? With this field enabled, contracts from stores can be closed at stores other than the store where the contract was initially created.
Auto Transfer Equipment To RETURN Store? With this field enabled, contracts closed at stores other than the store where the contract was initially created will force the inventory to be "returned" to the store where the contract is being closed.
Default Rental Length Enter the rental length or choose from the drop down list to default the rental length used when creating contracts.
Stored Order Value This field represents what is stored on the order detail line for printing purposes. For rental items, it is always the Equipment ID, but for merchandise you can choose from MFG/Part No, SKU, UPC Code, or alternate description.
DO NOT Print Rates On Open Customer Copy Enable this field if you do not want rates to print on open contracts.
Inspection Sheets Print At 'S'tart/'E'nd/'B'oth/'N'one This field allows you to choose when inspection sheets print during the contract process.
E-Mail User If Item OverBooked? With this field enabled, any user ID's that have an email address in their record will receive an email when an item is overbooked.
Use InShop Qty To Determine Availability? With this field enabled, items on work orders will be considered unavailable.
Use BEST Rates By Customer? Allows you to set best rate functionality BY CUSTOMER. This field is used in conjunction with the fields on Setup 2 Tab of the Store Manager File labeled "Divide Week Rate By 'X' For New Day Charge (If Out Over 1 Week) and "Divide Month Rate By 'X' For New Day Charge (If Out Over 1 Month)". Further setup is required in the customer file for this functionality to be enabled.
Availability Screen - Default to Reservation? Enable this field if you wish to have the "reservation" radio button on the item search order creation screen always enabled by default.
Allocate Amount on Exchanges Enable this if you wish for exchanges to force allocation of revenue between two items involved in an "exchanges". Disabling this field will force all revenue to go to the last item (the one that was never exchanged before the order closed)
|
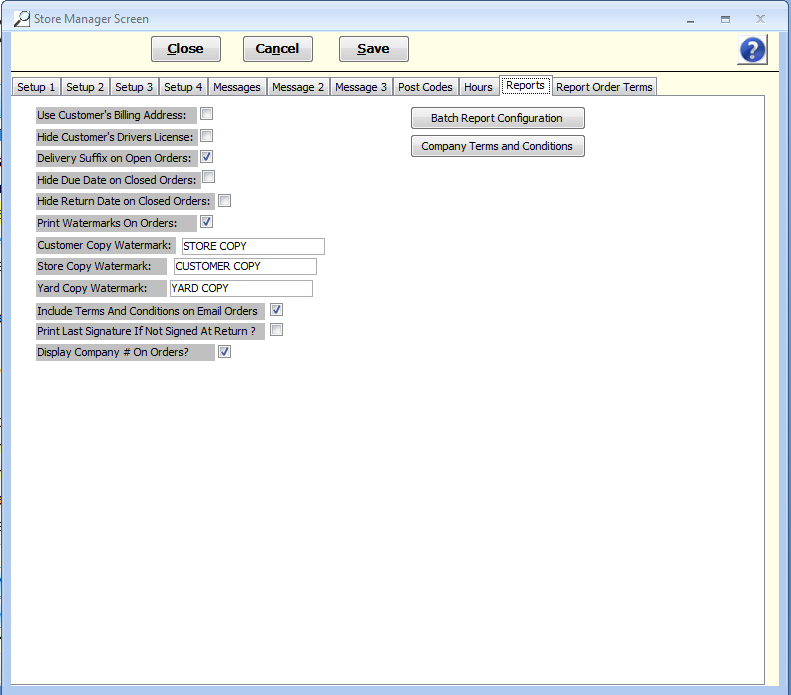
All of the options on this tab are related to the NEW contract form, available beginning with version 2.49.
Use Customer's Billing Address You may now choose to use/not use the customer’s billing address.
Hid Customer's Drivers License You may now choose to show/hide the customer’s driver’s license.
Delivery Suffix on Open Orders A delivery suffix is available to use on open orders (“Delivery” / “Customer Pick Up”)
Hide Return Date on Closed Orders You may now choose to hide the due date on closed orders.
Print Watermarks on Orders You may now customize watermark verbiage
Watermark verbiage You may use these fields to decide what the watermarks should say (if you choose to use them)
Include Terms and Conditions on Email Orders Check this box is you want the Company Terms and Conditions (described below) to be included in emails of orders.
Print Last Signature If Not Signed At Return Enable this checkbox if you want the last electronic signature used if there is no signature at the time of return.
Display Company # On Orders Enable this checkbox if you want the company number to appear before the order number on printed orders
Batch Report Configuration The Batch Report Configuration and company terms and conditions are used for the new 2-line order form. Use the batch configuration function to specify how many copies of transaction documents you would like to print, and if they should have watermarks and terms/condition verbiage.
From within this function you can control the following:
Open orders Customer Copy Include in batch - Should a this copy print? Use Watermark - Should a watermark print on the copy? Total Copies - If this copy is printing, how many of them should print? Terms and Conditions - Should terms and conditions be included with this copy when it is printed or emailed? Store Copy Include in batch - Should a this copy print? Use Watermark - Should a watermark print on the copy? Total Copies - If this copy is printing, how many of them should print? Terms and Conditions - Should terms and conditions be included with this copy when it is printed or emailed? Custom Attachments - Should custom attachments be included with this copy when it is printed or emailed? Yard Copy Include in batch - Should a this copy print? Use Watermark - Should a watermark print on the copy? Total Copies - If this copy is printing, how many of them should print?
Closed Orders Customer Copy Include in batch - Should a this copy print? Use Watermark - Should a watermark print on the copy? Total Copies - If this copy is printing, how many of them should print? Invoice Copy Include in batch - Should a this copy print? Use Watermark - Should a watermark print on the copy? Total Copies - If this copy is printing, how many of them should print? Custom Attachments - Should custom attachments be included with this copy when it is printed or emailed?
Reservations Customer Copy Include in batch - Should a this copy print? Use Watermark - Should a watermark print on the copy? Total Copies - If this copy is printing, how many of them should print? Terms and Conditions - Should terms and conditions be included with this copy when it is printed or emailed? Store Copy Include in batch - Should a this copy print? Use Watermark - Should a watermark print on the copy? Total Copies - If this copy is printing, how many of them should print? Terms and Conditions - Should terms and conditions be included with this copy when it is printed or emailed? Custom Attachments - Should custom attachments be included with this copy when it is printed or emailed? Yard Copy Include in batch - Should a this copy print? Use Watermark - Should a watermark print on the copy? Total Copies - If this copy is printing, how many of them should print?
Quotes Customer Copy Include in batch - Should a this copy print? Use Watermark - Should a watermark print on the copy? Total Copies - If this copy is printing, how many of them should print? Terms and Conditions - Should terms and conditions be included with this copy when it is printed or emailed? Store Copy Include in batch - Should a this copy print? Use Watermark - Should a watermark print on the copy? Total Copies - If this copy is printing, how many of them should print? Terms and Conditions - Should terms and conditions be included with this copy when it is printed or emailed? Custom Attachments - Should custom attachments be included with this copy when it is printed or emailed? Yard Copy Include in batch - Should a this copy print? Use Watermark - Should a watermark print on the copy? Total Copies - If this copy is printing, how many of them should print?
Invoices Customer Copy Include in batch - Should a this copy print? Use Watermark - Should a watermark print on the copy? Total Copies - If this copy is printing, how many of them should print? Invoice Copy Include in batch - Should a this copy print? Use Watermark - Should a watermark print on the copy? Total Copies - If this copy is printing, how many of them should print? Custom Attachments - Should custom attachments be included with this copy when it is printed or emailed?
Sales Customer Copy Include in batch - Should a this copy print? Use Watermark - Should a watermark print on the copy? Total Copies - If this copy is printing, how many of them should print? Invoice Copy Include in batch - Should a this copy print? Use Watermark - Should a watermark print on the copy? Total Copies - If this copy is printing, how many of them should print? Custom Attachments - Should custom attachments be included with this copy when it is printed or emailed?
Monthly Billing Open Copy Include in batch - Should a this copy print? Use Watermark - Should a watermark print on the copy? Total Copies - If this copy is printing, how many of them should print? Closed Copy Include in batch - Should a this copy print? Use Watermark - Should a watermark print on the copy? Total Copies - If this copy is printing, how many of them should print?
Credits Customer Copy Include in batch - Should a this copy print? Use Watermark - Should a watermark print on the copy? Total Copies - If this copy is printing, how many of them should print? Closed Copy Include in batch - Should a this copy print? Use Watermark - Should a watermark print on the copy? Total Copies - If this copy is printing, how many of them should print?
Open Work Orders Customer Copy Include in batch - Should a this copy print? Use Watermark - Should a watermark print on the copy? Total Copies - If this copy is printing, how many of them should print? Closed Copy Include in batch - Should a this copy print? Use Watermark - Should a watermark print on the copy? Total Copies - If this copy is printing, how many of them should print?
Closed Work Orders Customer Copy Include in batch - Should a this copy print? Use Watermark - Should a watermark print on the copy? Total Copies - If this copy is printing, how many of them should print? Closed Copy Include in batch - Should a this copy print? Use Watermark - Should a watermark print on the copy? Total Copies - If this copy is printing, how many of them should print?
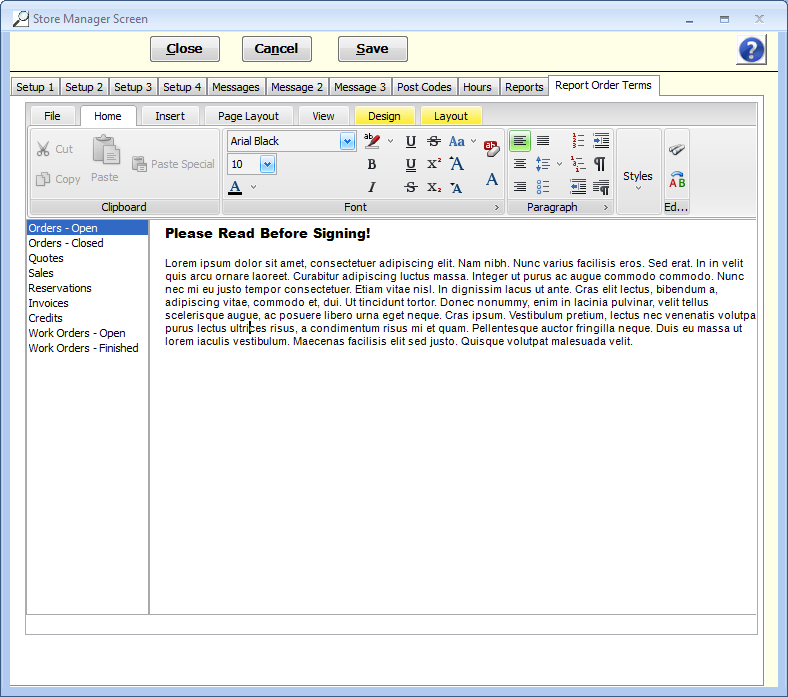
Company Terms and Conditions Company terms and conditions prints on a separate sheet, and do not replace terms and conditions on bottom of orders. |
This is the verbiage for the terms that print on the bottom of transaction documents. You may set up different terms verbiage for each different kind of document listed on the left side of the screen.
|

