Rental File

Contents
2-2 from the main menu
The rental file is where you store all of your rental items and other depreciable assets. For assets that are not rental-able, there is a flag available to mark the item appropriately. Many defaults for rental items already exist in the Rental Rate Tables. Your Rental Rate Tables should already be established before adding rental items. Once a rate table is selected for a rental item, many fields for the rental item will pre-fill based on rate table settings. These fields may be changed to suit your needs.

Upon entering the rental file you will be presented with a list screen. This screen shows the Equipment ID, Description, Group, Rate Table, Year to Date Dollars, Life to Date Dollars, Serial Number, whether or not it is a "bulk" item, whether or not it is an "attachment" and Vendor. In a multi store environment, for non serialized items, if you intend to rent items that you do not normally stock in your store, you should set up the item in your store anyway, and set the quantity to 0. When renting these items, either transfer the necessary inventory to your store prior to creating the contract, or overbook the item and transfer the inventory afterward. See notes below under Equipment ID for more information about non-serialized inventory.
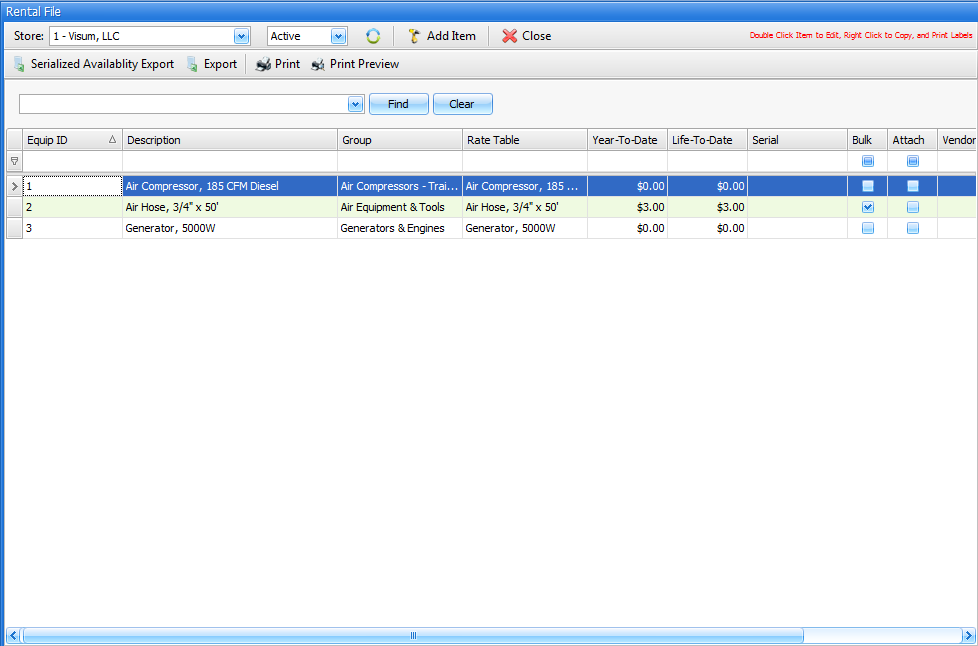
Different areas of this list screen are:
Store
You can choose to display all rental items or only those that are currently in a certain store.
Active/De-Active/All
In the upper left corner, you may choose to see "active", "de-activated" or "all" records. If you choose "All", the far-right "Active" column in the list will be visible, otherwise this "Active" column will not be visible.
Add Item
Click on this button to add a new rental item.
Serialized Availability Export
Click on this button to export a list of serialized items and their current availability to Excel.
Export
Click on this button to export the current list of rental items on the list screen to a screen that can generate an Excel spreadsheet.
Click on this button to print a list of rental items that resembles the current list screen. You will be prompted for a printer before the list prints.
Print Preview
Click on this button to preview a list of rental items that resembles the current list screen. From the preview screen you can print the list, email it, or create a PDF.
Wild card search function
The field to the left of the Find and Clear buttons will search for any string of characters in any of the columns on the screen. It is an interactive search, meaning the results will be displayed as you type.
Column Search Fields
The blank field on top of each column can be used to search for results within the appropriate column. This search function looks for matches based on the start of the string of characters. For example, if you were searching for the word "smith", typing "smi" would help you find results, but "ith" would not
Column headings functions
•If you left click on a heading, the records in the column will sort ascending or descending (alternating with each left click)
•If you right click on a column, you will be presented with options to:
oSort Ascending
oSort Descending
oClear Sorting
oGroup By This Column
oShow Group By Box
oRemove This Column
oChoose Which Columns to Display
oBest Fit THIS Column
oBest Fit ALL Columns
oFilter Results in this Field using 13 methods (Equals, Does Not Equal, Greater Than, Less Than, etc.)
oHide the Auto Filter Row
•If you "hover" over the column heading, a tiny filter will show in the upper right corner of the column name, where you can then filter the column based on real time results of the column
Export
Click on this button to export the current list of records on the list screen to a screen that can generate an Excel spreadsheet.
Click on this button to print a list of records that resembles the current list screen. You will be prompted for a printer before the list prints.
Print Preview
Click on this button to preview a list of records that resembles the current list screen. From the preview screen you can print the list, email it, or create a PDF.
You may double click on a record to open it, or right click->open to open a record. Right clicking on a rental item also allows you to:
•Copy the item - Useful when adding multiples of the same type of item, especially when initially setting up FocalPoint.
•Expense Quantity - Formerly in the inventory functions menu in FocalPoint, you can now expense quantities directly from this screen. Expensing items allows you to increase or decrease inventory for reasons other than normal sales and purchases.
•Expense Transfer - Instead of expensing items from your inventory, if you wish to move quantities from one rental item to the other, use the "Expense Transfer" function.
•See Expense Rental / Merchandise for instructions on expensing quantites or transfers
There are several screens in the Rental File. The screens are listed below. On the top section, the following functions and fields will always be available:
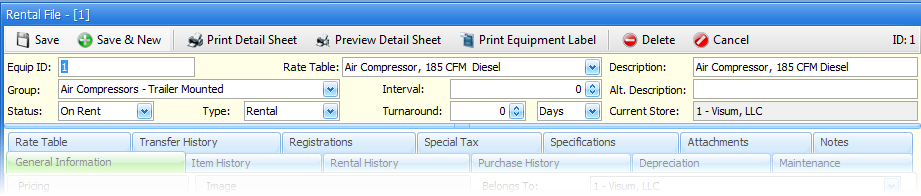
Save / Save & New
Use this button to save your changes or additions. The Save/New button will take you to a blank screen to add another new record.
Print/Preview Detail Sheet
Use this button to print or preview a detail sheet.
Print Equipment Label
Use this button to print an equipment label.
Delete
Use this button to delete rental items that have no activity on them.
Equipment ID
Enter an equipment ID for this item. If you do not have a structured ID system in place, and you wish to use random numbers similar to FocalPoint's internal Item #, enter the item number as it is shown (in gray) to the right of the Equipment ID field.
For serialized items, Equipment ID's server the purpose other than to identify the item. For non serialized items (tables, chairs, blades, etc), in a multi-store environment or when you are transferring merchandise to rental, a little more thought is involved with Equipment ID's. For example, if you have three stores that all stock the same chair, you will need to set the item up in all three stores. The system defaulted Item # (below) will be unique each time you set up the item. The Equipment ID, however, will need to be the same for all three store. This requirement is in place primarily for transferring purposes, so that when you transfer chairs from one store to another or when you are converting merchandise inventory to rental inventory, the inventory decreases and increases properly for the item in the stores or files involved in the transfer.
Group
Select a group from the drop down list.
Status
Normally this field is set to Available when the item is being set up, as the status of an item will be automatically controlled by the type of activity currently associated with it.
Type
Normally, rental items are set to "R"ental. If an item is set to "F"ixed Asset, it will not be available for rental, but will still be subject to depreciation functionality.
The "Kit" type allows you to set up a rental item that represents an assembly of many other parts/pieces also in your rental file. For example, you may set up a Kit rental item for a 20' by 20' tent, then when you set up the kit, make this item the primary item, and make all the parts/pieces that make up this tent as kit detail items
For re-rent items, you can just set up 1 rental item per store or one item per each rate table. You will need a rental rate code set up for this re-rent item, however, it is typical for the pricing on re-rent items to be overwritten each time that the item is added to the order. When you rent this item, simply change the description and rates as needed. As the item is set to a type "E" you will be presented with additional fields at the time of rental asking for the vendor and the re-rent cost information.
Rate Table
Select a rate table set up in the Rate Table File from the drop down list.
Current Interval
This field reflects the current interval (Hours, Miles, etc) for the item.
Turnaround Increment and time frame
Enter the number of days, hours or minutes after an item is returned that it should be considered "in the shop", unavailable for rent, then choose "days", "hours" or "minutes" from the dropdown. Works great for linens that need to be laundered between uses.
Primary/Alternate Description
You may enter up to two descriptions for any rental item. Either of these descriptions will be searched when searching for rental items by description. The primary description will show on printed documents. The alternate description is used for searching purposes.
Current Store
This is the current location of the item.
Active (lower right corner)
If this item should be available to rent (with the exception of fixed assets), enable this field. When an item is sold, this field will be automatically disabled.
Added on
Shows the date/time that the item was added.
You may go directly to the area needed by clicking on one of the following links:
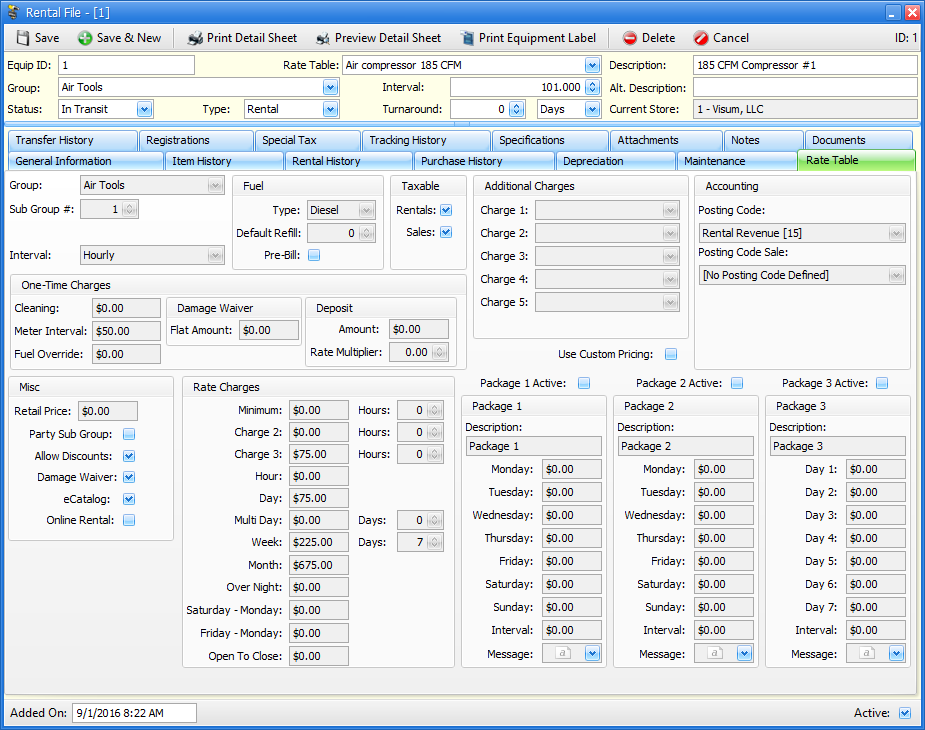
The field definitions below explain each field on this screen.
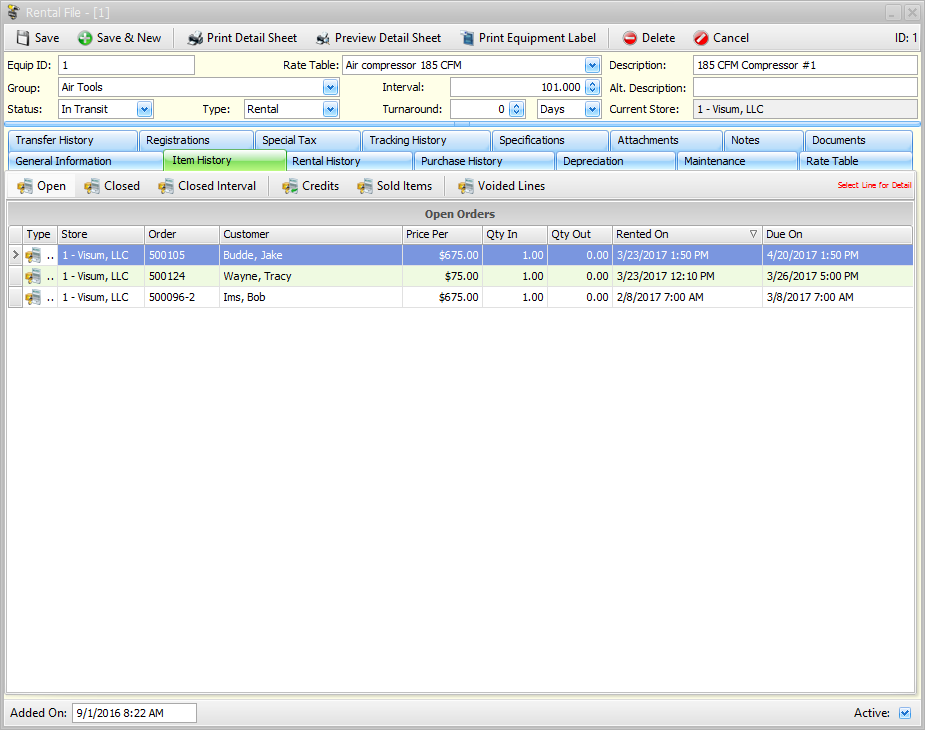
Pricing
Retail Price Set the default selling price for this item should you choose to sell this item on a rental contract or sales invoice. This field is optional.
Selling Price May be used to store a current selling price of an item. Will not default on orders.
Commission Percentage Enter the commission percentage if it is different from normal commissions set in the salesperson file.
Commission Amt Enter a flat commission amount if it is different from normal commissions set in the salesperson file.
Flat DW Amount If there is a FLAT damage waiver amount (instead of a damage waiver percentage, as set up in the Store Manager File, Setup Tab, enter the flat damage waiver amount in this field.
Quantity
Total All Stores Reflects the quantity on hand with identical Equipment ID's at all stores
Quantity in Store Enter the quantity you currently have on hand at this location. If this is a serialized item, enter '1' for the quantity.
Quantity on Orders, In Store Count, Qty Reserved, Qty Late, Qty In Shop, Qty In Transit, Total Owned:All Stores These fields are not accessible, but relay information to you about the quantities you have in your store, reserved, in shop, etc.
Item Options
Depreciable If this item is depreciated, enable this field.
Serialized If this item in serialized, enable this field.
Attachement If this item is an attachment that would normally be attached to a different item, check this box. This is explained in detail in the Attachment section.
Damage Waiver If this item should normally be subject to damage waiver charges, enable this field. You still have the option to change damage waiver subjectivity while creating a contract, but by default, this flag controls whether or not items should be charged a damage waiver.
Commission-able If this item would normally be commission-able, enable this flag. Even with this flag enabled, if you do not pay commissions, no commission will be calculated.
Consignment Item This field needs to be checked if you are using functionality built into FocalPoint for consignment items.
Auto Work Order If checked, the item will be put on a work order each time it is returned from rental
Allow Discount With this field enabled, any discounts for the customer or at the contract level will be applied. With this field disabled, discount functionality will ignore this item.
Toilet Dispatch Enabling this field allows you to dispatch only these special items. Typically used for porta-john applications where dispatching is highly active.
Display in Availability Enable this check box if you want this item to display in availability searches for rental items. Most of the time you will want this, unless the type of this item is KIT.
Calculate Availability Check this box if you want FocalPoint to calculate availability when searching for this item. Most of the time you will want this, unless it is some kind of intangible item that you add to orders and you do not care how many you have on hand.
ImageYou can associate an images with this rental item by clicking on the Import button and selecting an image from your PC or any network folder. Once the image is selected, FocalPoint will store a copy of the image on the server so that it can be viewed from any PC in FocalPoint in the future.
Tax Options
Rentals Taxable Enable this field if the rental items is taxable when rented.
Sales Taxable Enable this field if the rental items is taxable when sold.
Special Tax Exempt-Rental If a customer is only tax exempt on certain rental items, then check the “special tax exempt” check box on this screen, along with a “special tax exempt” check box in the appropriate customer file record.
Special Tax Exempt-Sale If a customer is only tax exempt on certain rental items when they are sold, then check the “special tax exempt” check box on this screen, along with a “special tax exempt” check box in the appropriate customer file record.
Fields in Upper Right
Belongs to This field represents the store number where the rental item started or the store that the item is supposed to be at. When a rental item is set up, the current location of the item will be the store that you are logged in to when setting up the item.
Manufacturer Use the drop down list to select the appropriate manufacturer for this item. This field is optional.
Spec Sheet Prefix You have the ability to store separate specification sheets, instructional sheets, or safety sheets that will print immediately after a contract prints that has this rental item on the contract. For more information about how to set up these sheets, please view Specification Sheets and Custom Attachments.
Bin Location Enter a bin location for the item as desired
Details
Make Enter the make of the rental item if applicable.
Model Enter the model of the rental item if applicable.
Color Enter the color of the rental item if applicable.
Year Manufactured Enter the year that the rental item was manufactured if applicable.
VIN Number Enter the VIN Number of the rental item if applicable.
Part Number Enter the part number of the rental item if applicable.
Bar Code ID Enter the bar code ID of the rental item if applicable.
Serial Number Enter the serial number of the rental item if applicable. Of course, if the rental item is not serialized, leave this field blank.
License Plate # Enter the license plate # of the rental item if applicable.
Warranty Expiration Date Enter the date that the warranty expired for this item if applicable.
Dimensions
Weight Enter the weight of the rental item if applicable.
Height Enter the height of the rental item if applicable.
Length Enter the length of the rental item if applicable.
Width Enter the width of the rental item if applicable.
Web URL You may enter a web address or a network address in this field, and wherever you see the Web Address Link button, you will be able to have easy access to whatever address is in this field from many order processing screens. External website addresses should be in the format http://www.coolwebsite.com, internal network links should be in the format \\pcname\sharedfolderwherefileis
GPS ID This is a custom field for future use.
Static IP Address This is a custom field for future use
Accounting
Post Code - GL Use the drop down list to select the appropriate post code for the item. During initial set up, leaving the posting code to Rental Revenue is fine. If you suspect you will want to track separated revenue streams in QuickBooks (or Peachtree) for different types of items (like Party vs General Equipment for example), give us a call and we'll help you set up additional posting codes that you can use when setting up rental items.
Post Code - Sale If there is a posting code in this field, then when you sell the rental item, the rules of this posting code will be followed. If there is no posting code of this field, then the posting codes in the store manager file associated with New Rental Sales and Used Rental Sales will be used (You can see these store manager fields by going to C-4 from main menu, "Post Codes" tab)
Vendor Use the drop down list to select the appropriate Vendor associated with this rental item. This field is optional.
Tax Code This field should only be populated if this rental item should always be associated with a particular tax code. Select the appropriate tax code from the drop down list.
|
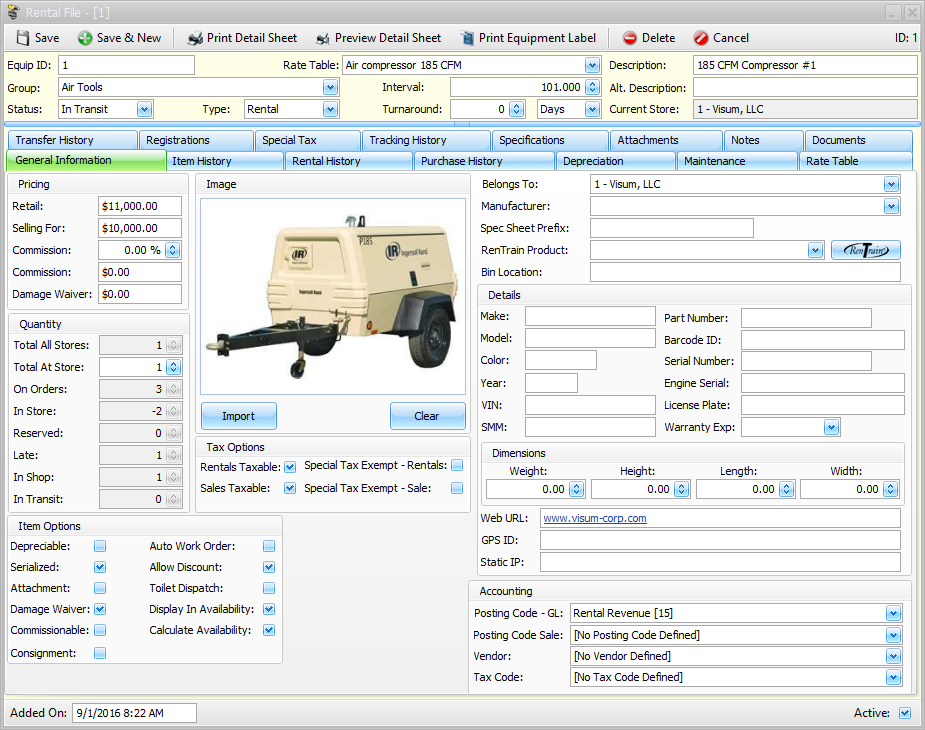
The Item History tab is for information purposes. Use the Closed Orders, Credits, Open Orders, Voided Lines, Sold Items, and Closed Interval buttons to see historical data about this item.
|
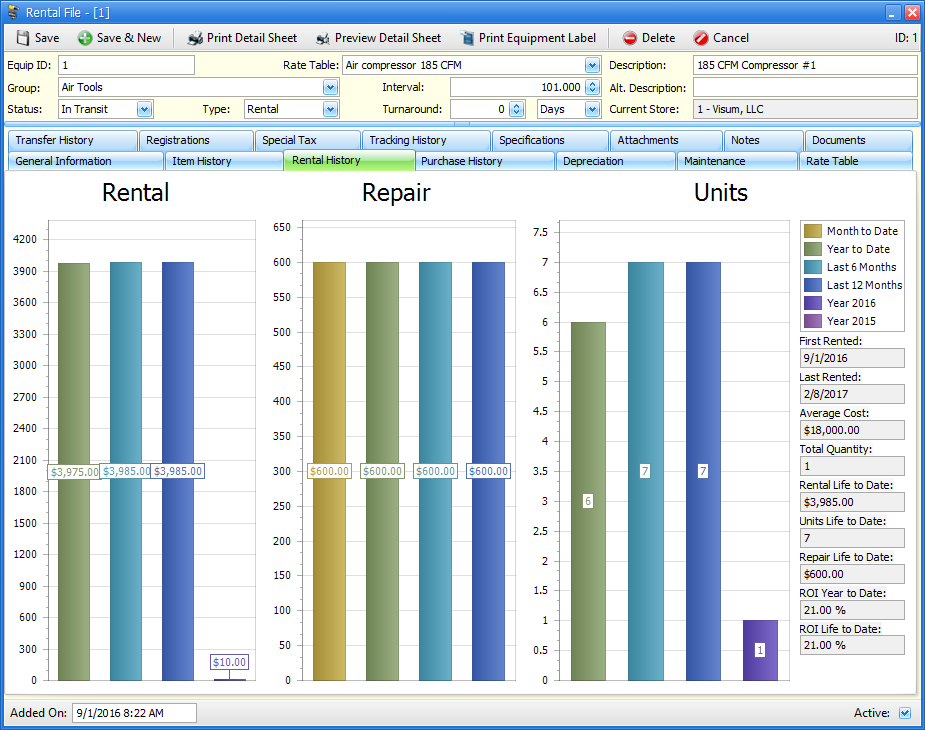
Month to date, Year to date, Last 6 months, Last 12 months, Last Year and Two Years Ago A large portion of this screen is graphical, showing rental dollars, Repair dollars, and number of times rented for various time frames.
Date of First Rental This field reflects the date of the first rental. You cannot edit this field from this screen.
Date of Last Rental This field reflects the date of the last rental. You cannot edit this field from this screen.
AVG Cost This average cost is what will be used for ROI calculation
Total QTY If this is a non-serialized item, this field represents the quantity of all items in all purchase records for this item (across all stores).
LTD Rental Amount This field reflects the life to date rental amount for this item. You cannot edit this field from this screen.
LTD Rental Units This field reflects the number of times (life to date) this item has been rented. You cannot edit this field from this screen.
LTD Repair Amount This field reflects the life to date repair costs for this item. You cannot edit this field from this screen.
ROI YTD This field reflects the year to date return on investment for this item. You cannot edit this field from this screen.
ROI LTD This field reflects the life to date return on investment for this item. You cannot edit this field from this screen.
|
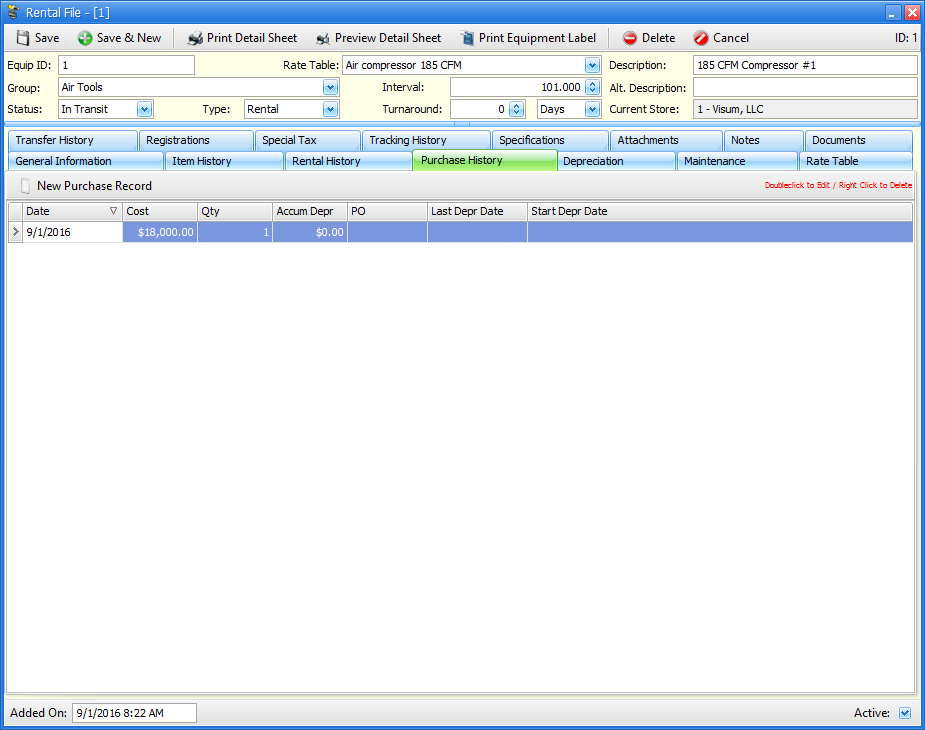
The Purchase History tab will show all occurrences of purchases made for this item. If the item is serialized, there should only be one purchase record for the item. If the item is not serialized (tables, chairs, air hoses, etc.) then there could be multiple purchase records for the item (for times when you purchase more of the same item to replenish your inventory.
When you add a rental item, a purchase record should be added for you automatically. After saving the new item you can edit this purchase record. Another way to add purchase records is to use FocalPoint's Purchase Order functionality. You can also use the Add Purchase Record button to add a purchase record, or the Delete Purchase Record Button to delete a purchase record.
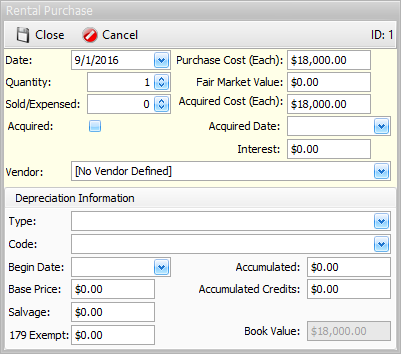
If you double click on a purchase record, you will have access to the following fields. If you choose to calculate depreciation in FocalPoint, all of these fields should be considered mandatory:
Purchase Date This field will default to today's date, but can be changed as appropriate.
Purchase Cost Enter the cost of the rental item here. The cost should be entered as a "per item" cost.
Quantity Enter the quantity that was purchased.
Acquisition Cost The acquisition cost reflects any additional costs incurred to obtain the item, such as freight costs.
Vendor Select the vendor from the drop down list.
QTY Sold/Expensed If some of the items purchased were already sold or expensed, enter the quantity sold or expensed here. Normally when adding a purchase record, this field remains 0, and FocalPoint updates the field as items are sold or expensed.
Depreciation Type Select the depreciation type from the drop down list.
Depreciation Code Select the depreciation code from the drop down list.
Accumulated Depreciation Enter the amount of depreciation already incurred against this item.
Depr Begin Date Enter the date to begin depreciation the rental item.
Base Price Enter the amount that will be depreciated. This will be the amount (less any salvage value) that is depreciated. Be sure to include both purchase costs and acquisition costs as dictated by your accounting practices.
Salvage Value Enter any salvage value for this item in this field. This amount will be subtracted from the base price when calculating depreciation.
Accum Credits This field is for historical information only.
179 Exemption This field is for historical information only.
Book Value This value is for display only, and is automatically recalculated each time depreciation is calculated. |
The depreciation tab will list out all occurrences of depreciation being calculated for the item. For more information about depreciation, visit the depreciation section of this help file. |
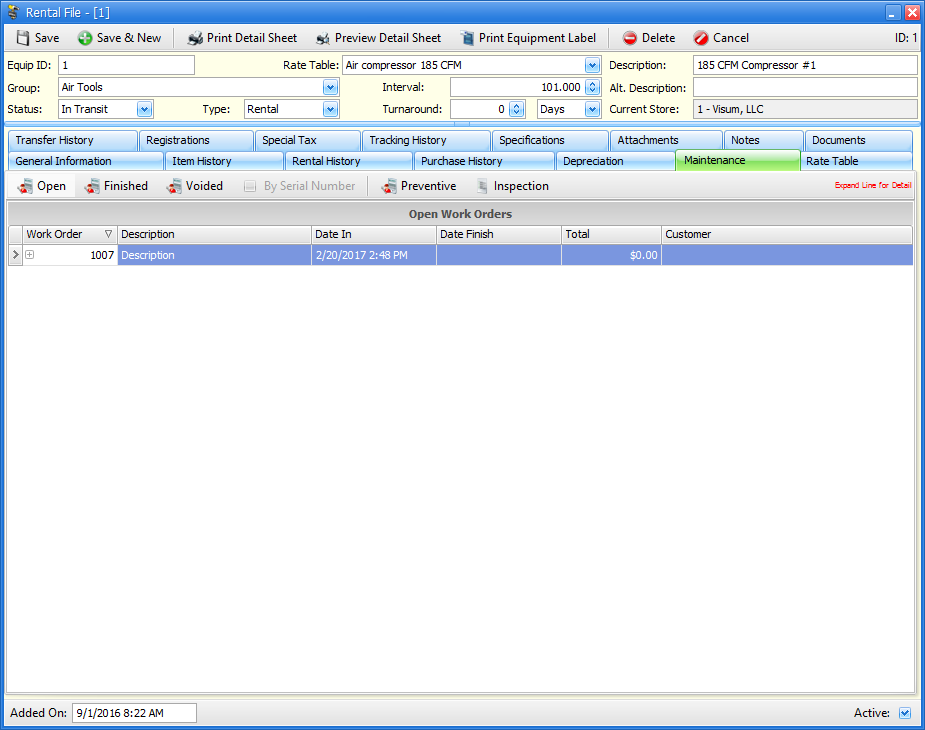
The Maintenance Due tab will allow you to see historical data about the maintenance of this item. Use the Open, Finished and Voided buttons to see open, finished and voided work orders. The Preventative button will show any Preventative Maintenance that is due for the item. The Inspection button will show any active inspection forms set up for this item. More information about service set up, preventative maintenance and inspection forms may be found in the Maintenance Setup section of this help file.
|
The Rate Table tab will show information about the rate table that is assigned to this item. Please note that you CANNOT change the rate table from this screen.
|
The transfer history tab will show all transfer activity for this item. You can choose to see transfers to this store or from this store by clicking on the From Current Store or To Current Store buttons. |
The Registration tab is used to record registration information about this item by state. |
If this item is subject to special taxes set up in the zip code file, select the state(s) where this special tax is applicable. More information about special tax setup can be found in the Special Tax Setup section of this help file. |
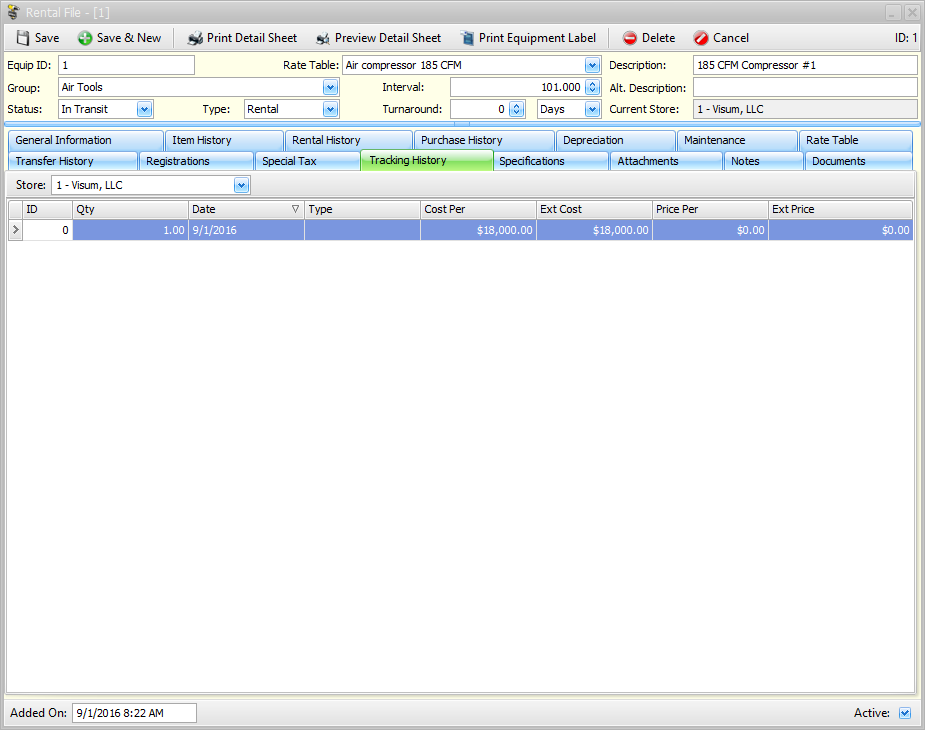
When changes are made to your rental inventory, FocalPoint will audit these changes so that you can monitor quantity and value fluctuations. This screen allows you to view such changes by date range and company. There is also a rental inventory tracking report to allow you to report on these events.
|
Additional specs may be set up for items. These specs are for informational purposes only |
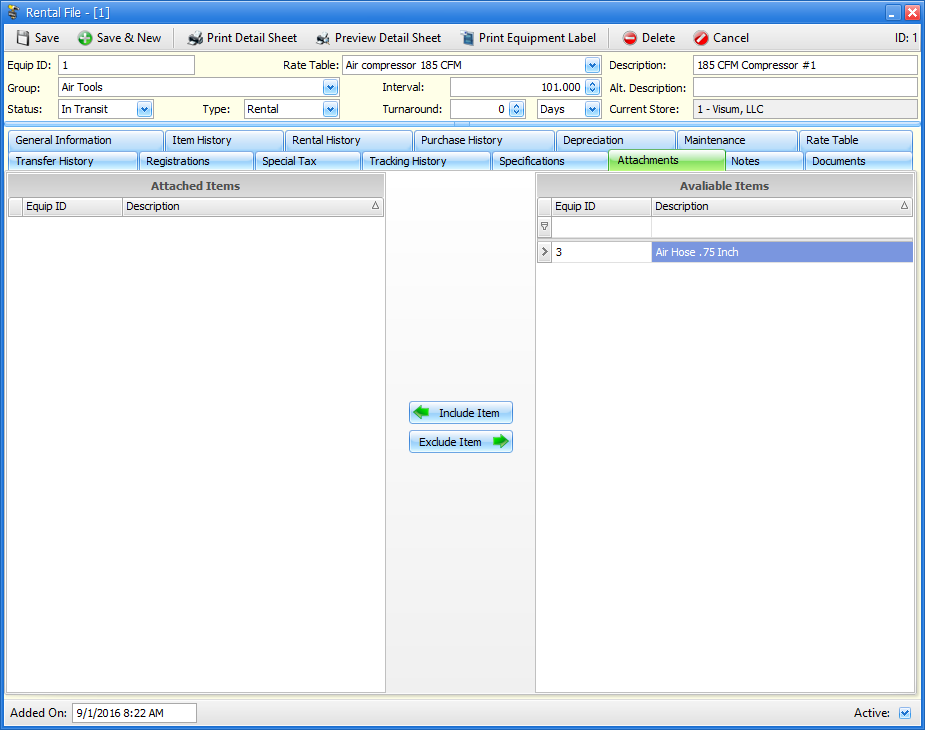
Use this screen to "attach" rental items that were set up as attachments to this item. You do this by double clicking on the appropriate attachment on the right side of the attachment screen or by clicking on the appropriate item and clicking on the Include Item button. When you rent this item, any "attached" items will also be added to the order at the same time that this item is added to the order. |
Notes may be added to rental item records. These notes are for internal purposes only.
|
You may attach documents (PDF, DOC, etc) to rental items to refer back to later. Works great for Invoices, permits, registrations, and so on. |