Customers

Contents
6-2 from the main menu
Customers can be added at the time of rental by using an ID Scanner or manually entering customer information. You can also enter customers by directly accessing the customer file, which will be discussed in this topic. FocalPoint provides a "Cash Customer" record as customer #1. This is the customer that the system uses for "sales only" transactions where the actual customer name is not necessary. The decision as to which customer is THE cash customer is set in the Store Manager File, Setup Tab.
You may not create RENTAL transactions for the designated cash customer. This is the customer record that is automatically selected during a a Sales Only order when "Use Cash Customer" is selected upon starting that sale. This customer is also the only customer that is used for "Quick Sales" and "Quick Credits".
A short video on the customer file may be viewed here. Customer file functionality is below the video.

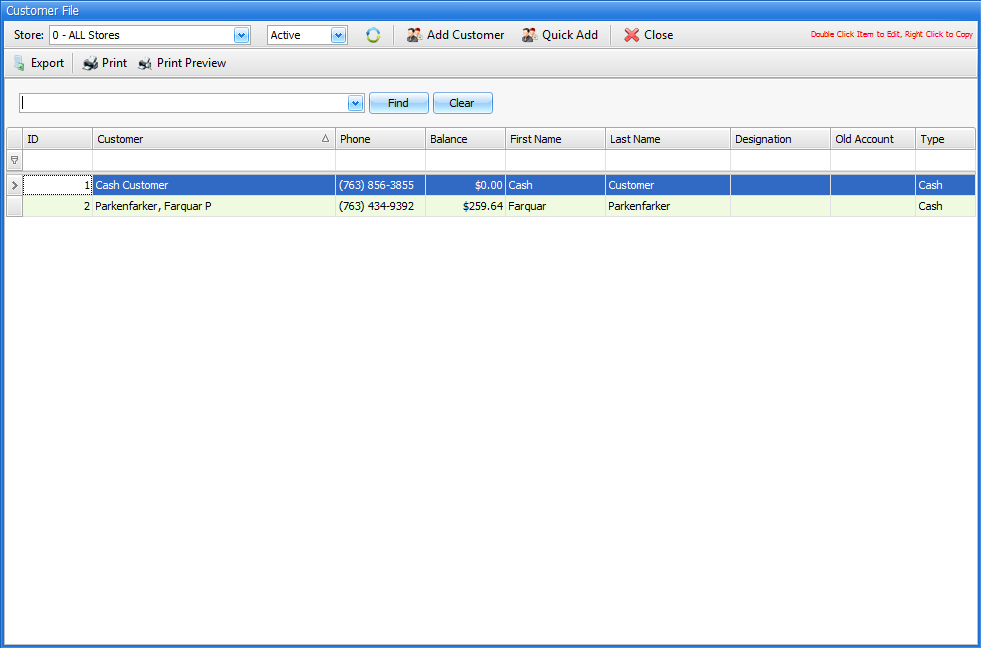
When you first go the the customer file, you will be presented with a list screen. The list screen will show you the customer's number and name, phone number, the customer's balance, first and last name, designation, old account number, and type in the customer record. Please note that the customers balance may not be current if there has been recent activity with the customer. These balances are reset overnight.
You may double click on a record to open it, or right click->open to open a record. You may also copy a record by right clicking on it.
Different areas of this list screen are:
Store
You can choose to display all customers or only those that "belong to" a certain store.
Active/De-Active/All
In the upper left corner, you may choose to see "active", "de-activated" or "all" records. If you choose "All", the far-right "Active" column in the list will be visible, otherwise this "Active" column will not be visible.
Add Customer
Click on this button to add a new customer
Quick Add
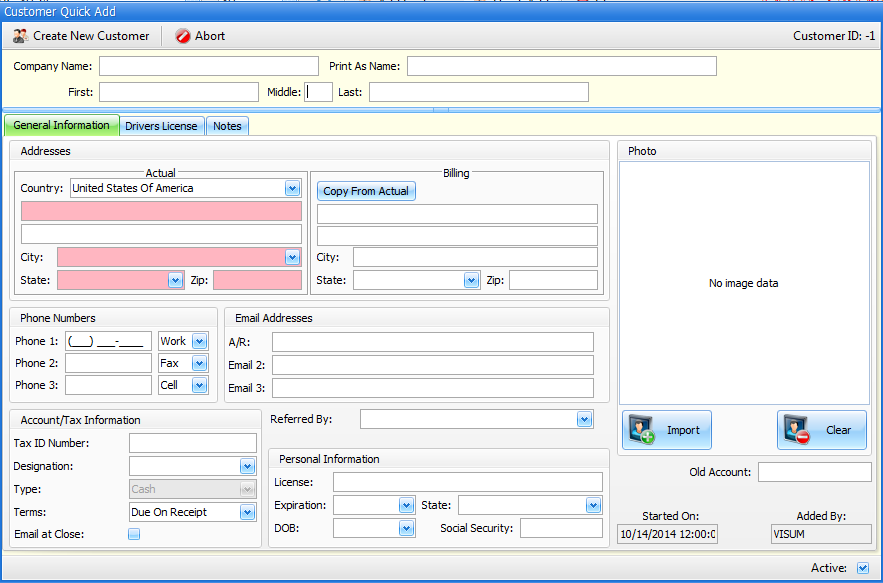
Use this function to add a customer, but only fill in the most important fields.
Click here to see customer quick add screen.
|
Wild card search function
The field to the left of the Find and Clear buttons will search for any string of characters in any of the columns on the screen. It is an interactive search, meaning the results will be displayed as you type.
Column Search Fields
The blank field on top of each column can be used to search for results within the appropriate column. This search function looks for matches based on the start of the string of characters. For example, if you were searching for the word "smith", typing "smi" would help you find results, but "ith" would not
Column headings functions
•If you left click on a heading, the records in the column will sort ascending or descending (alternating with each left click)
•If you right click on a column, you will be presented with options to:
oSort Ascending
oSort Descending
oClear Sorting
oGroup By This Column
oShow Group By Box
oRemove This Column
oChoose Which Columns to Display
oBest Fit THIS Column
oBest Fit ALL Columns
oFilter Results in this Field using 13 methods (Equals, Does Not Equal, Greater Than, Less Than, etc.)
oHide the Auto Filter Row
•If you "hover" over the column heading, a tiny filter will show in the upper right corner of the column name, where you can then filter the column based on real time results of the column
Export
Click on this button to export the current list of customers on the list screen to a screen that can generate an Excel spreadsheet.
Click on this button to print a list of customers that resembles the current list screen. You will be prompted for a printer before the list prints.
Print Preview
Click on this button to preview a list of customers that resembles the current list screen. From the preview screen you can print the list, email it, or create a PDF.
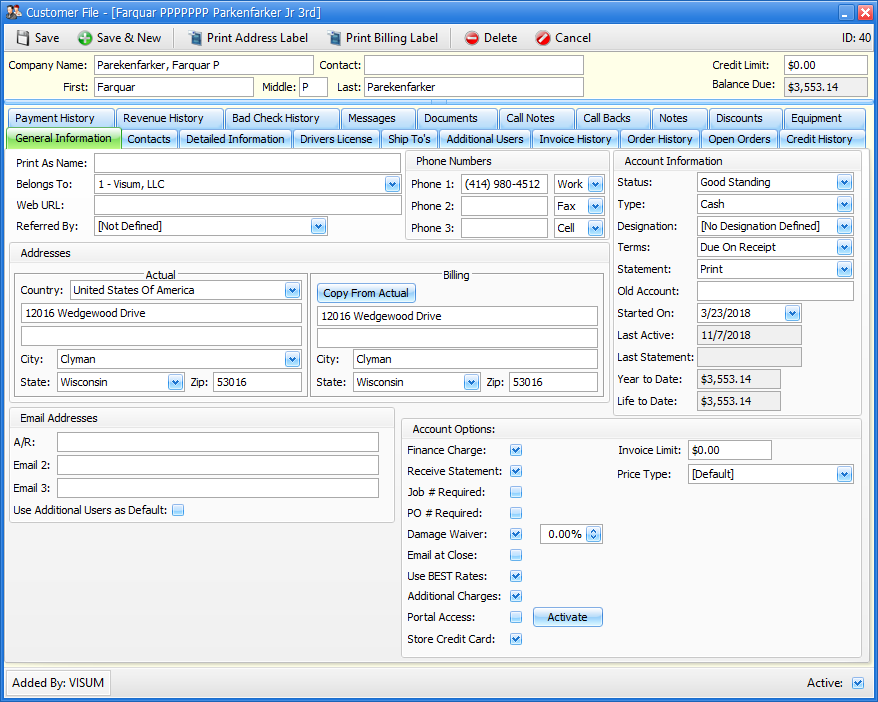
Individual Customer Records
Once you see the customer on the list screen that you are searching for, double click on the customer to enter the customer record. If you are adding a new customer, click on the "Add New Customer" button, and you will be directed to a blank customer record. Across the top of the customer you open (or the blank customer record if you are adding a new customer), you will always see:

Save
Click to save a new customer or save changes to an existing customer
Save & New
Click to save a new customer or save changes to an existing customer, then begin again
Print Address Label
Print an address label on an Avery 5160 label using the actual address
Print Billing Label
Print an address label on an Avery 5160 label using the actual address
Delete
You can delete a customer with no activity
Cancel
Cancel your new customer addition or changes you made to an existing customer
ID
This is an auto assigned system number that cannot be modified.
Company Name
If the customer is a company, enter the company name here. Otherwise, TAB to the First, MI, Last Name fields. Once the First, MI and Last Name are entered, The Company Name will default to the First, MI, and Last Name. The defaulted text can always be changed to adhere to your processes or procedures.
Contact
Use this field to store a contact name for this customer
First Name, MI, and Last Name
Enter the First, Middle Initial (optional), and Last Name of the customer.
Try this:
For a customer that is not a "company", leave the company name blank. Enter the first name, middle name (optional) and last name, pressing TAB after each entry. Once you TAB out of the last name field, the company name will be filled in with the customers first and last name (or last name, first name, depending on how you set the field named "Store Customer by Last Name, First Name" field in the store manager file.
Credit Limit
A credit limit set for a customer (other than ZERO) will prompt a message to come up during transactions if the customer's balance has exceeded the customer's credit limit.
Balance Due
The current balance of the customer
There are several "tabs" within in the Customer File. The tabs are listed below. Expand any section to learn more about the fields in the related tab.
Print As Name If you or your customer want a different name to print other than the Company Name or First and Last Name, enter this text here.
Belongs to This field will default to the store you are in while adding the customer. There are some reports that allow you to see customers information based on what store the customer "belongs to". With respect to invoices, credits, etc, the store that the transaction belongs to controls the financial aspects, not the store that the customer belongs to.
Web URL Enter the website address for the customer in this field. You may click on the entered text to go directly to the website entered.
Start Date Represents that date that the customer was added to FocalPoint
Referred By Select a choice from the drop down. Choices for this field are set up in the "Customer Found Type" file, 6-9-D from the main menu. Phone Numbers and TypesFocalPoint allows up to three phone numbers for a customer. Begin typing the phone number, and do not enter any punctuation, as FocalPoint will enter that for you. Area codes may be ignored, but this is not preferred. Choose from the available phone number types from the drop down list.
Addresses
Country The country will default to the USA. Canada is the other option. You may set up your own in the Country file, 3-3 from the main menu. If you choose any country other the USA, the address/city/state fields will change to be three lines of free form lines that you may fill in as you need to.
Address Information - Actual Enter information for the address lines, and press TAB to advance to the next field. Upon entering a Zip Code and press TAB, the city and state will pre-fill for you. If there is more than one city associated with this Zip Code, a drop down list will be presented to allow you to choose the correct city. You may override the city and state that has been defaulted.
Address Information - Billing Either click on the Copy from Actual button or enter information for the address lines, and press TAB to advance to the next field. Upon entering a Zip Code and press TAB, the city and state will pre-fill for you. If there is more than one city associated with this Zip Code, a drop down list will be presented to allow you to choose the correct city. You may override the city and state that has been defaulted.
Email Addresses
Email Addresses Enter the email address for the customer in this field. The A/R email address will be used when emailing contracts and invoices to the customer, but this field can also be clicked to invoke your Windows default email program to send the customer an email. The other two email addresses can be selected in certain email dialog boxes when attempting to email orders, work orders, or credits from FocalPoint.
Use Additional Users as Default On an outgoing email instead of using the email address of the customer as the default email it uses the email address of the additional user. Examples:
Emailing orders•If this box is checked - if the order has an additional user selected, and if this additional user has an email address, it will default to go to the additional user email address. •If this box is checked - If the additional user does not have an email address, we default to the A/R email address in the customer file. •If the box is not checked – Regardless of the email address of any additional user being used, we default to the A/R email address in the customer file.
Emailing creditsThere is no additional user option for credits, so we default to the A/R email address in the customer file.
E-mailing work ordersThere is no additional user option for work orders, so we default to the A/R email address in the customer file.
E-Mailing StatementsThere is no additional user option for statements, so we default to the A/R email address in the customer file.
Account Information
Status Use the drop down list to select the status for the customer. The five options are: •Good Standing (G) - You can create rental and sales invoices for this customer. •On Hold (B) - You cannot create rental or sales invoices for this customer. •Light Hold (L) - You can create an invoice for a customer, but you will need to know the "Light" password in order to do so. This password is located in Store Manager File, in the Setup Tab. •Heavy Hold (H) - You can create an invoice for a customer, but you will need to know the "Heavy" password in order to do so. This password is located in Store Manager File, in the Setup Tab. •Dormant Account - If you have your store manager file set up to change customers to "dormant" after X number of days of inactivity, the status of the customer will change to Dormant Account. •In Collection
Type Select Charge or Cash from the drop down list. Open and Miscellaneous options are reserved for future functionality.
Designation The designation refers to "kinds" of customer, like "Homeowner" or "Contractor". Designations can be set up in the Customer Type File, 6-9-9 from the main menu.
Terms Use the drop down list to select the terms for the customer. Terms are set up in the Terms Codes File, 6-9-6 from the main menu.
Statement (Type) Use the drop down list to choose by default the type of statement the customer should receive.
Old Account Number Use this field to store an account number from your prior rental software package if desired. You can search for a customer using this field when creating an order.
Started On This date represents the day the customer became a customer
Last Active This date represents the last active date for the customer.
Last Statement This date represents the last date a statement was created for this customer
Year To Date This field represents the Year To Date dollar amount for the customer.
Life To Date This field represents the Life to Date dollar amount for the customer.
Account OptionsFinance Charge Enable this field if the customer is eligible for finance charges when you Create Service Charges. Finance charge percentages are set up in the Terms Code File.
Receive Statements Enable this field if the customer should receive statements when you create statements.
Job # Required Enable this field if the customer requires that all contracts and sales invoices have the customers Job # on the document. If this field is enabled, you will not be able to save a contract or sales invoice without this field populated on the rental contract or sales invoice.
PO # Required Enable this field you the customer requires that all contracts and sales invoices have the customers PO # on the document. If this field is enabled, you will not be able to save a contract or sales invoice without this field populated on the rental contract or sales invoice.
Damage Waiver Enable this field if the customer should automatically have damage waivers calculated on rental contracts.
Damage Waiver Percent Most often, your customers will adhere to the damage waiver set up in the store manager file. However, you may set up different damage waiver percentages for different customers using this field.
Email at Close If the customer should receive an email of an invoice at the time the invoice is created, enable this field.
Use Best Rates Used in conjunction with best rate functionality set up in the Store Manager File, "Use Best Rates By Customer" in the Hours Tab, and the fields on Setup 2 Tab of the Store Manager File labeled "Divide Week Rate By 'X' For New Day Charge (If Out Over 1 Week) and "Divide Month Rate By 'X' For New Day Charge (If Out Over 1 Month)"
Additional Charges Enable this check box if this customer should be eligible for any additional charges set up in the additional charges file, 3-G from the main menu
Portal Access and Activate button Check this check-box if this customer's information should be synchronized with the FocalPoint Customer Portal (for more information about this, call Visum)
Click on the Activate button after checking the Portal Access check-box. This will initiate the synchronization.
Active You cannot delete customers in FocalPoint. If a customer is no longer valid, make the customer inactive by un-checking the active flag. By not allowing you to delete customers, FocalPoint is able to retain full transaction history for the life of the system.
|
|
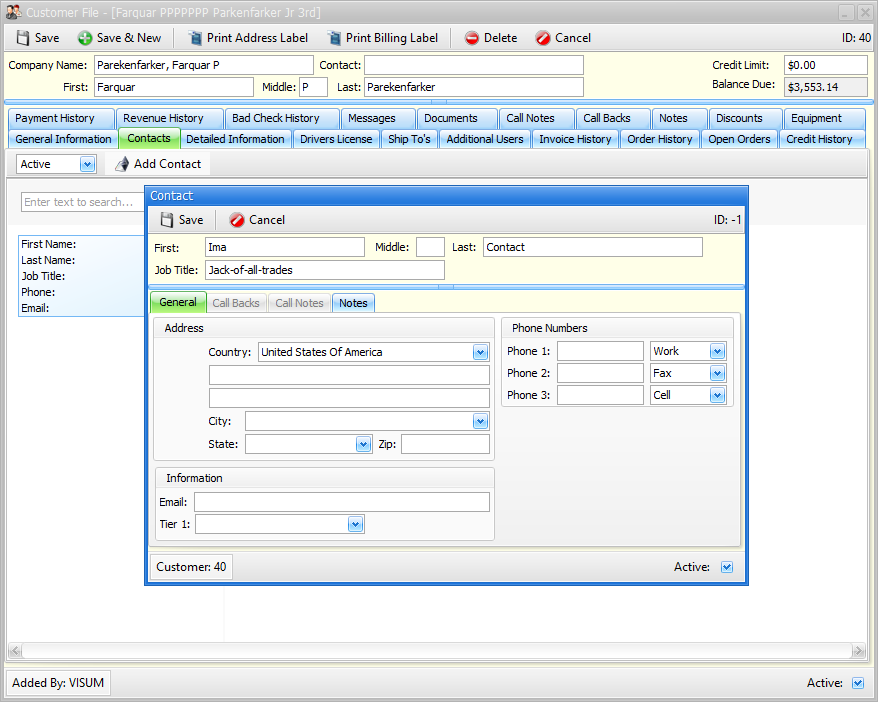
The customer contact tab allows you to add as many contacts as you would like for your customer. These contacts are for internal purposes only.
|
Personal Information
Driver's License Number, Expiration and State Enter the driver's license number, expiration date and the state as needed. If you are using a driver's license scanner, these fields will be filled in for you automatically.
DOB (Birth Date) Enter the birthday of the customer if desired.
Social Security Number Enter the social security number of the customer if desired.
Sales Split
Salespersons You may assign up to two salespeople to a customer. Use the drop down list to select the appropriate salesperson. Salespeople are set up in the Salesperson File.
Salesperson Split % This field is reserved for future use.
Insurance Information
Insurance Companies You may store up to three insurance companies that insure your customer. These insurance companies are stored in the Insurance File.
Insurance Expiration Dates You may enter an insurance expiration date related to each of the insurance companies. This is usually used for tracking General Liability and Physical Damage Coverage for a customer, which may or may not determine the customer's damage waiver eligibility.
Insurance Exp Date Notify Flag For each of the Insurance Expiration Dates, if the counter should be notified when one of the expiration dates has been reached or exceeded, enable these fields appropriately.
Pricing Discounts
Rental Percent If the customer always receives a percentage discount on ALL rentals, you may adjust this field to reflect the automatic discount. By default, this field is set to 100%, indicating "100%". Changing this field to 90% would automatically calculate all rental charges at 90% of the normal rates. Changing this field to 110% would calculate all rental charges at 110% of normal rates. You may set up more structured discounting for customers in the Discounts Setup file.
Merchandise Percent If the customer always received a percentage discount on ALL merchandise sales, you may adjust this field to reflect the automatic discount. By default, this field is set to "1", indication "100%". Changing this field to 90% would automatically calculate all merchandise charges at 90% of the normal prices. Changing this field to 110% would calculate all merchandise charges at 110% of normal prices. You may set up more structured discounting for customers in the Discounts Setup file.
What about mark-ups over cost for employees? If you have a policy in place that offers something like "10% over cost" for employees, set up your employees as customers and use the Use Merchandise Cost field. For example, if you put 110% in the merchandise percent field, and check the Use Merchandise Cost check box, the customer will be charged 110% of the cost of the item. Likewise, changing the Merchandise Percent field to 90% with the Use Merchandise Cost check box enabled would cause FocalPoint to calculate the selling price of the item at 90% of cost (which would be 10% below cost).
Monthly BillingMonthly Billing Bill Cycle For this customer, you may enter the number of days that should be billed for on a monthly invoice. If this field is blank, then the defaults set in the Store Manager File on the Hours Fields Tab.
Monthly Billing Days for First Bill For this customer, enter the number of days that should pass before the first monthly invoice for a rental contract should automatically be created, or should be available for monthly billing if you manually monthly bill contracts. If this field is blank, then the defaults set in the Store Manager File on the Hours Fields Tab.
Monthly Billing Days for Succeeding Bills For this customer, enter the number of days that should pass before the invoices after first monthly invoice for a rental contract should automatically be created, or should be available for monthly billing if you manually monthly bill contracts. If this field is blank, then the defaults set in the Store Manager File on the Hours Fields Tab.
Click here for more information on how billing cycle settings work with cycle bills
Tax Information
ID Number (Resale/Tax Exempt #) If the customer is tax exempt, you may use this field to record the customers state issued tax exempt number. The exisitence of any characters in this field will default the customer to "tax exempt" when creating rental contracts or sales invoices.
Expiration Enter the expiration of the tax exempt number as needed.
Type If you are in a state where you are required to track tax exempt customers by tax type (Agricultural, Governent, Religeous, etc), you may use this field to assign a tax type to the customer. Tax Types are set up in the Customer Tax Type file.
Code If the customer has a customer specific tax set up in the tax code file, use this field to assign the tax code to this customer. Under most circumstances this field should be left BLANK. When creating a rental or sale transaction, the default tax code in the store manager file will be used.
Special Tax Exempt If a customer is only tax exempt on certain rental items, then check the “special tax exempt” check box on this screen, along with a “special tax exempt” check box in the appropriate merchandise or rental record that the customer does not have to pay tax on.
Photo
Picture of Customer You may add a picture of the customer manually using the Import button or remove a picture by using the Clear button here. Normally, the picture of the customer is obtained through the front counter using a drivers license scanner, but the customer's picture may be maintained directly in this file as well.
|

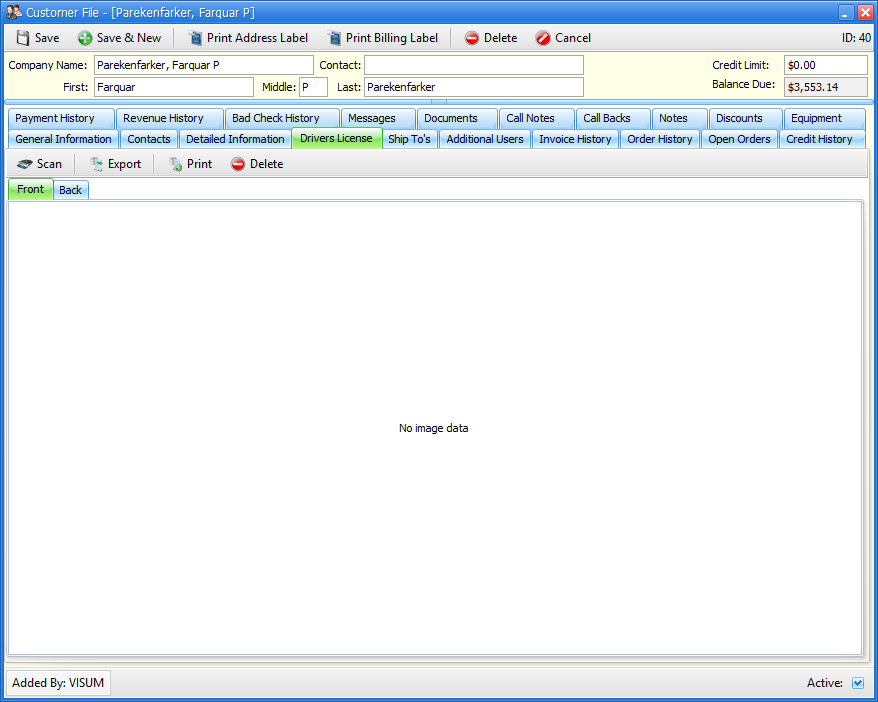
Typically you will be scanning driver's licenses at the front counter, and these scans will be stored with the customer record. You can, however, also scan a driver's license while in the customer file.
Scan Press this button to initiate the scan process. This scan process is identical to the scanning process in the front counter area
Export Use this function to export an image to a graphic file. Typcially this function is only used for troubleshooting, where Card Scanning Solutions (the manufacturer of the driver's lIcense scanner has requested a scan for analysis.
Use this function to print a driver's license
Delete Use this function to delete a previously captured driver's license
|
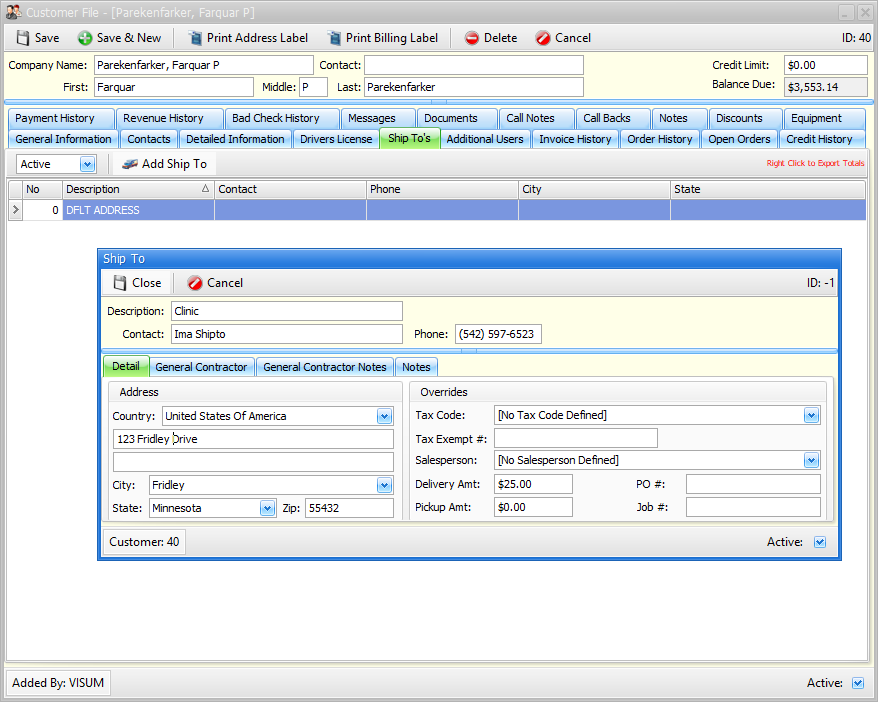
Ship to records may be added directly from a rental contract, but may also be added or maintained in the customer file.
From the list screen, you may double click on any existing ship to record. The Add Ship To button will allow you to add a new ship to record from this screen. If you RIGHT CLICK on a ship to record you can export totals to generate a screen of activity for a selected Ship To record, which can be exported to Excel and manipulated further.
When you choose to add a ship to record you will be presented with the screen below
Description Describes the ship to location ("Northtown Mall", "Jefferson High School", "John Jacob's House")
Contact Enter the contact name for this ship to location.
Phone The phone number associated with this ship to address.
Address Information Enter the address, Zip Code, City and State for this ship to location. The same functionality with respect to Zip Code/City defaults that exists on the Customer Info Tab in the Customer File exists for these fields also.
Tax Code If the nature of this ship to location should change the default tax code{linkID=376}, enter the tax code here.
Tax Exempt # If the nature of the ship to location for this customer should default the customer to be tax exempt, enter the Tax Exempt information here. The exisitence of any characters in this field will default the customer to "tax exempt" when creating rental contracts or sales invoices.
Salesperson If the salesperson for this ship to location is different from the custome'rs salesperson, use the drop down list to select the salesperson{linkID=383} here.
PO# If this ship to location has a default PO# that should be used every time this ship to location is selected, enter the PO# here.
Job# If this ship to location has a default Job# that should be used every time this ship to location is selected, enter the Job# here.
Delivery Amount You may enter a default delivery amount that for this ship to location in this field.
Active Flag Enable this flag if this ship to location should be available for selecting when creating a rental contract or sales invoice.
Notes Record and internal notes for this ship to location in this field. |
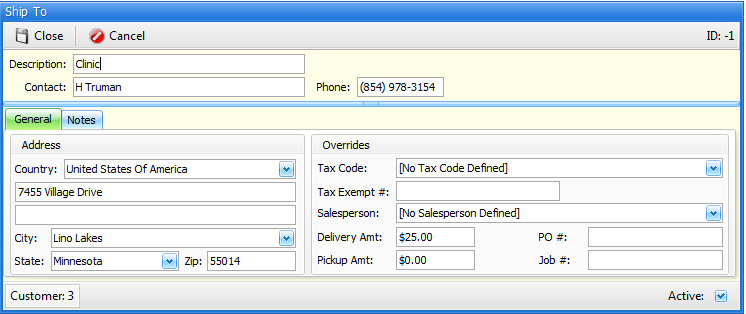
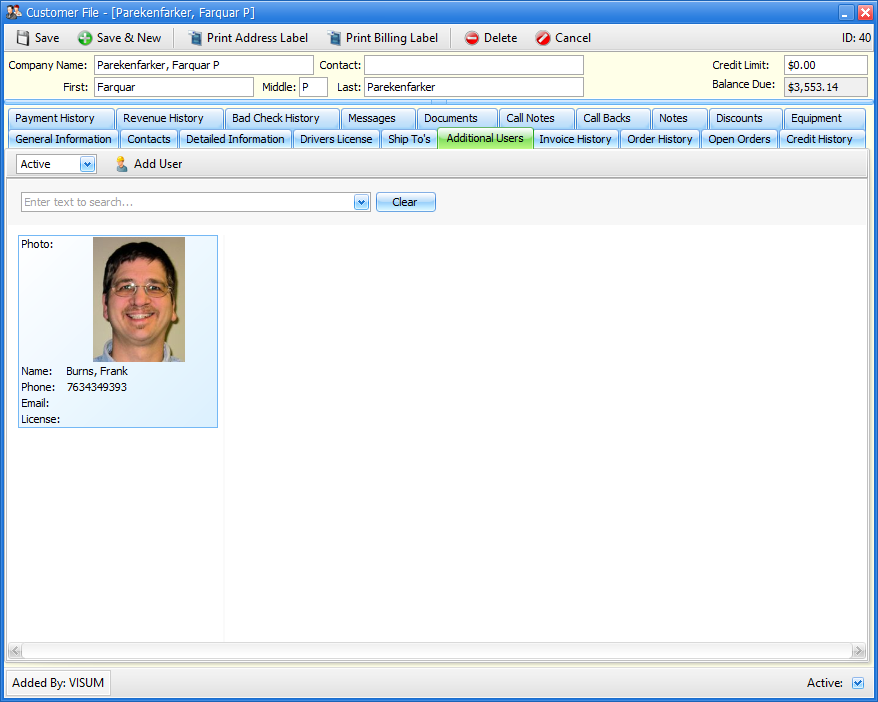
Also known as "Authorized Users", these records may be added directly from a rental contract, but may also be added or maintained in the customer file. Authorized users are by definition people who are authorized to rent or purchase from you on behalf of the customer.
Active/De-Active/All In the upper left corner, you may choose to see "active", "de-activated" or "all" records. If you choose "All", the far-right "Active" column in the list will be visible, otherwise this "Active" column will not be visible.
If you wish to add an authorized user from this screen: (Did you know you can add a new authorized user record right from an order? Just double click in the auth user field on the order, and follow the prompts.)
Click on Add User
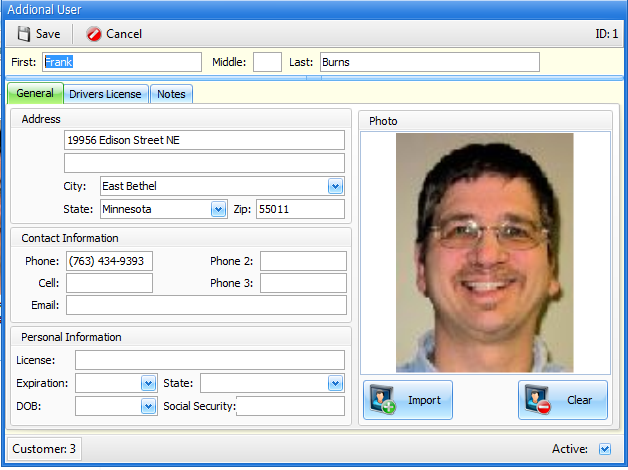
Enter the First, Middle Initial and Last Name (Middle initial is optional). The active flag in the lower right hand corner of the screen must be checked in order for this user to be available for selection.
There are three tabs available when adding a user.
On the General tab:
Address Information Enter the address, Zip Code, City and State for this authorized user. The same functionality with respect to Zip Code/City defaults that exists on the Customer Info Tab in the Customer File exists for these fields also.
Contact Information You have four available phone number fields for the authorized users. Enter the phone number without any punctuation. You also can put in the authorized users email address. If you select this authorized user on an order, and attempt to email the order, the email address for this authorized user will default.
Personal Information As needed, enter the drivers license number and state for this authorized user as well as other information provided. If you add this information with a driver's license scan, this information will be filled in for you.
On the Driver's License TabScan Press this button to initiate the scan process. This scan process is identical to the scanning process in the front counter area
Export Use this function to export an image to a graphic file. Typically this function is only used for troubleshooting, where Card Scanning Solutions (the manufacturer of the driver's lIcense scanner has requested a scan for analysis.
Use this function to print a driver's license
Delete Use this function to delete a previously captured driver's license
On the Notes tabRecord and internal notes for this authorized user in this field.
|
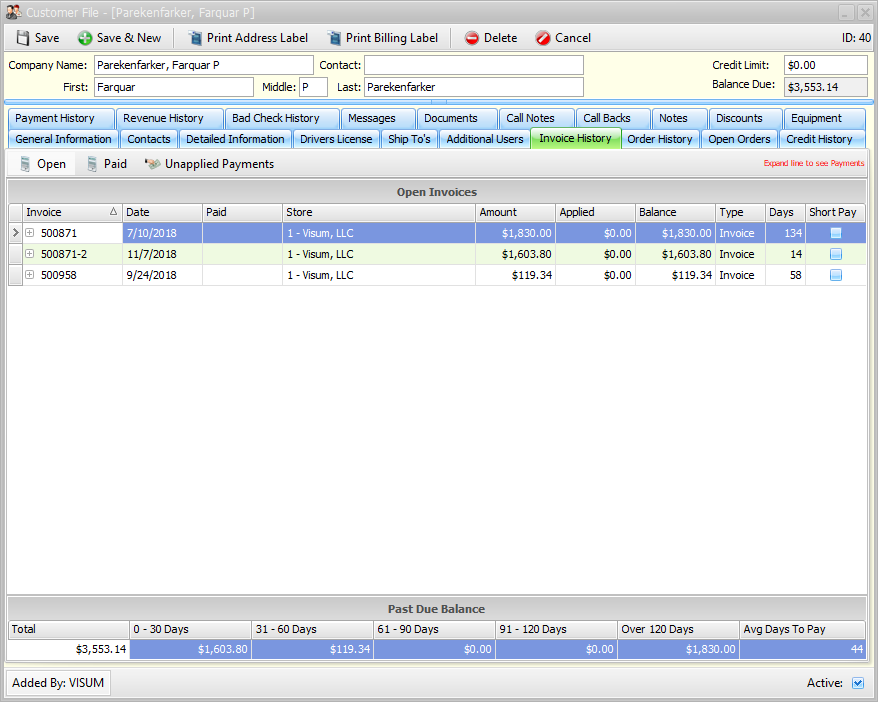
The Invoices History tab reflects ACCOUNTS RECEIVABLE activity for the customer. Upon entering this screen, any open invoices for this customer will show. You may toggle the screens by clicking on Open, Paid, or Unapplied Payments in the upper left corner of the screen. By clicking on a "plus sign" to the left of an invoice, you can see payment information related to the invoice.
The "Unapplied Payments" screen shows any payments or credits that have not been fully applied to invoices.
For a breakdown of how a payment was applied, refer to the Payment History tab within this file.
IF YOU NEED TO REPRINT OR EMAIL A COPY OF AN INVOICE, you can do so from the Order History tab.
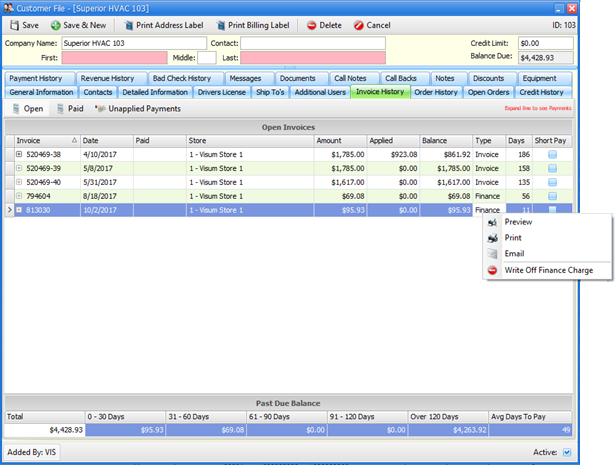
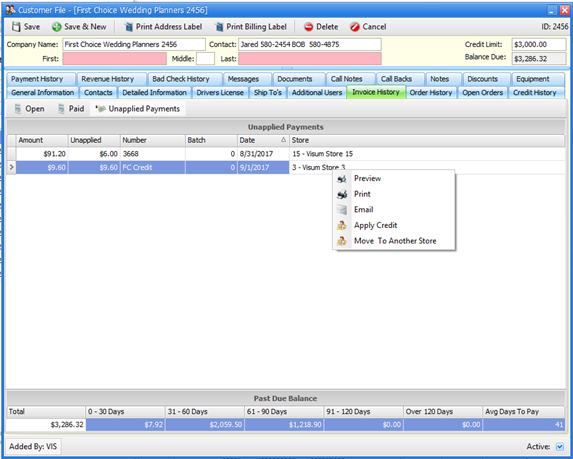
ACCOUNTING FUNCTIONS AVAILABLE IN THIS TAB
The accounting functions Apply Unapplied Credit (6-5-2) and Move Credit By Store (6-5-9) are available for Unapplied Payments and a new function Write Off Finance Charge is available for Open Payments. To use this functionality right click on any item and a menu will be shown with the options that are available for the item chosen. For example in the Open Payments list, if you right click on a Finance Charge item, you will see an option to Write off the Finance Charge.
In the Unapplied Payments list, if an item selected is in the same store that you are logged into, you will see an option to move that item to another store along with the Apply Credit option. If the item dows not belong to the logged in store you would only see the Apply Credit option.
|
 .
.
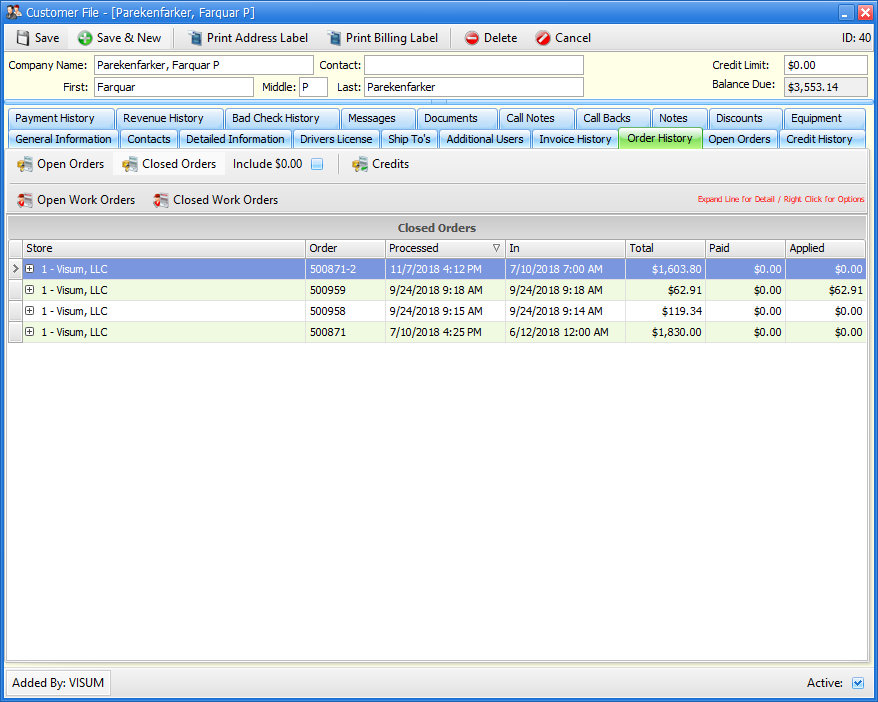
The Order History tab reflects counter activity for this customer. Upon entering this screen, any you will need to click either the "View Open Orders", "View Closed Orders", "View Credits" or "View Work Orders" buttons to find the information you are looking for.
By right-clicking on a record, you may preview, print or email any open order, closed order, credit or work order. Also, right clicking on an open order or closed order record will allow you to see Payment History and Credit History.
If you wish to include orders that were for $0.00, there is a check-box that needs to be enabled in order to see such orders at the top of this screen labeled Include $0.00.
|
This screen presents a list of all open orders for this customer, as well as the items on the order. |
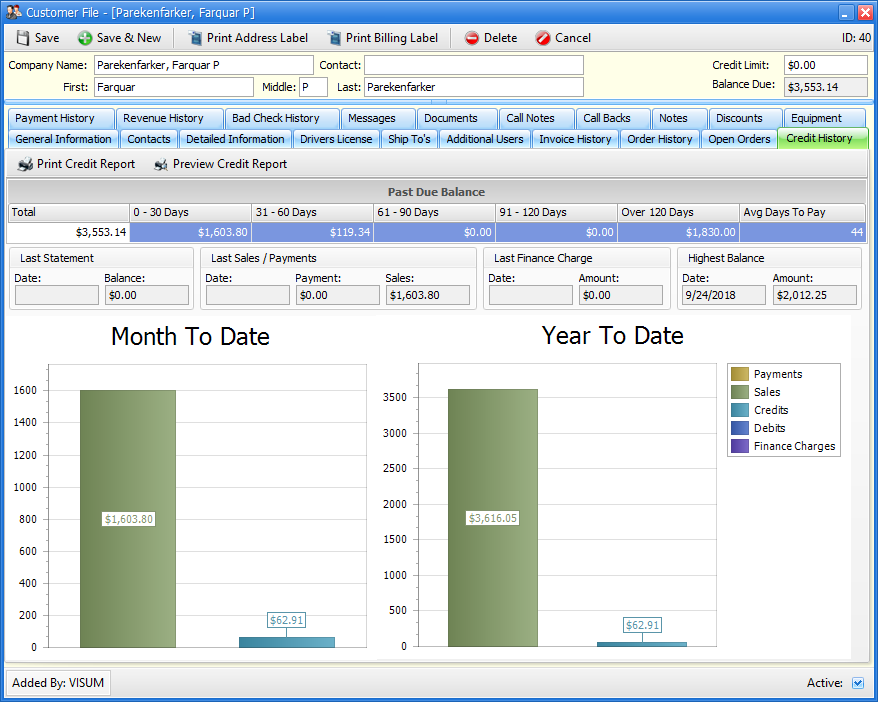
The credit history screen shows most information needed to determine the customers credit worthiness and history. To print or preview a credit report, click the Print Credit Report or Preview Credit Report button at the top of this screen. You will be prompted to choose a printer. Often times this report is used for times when you receive a call from another vendor asking for a "credit reference" for your customer. |
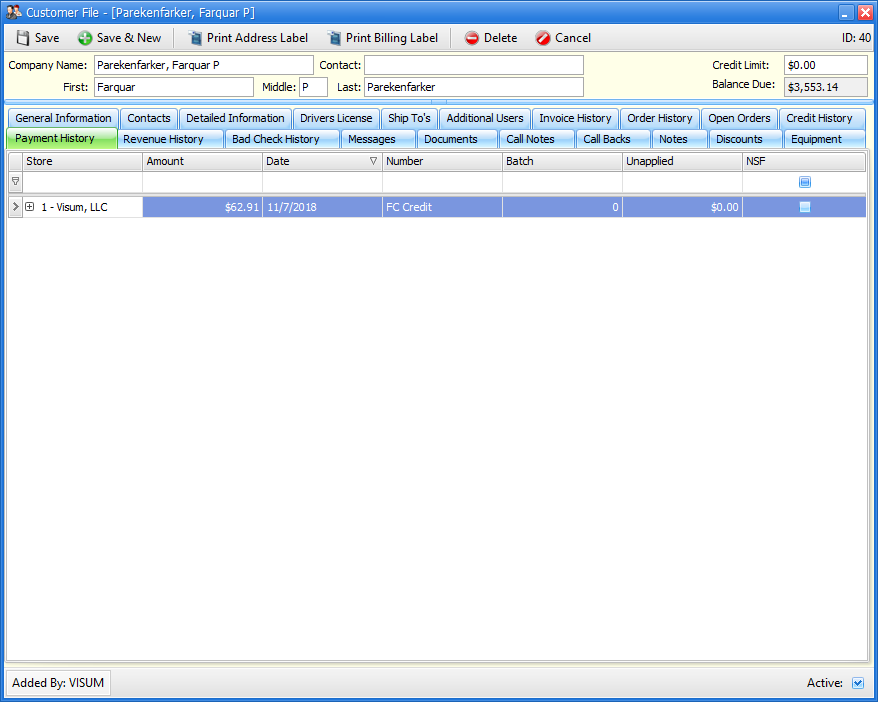
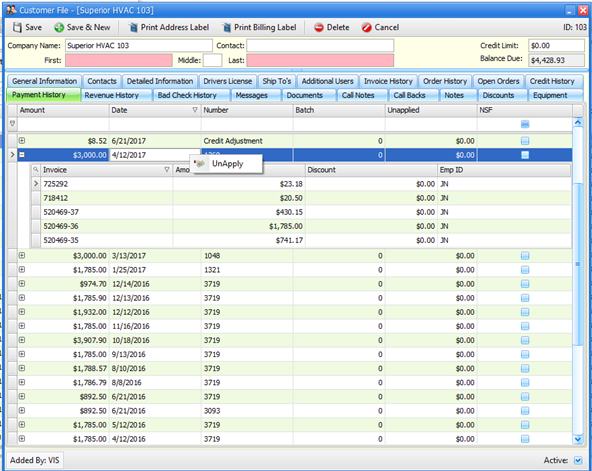
As mentioned in the Invoices/Payment Tab section, this screen is used to see how a payment was applied to one or more invoices. From the list of payments, click on any payment and the invoices that the payment or credit was applied to will below the payment. In the blank fields under the column headings, you may enter text or numbers to search for information within the column. You may also click on the column headings to sort the information on the screen in ascending/descending order.
ACCOUNTING FUNCTIONS AVAILABLE IN THIS TAB
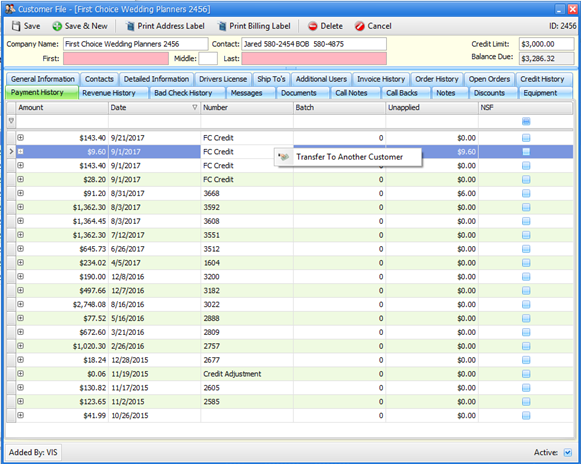
The accounting functions UnApply Payments/Credits (6-5-7) and ReAssign Payment (6-5-8) are available for for selected payment lines. To use this functionality right click on any item and a menu will be shown with the options that are available for the item chosen. For example in order ReAssign a payment to another customer, the Amount and the Unapplied must be the same amount. If they are different amounts. If you right click on such an item you will see the following:
Note that this is the only option that appears because you cannot unapply this payment since the amounts match.
To UnApply a payment, simply select the payment wanted and right click the mouse:
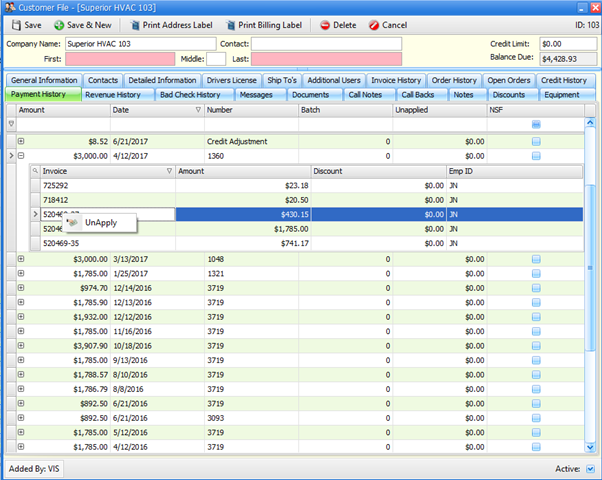
The functionality of UnApply Payments/Credits has been expanded to individual invoices within a payment. If you do not wish to UnApply an entire payment, you may right click on an Invoice and UnApply only that Invoice.
|
|
This list screen shows all bad checks recorded for this customer. For further information about bad checks, see Bad Check Processing. |
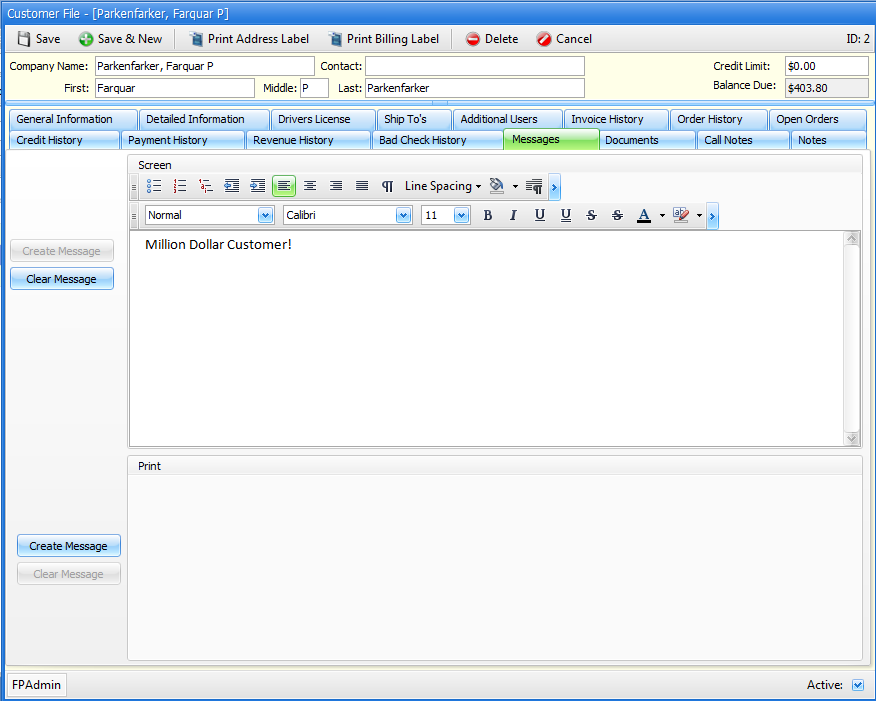
You can set up messages for a customer in FocalPoint that will either show on the screen or print on a contract or invoice for that customer.
To enter a message that should show on screen when a customer is selected for a contract or invoice, click on the Create Message to the left of the screen. Your cursor will then be taken to the Screen Message area and you may type in messages to show on screen. There is no need to "save" after entering messages. Your messages will be saved when you save the customer record.
Likewise, to enter a message that should show on documents for a customer (such as rental contracts and sales invoices), click on the Create Message to the left of the screen. Your cursor will then be taken to the Print Message area and you may type in messages to show on orders. There is no need to "save" after entering messages. Your messages will be saved when you save the customer record. |
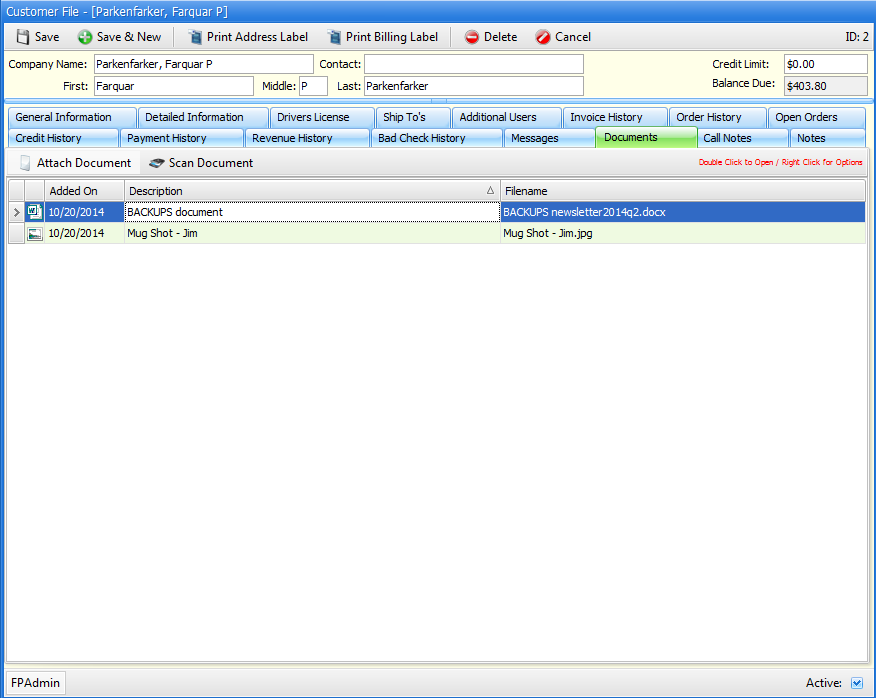
Document can be attached to customers for future reference. When you Attach or Scan a document from your PC, FocalPoint will copy the document to the server so that all FocalPoint workstations can access the document after it has been added. You may also double click on the attached document to view it.
|
Customer Notes functionality is in place to allow you to track conversations or other correspondences that you have had with your customers. Credit collection calls, for example are best stored in the Customer Notes area.
Upon entering this screen, a list of all notes previously entered will appear. You may double click on any line to see additional detail on previously entered notes.
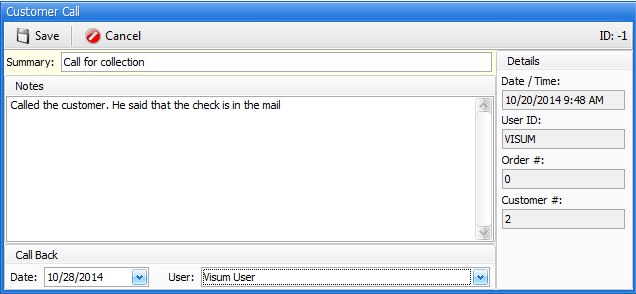
To add new notes, click on the Add Note button in the lower right hand corner of the screen. A new screen will appear with the following fields:
Summary Summarize the note in this field. For the credit collection call example, you may enter something like "Called again for payment", or "Checks in the mail".
Notes Enter details about the call in this field.
Call Back Date Enter the date that the customer should be called back or the note should be reviewed.
Call Back ID Enter the user ID of the person who should call back or review the notes for this customer |
You may enter free-form notes about the customer that are for internal purposes only. These notes will not print anywhere but can be seen from the order if you click on the Edit Customer button from the order header
|
Enter topic text here.