Work Order Counter

Contents
E-2 from the Main Menu
The Work Order counter is where you create, edit, and finish Work Orders for your own items or for customers. You can bill the customer, warranty customer or internally. All of these revenue options (customer/warranty/internal) can be on the same work order or separate work orders, depending on your preferences.
There are two tabs available when you open this screen; "Work Orders" and "Customers". The below help file is related to the "Work Orders" tab. Information about the "Customers" tab can be found here.
A simple work order will normally include an item that you are servicing, parts that are used to repair an item, a technician’s labor expended to repair and item, and possibly a customer. A customer is optional because you might be fixing one of your own rental items, and you are normally not a customer.
In order to use FocalPoint to create simple work orders, then, you would need to set up:
• Technicians in the user file
• Parts in the merchandise file
• Customers in the customer file, and
• Rental items in the rental file
You might also need to set up Customer Owned Items if you repair your customer’s items. Other areas that might need to be set up in FocalPoint include Work Order Messages, Repair Types, Equipment Status’s, and Trucks for dispatching.
When you first enter the Work Order Counter, you are presented with a list screen as shown below. This screen is broken up into sections, defined as follows:
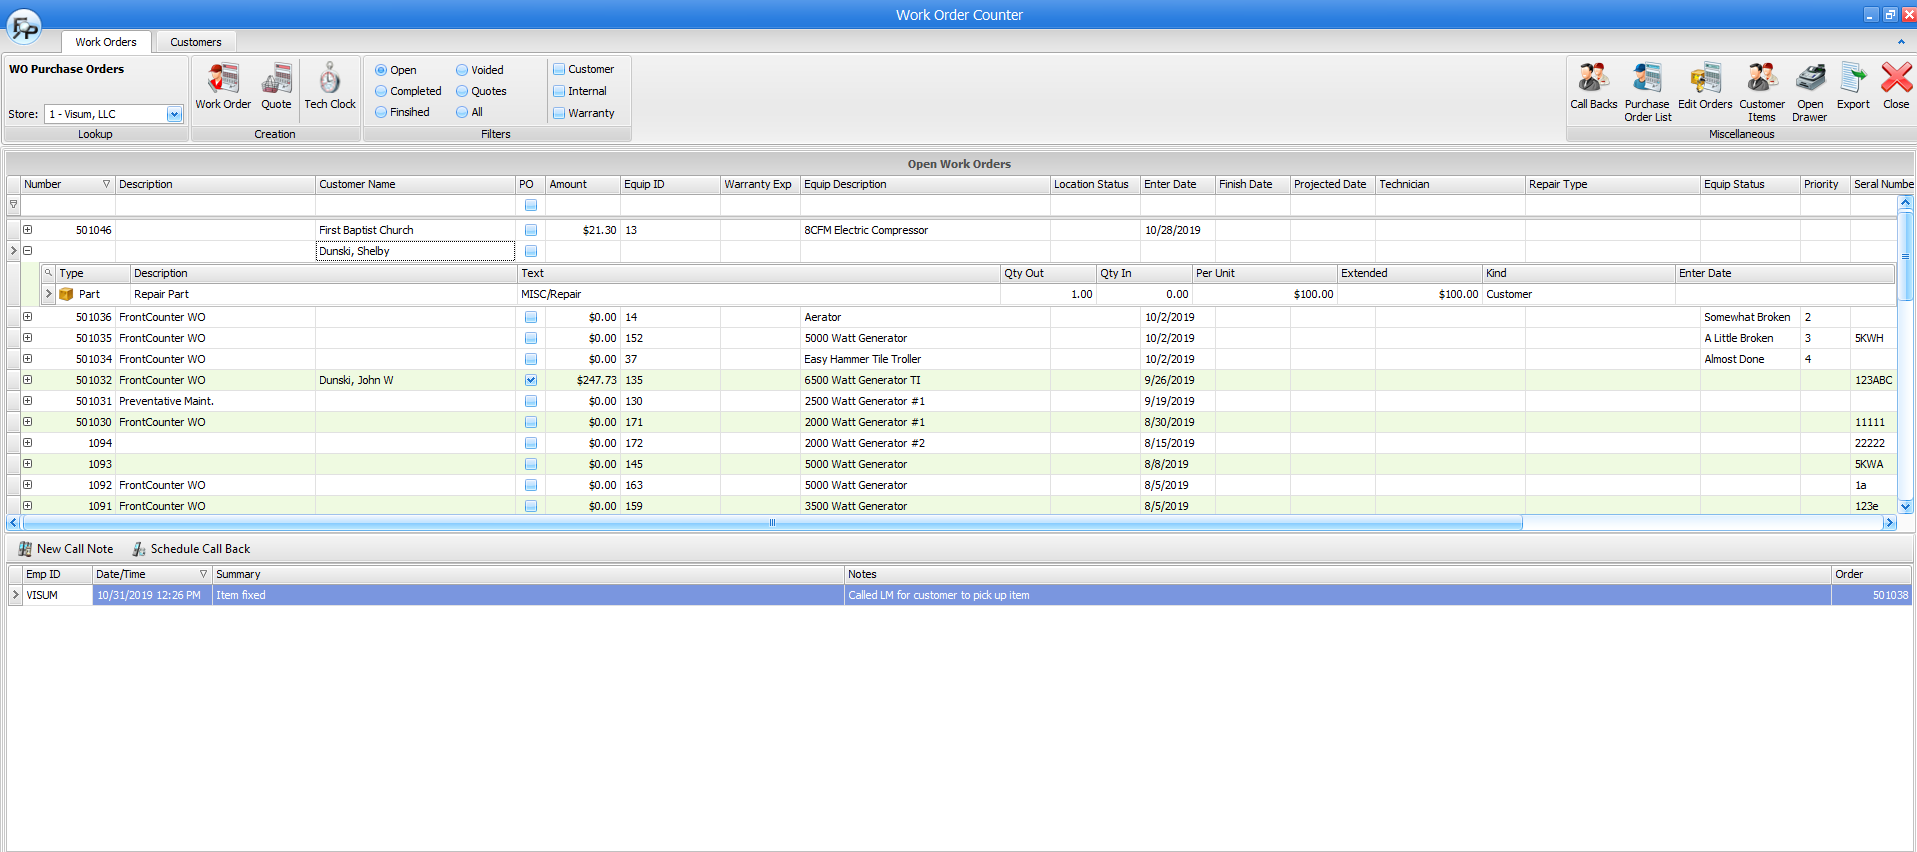
Lookup
From here, you can choose which store's work orders you wish to see.
Creation
Create new work orders or work order quotes
Tech Clock
The Tech Clock allows technicians to "punch in" or "punch out" of any labor line on any open work order. From the list screen, the technician will need to choose a work order and a labor line to use. There is also Tech Clock access from inside of an open work order, where the technician only needs to choose a labor line to use (the work order that the tech is working on is a given, because the tech is in the work order)
Filters
•This section allows you to control what work orders are showing on the primary list screen. You can filter work orders based on their current status, like:
•Open - Open work order that have no completed date.
•Completed - Open work orders that have a completed date
•Finished - Work order is closed.
•Voided - Voided work orders cannot be edited unless reverted
•Quotes - Open work order quotes
•All - All of the above
There is another set of filters that allows you to narrow down the list to only work orders with the following items on them
•Customer
•Internal
•Warranty
Miscellaneous
•See and access a list of open purchase orders related to open work orders
•Access the front counter "Edit Existing" screen for open orders/reservations/quotes
•Access the Customer Items file
•Open the cash drawer
•Export the list screen to a screen from where you can create an xlsx, csv or text file
The work order list screen area
Fun with column headings
(these options are typically available from all list screens in FocalPoint):
•If you left click on a heading, the records in the column will sort ascending or descending (alternating with each left click)
•If you right click on a column, you will be presented with options to:
oSort Ascending
oSort Descending
oClear Sorting
oGroup By This Column
oShow Group By Box
oHide the column - if you hide a column, it will stay hidden for your user ID until you bring it back.
oRemove This Column
oChoose Which Columns to Display - (this is how you bring it back)
oBest Fit THIS Column
oBest Fit ALL Columns
oFilter Results in this Field using 13 methods (Equals, Does Not Equal, Greater Than, Less Than, etc.)
oShow the Find Panel for more robust wildcard searches
oHide the Auto Filter Row
•If you "hover" over the column heading, a tiny filter will show in the upper right corner of the column name, where you can then filter the column based on real time results of the column
Searching
Below each column heading is a blank field that you can use for searching within that column. Searching hints:
•If you start typing in numbers or letters in any of the search fields, FocalPoint will return results for any matches that BEGIN WITH the characters you entered.
•If you precede your search characters with a %, FocalPoint will return results for any matches that CONTAIN the characters you entered.
•Preceding your search characters with an asterisk (*) works the same as preceding your search characters with a percentage sign.
Right Clicking and Double Clicking on a Work Order, and the "plus sign"
Below the blank search field is a list of work order results based on the criteria you've chosen to this point. Double click on any unfinished work order to open it. Right click on any work order to:
•Open - "Read Only" for finished work orders.
•Email - Invokes email dialog box
•View Images - Allows you to see any images you attached to the work order
•Preview
•Pick List Print - Pick lists show the parts needed for the work order
•Pick List Preview
•Repair Ticket Print - Repair tickets show relevant information on the top section, then "lines" in the body for technicians to use for hand written notes.
•Repair Ticket Preview
•Label Print
Clicking on the plus sign next to a work order will reveal the parts and labor currently on the work order.
Work Order List Default and non-default column headings
Effective version 2.54, the change you make to the columns on this and many other list screens will be saved based on your user ID (See "Fun with column Headings" above to learn about the changes you can make).The columns that show on this list screen by default are:
•Number - This is the work order number
•Description - The description that you enter on the work order header screen
•Customer Name - If applicable
•PO check box - If there are any PO's associated with this work order, this check box will be checked
•Amount - The work order total amount
•Equip ID - Either the Equipment ID from the rental file or from the customer item file
•Warranty Exp - Warranty expiration date if applicable
•Equip Description - Description of the item you are working on
•Location Status
•Enter Date - The date that the work order was created
•Finish Date - The date the the work order was finished
•Projected Date - The date that you enter in the Projected Date field on the work order header
•Technician - If applicable, the technician assigned to the work order
•Repair Type - If applicable, the repair type that is selected on the work order
•Equip Status
•Priority
•Serial Number - The serial number of either the rental item or the customer owned item
•VIN - The VIN of either the rental item or customer owned item being repaired
•Driver's License
•Type
Other fields that you can add to this list screen include:
•Rental Bin - The current bin location of the rental item
•Store - The store where the work order was created
•WOCusNo - The customer number of the customer on the work order
•WoItem
•WOStatus
•WOStatusColor
•WOStatusID
Call Notes and Callbacks
New Call Note
If you highlight (single click) on a work order in the list, you can then click on "New Call Note" to add a call note about the work order.The call note fields are as follows:
Summary - A summary of the call. For example "Repairs complete"
Contact - This is a list of contact names from the customer file
Notes - Notes about the call you made. For example "Called the customer to let him know repairs are done. He said he'd be in on Tuesday to pick it up".
Append notes to work order - If you would like the these notes to be added to your work order, check this box.
(there are many other fields on this screen, but they are prefilled for you.
Using this example, you might want to click the "Schedule Callback" button to remind yourself to call your customer if they don't show up on Tuesday as planned. Otherwise, you may also choose "Save" or "Cancel"
Schedule Callback
Subject - Brief description of the callback you will need to make
Contact - A summary of the call. For example "Repairs complete"
User - Who should make the callback
Date / Time - When the callback is scheduled for
Any Time of Day - Can be used with reminders if you have CRM module enabled
Reminder - Can be used with reminders if you have CRM module enabled
Notes - Notes about the callback
In the miscellaneous section of this screen (upper right), you can click on the CallBacks button to see scheduled callbacks. From the callback list, you can double click on a callback, open it, and start a new call note cycle all over again as needed.