Posting Code File

Contents
2 - C from the main menu
Posting codes are internal codes that are assigned general ledger account numbers to give you the ability to track revenue and expenses by a classification other than GL accounts. They are the buffer between your accounting books and your employees. They offer an adaptable method to track revenue and expense without the need for front-line people to have to determine where revenue and expenses should flow from an accounting standpoint. Posting codes are assigned to:
•Certain areas of your Store Manager File to determine defaults when setting up inventory. These defaults can be changed on an item-by-item basis, but a "catch all" is in place in this file.
•Your rental items. Each rental item has a posting code assigned to it. Most often, the same posting code or a few posting codes are used for rental equipment, but you may track revenue as broadly or specifically as you wish by using different posting codes for different items.
•Your merchandise items. Each merchandise item has a posting code assigned to it. Most often, the same posting code or a few posting codes are used for merchandise, but you may track revenue as broadly or specifically as you wish by using different posting codes for different items.
•Your rate tables have posting codes assigned to them so that when you set up a rental item and assign a rate table to the rental item, a default is in place for the rental item's posting code.
•Different payments types (Cash, Check, Visa, etc) may have different posting codes to control which accounts should be affected in your accounting software when payments are received.
•Additional charges, like surcharges, environmental fees, etc, have posting codes assigned to them so that you may track this revenue separately.
•The "Tech ID's" for the technicians in your shop have posting codes assigned to them so that you may track internal/external labor separately.
When FocalPoint is installed, some posting codes are already set up for you.When entering the Posting Code maintenance program, you will see a list of all existing posting codes.
Post Code List Screen Fields
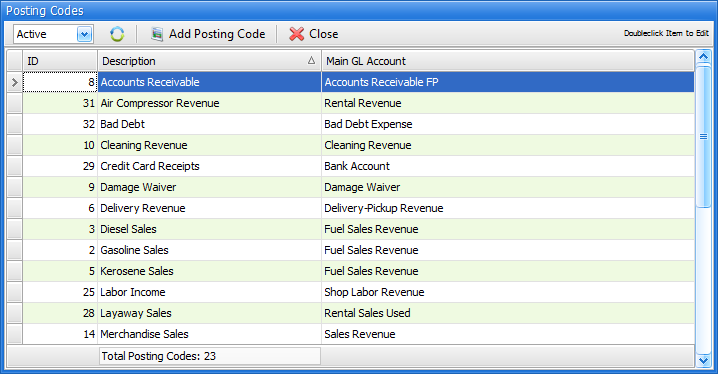
Code ID
This is the posting code number that is used to assign posting codes to Rental Inventory and Merchandise.
Description
This field will be used in reports and exporting functionality.
Main GL Account
This GL Account represents the primary account for the posting code.
Across the top of this screen you can choose to see active or inactive codes, at a posting code, or close out of the screen.
To Add a New Posting Code, click on the "Add Posting Code" button. To edit an existing Posting Code, double click on the posting code in the list. A number of posting codes are already added for you during installation.
Please go through each one as directed below. Afterwards, you are free to add additional posting codes as needed. Please do not de-activate any posting codes from the below list unless instructed to do so. Leaving posting codes active that are not relevant to your company will not harm anything.
•Gasoline Sales - After double clicking on this posting code, use the Main Account drop down to select the Revenue/Income account that should be credited when you sell Gasoline. If you do not sell Gasoline, leave the Main Account blank. Then Exit and Save.
•Diesel Sales - After double clicking on this posting code, use the Main Account drop down to select the Revenue/Income account that should be credited when you sell Diesel Fuel. If you do not sell Gasoline, leave the Main Account blank. Then Exit and Save.
•Propane Sales - After double clicking on this posting code, use the Main Account drop down to select the Revenue/Income account that should be credited when you sell Propane. If you do not sell Gasoline, leave the Main Account blank. Then Exit and Save.
•Kerosene Sales - After double clicking on this posting code, use the Main Account drop down to select the Revenue/Income account that should be credited when you sell Kerosene. If you do not sell Gasoline, leave the Main Account blank. Then Exit and Save.
•Delivery Revenue - After double clicking on this posting code, use the Main Account drop down to select the Revenue/Income account that should be credited when you charge a customer for delivery or pickup. Then Exit and Save.
•Tax Collected - After double clicking on this posting code, use the Main Account drop down to select the Sales Tax Payable - FP Account you set up as instructed in the "General Ledger Accounts" chapter. Then Exit and Save.
•Accounts Receivable - After double clicking on this posting code, use the Main Account drop down to select the Accounts Receivable - FP Account you set up as instructed in the "General Ledger Accounts" chapter. Then Exit and Save.
•Damage Waiver - After double clicking on this posting code, use the Main Account drop down to select the Revenue/Income account that should be credited when you charge a customer for damage waiver. If you do not charge damage waiver, leave this field blank, then Exit and Save.
•Cleaning Revenue - After double clicking on this posting code, use the Main Account drop down to select the Revenue/Income account that should be credited when you charge a customer for cleaning charges. If you do not charge for cleaning charges, leave this field blank, then Exit and Save.
•Unassigned Revenue - After double clicking on this posting code, use the Main Account drop down to select a "Misc Revenue" or "Ask My Accountant" account. Then Exit and Save.
•Receipts - After double clicking on this posting code, use the Main Account drop down to select your cash account, undeposited funds account, or other cash holding account. Also, you will need to fill in a "Deposits Liability" optional account. See the below field definition for an explanation of the Deposits Liability functionality.
•Note: As previously mentioned, you may need to set up a new account in QuickBooks for Deposits Liability ("Money on Open Accounts"). It will be a "Other Current Liability" account.
•Party Rental - After double clicking on this posting code, uncheck the "active" flag, then Exit and Save.
•Merchandise Sales - After double clicking on this posting code, use the Main Account drop down to select a Revenue/Income account that should be credited when you sell merchandise. Also, you may need to fill in Inventory, Purchases/COGS, Work Order Expense and Warranty Expense optional accounts. See below field definitions for explanations of these fields.Then Exit and Save.
•Rental Revenue - After double clicking on this posting code, use the Main Account drop down to select a Revenue/Income account that should be credited when you rent items to your customers. Then Exit and Save.
•Service Charges - After double clicking on this posting code, use the Main Account drop down to select a Revenue/Income account that should be credited when you charge finance charges to your customers. Then Exit and Save.
•Auger Rentals Revenue - After double clicking on this posting code, uncheck the "active" flag, then Exit and Save.
•Balloon Sales - After double clicking on this posting code, uncheck the "active" flag, then Exit and Save.
•Saw Sales - After double clicking on this posting code, uncheck the "active" flag, then Exit and Save.
•Balloon Sales 2 - After double clicking on this posting code, uncheck the "active" flag, then Exit and Save.
•Rental Sales - New - After double clicking on this posting code, use the Main Account drop down to select a Revenue/Income account that should be credited when you sell a previously un-rented (new) piece of rental equipment. Also, you may need to fill in Inventory and Purchases/COGS optional accounts. See below field definitions for explanations of these fields. Then Exit and Save.
•Rental Sales - Used - - After double clicking on this posting code, use the Main Account drop down to select a Revenue/Income account that should be credited when you sell a previously rented (used) piece of rental equipment. Also, you may need to fill in Inventory and Purchases/COGS optional accounts. See below field definitions for explanations of these fields. Then Exit and Save.
•New Merchandise Sales - After double clicking on this posting code, uncheck the "active" flag, then Exit and Save.
•Labor Income - After double clicking on this posting code, use the Main Account drop down to select a Revenue/Income account that should be credited when you bill a customer for labor on a work order. Then Exit and Save.
•Security Deposits - After double clicking on this posting code, uncheck the "active" flag, then Exit and Save.
Once you have finished adjusting the above posting codes, you are free to add new ones as necessary. Please review the field definitions below as needed, then move on to the next section of the setup guide.
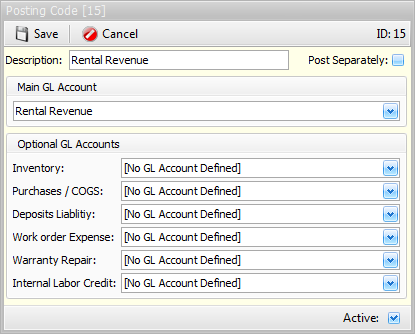
Description
This field will be used in reports and exporting functionality.
Main Account
Assign the Main GL Account Number to this posting code. For most posting codes, this is an easy task. Your Posting Code for Rental Revenue will no doubt have the Rental Revenue GL Account assigned to it. The Posting Code for Cash, which will be assigned in the Payment Types file, would no doubt be assigned a GL Account number representing the GL Account that would be increased when you take a payment (or decreased if you are refunding cash).
The Main Account in the Posting Code file will be affected, by in large, by the type of account it is. In the examples directly above, The GL Account you assign to your Rental Revenue Posting Code will be credited upon creating an invoice. This is because revenue, or income accounts, carry a credit balance by default. Your GL Account for Cash, which carries a debit balance, will be debited when creating an invoice where cash was taken, as Cash is an asset, which carries a debit balance.
Optional Accounts
For many transactions, the optional accounts are not used. For example, if you rent an item for $100, and your customer pays you with a check, the posting codes have already been determined while closing the transaction.
The Main Account of the Posting Code assigned to the rental item will be credited.
The Main Account of the Posting Code assigned to the payment type will be debited.
Focal Point needs no further information to track the revenue for this transaction, and all of the information was stored and dispersed automatically. There are occasions however, where optional accounts will need to be set up to further track information. Examples will be given below each of these fields.
Inventory
This field applies to all posting codes related to INVENTORY.
Used in conjunction with the Purchases/COGS optional account. When you are SELLING merchandise or rental items, you have the option to not only track the revenue information, but also the "cost side" of the equation, then inventory and cost-of-goods-sold (COGS) information. To do this, you must enter the Inventory Account that will be credited (reduced) when you sell inventory. You have the option to NOT track this information via a setting in the Store Manager File, under the Setup 3 Tab, named "Export COGs/ Inventory?"
Purchases/COGS
This field applies to all posting codes related to INVENTORY.
Used in conjunction with the Inventory optional account. When you are SELLING merchandise or rental items, you have the option to not only track the revenue information, but also the COGS information. To do this, you must enter the COGS Account that will be debited when you sell inventory. This is normally an expense account, but you may enter whichever account you want to be debited in this field. You have the option to NOT track this information via a setting in the Store Manager File, under the Setup 3 Tab, named "Export COGs/ Inventory?"
To expand on the Inventory and Purchases/COGS optional accounts, when you sell an item:
The Main Account of the Posting Code assigned to the merchandise item will be credited.
The Main Account of the Posting Code assigned to the payment type will be debited.
The INVENTORY account will be credited with the cost of the sold item.
The PURCHASES/COGS account will be debited with the cost of the sold item.
Deposits Liability
This field applies to all posting codes related to PAYMENT TYPES.
FocalPoint does not recognize revenue until a contract is closed.
To expand on this, please understand that while the revenue is not recognized until the contract is closed, the payment is recognized at the moment you take the payment. To accomplish this, FocalPoint uses a Deposits Liability account to offset the payment when a payment is taken on an open order. From here forward, when you see the words "deposits liability", think to yourself "money on open orders".
Example:
Consider the following example where an order is opened on 11/25 and the estimated amount of an order will be $100. When you close the contract on 11/29 the actual rental charges added up to $50 (trying to keep the example easy here):
When you open an order and take money on 11/25, the following accounts will be affected:
“Cash” - DEBITED $100
“Deposits Liability” – CREDITED $100
If you looked at the export and this was the only transaction that happened 11/25 you would see total debits of $100 and total credits of $100.
When you close the order on 11/29, the following accounts will be affected:
First, FocalPoint will COMPLETELY back out the original entry…
“Cash” – CREDITED $100
“Deposits Liability” – DEBITED $100
(Without completely backing out the original entry and recording the new entry, your accounting software would not be properly updated. This is why there has to be a complete back-out and re-entry.)
At the same time, FocalPoint will record the closed transaction…
“Cash” – DEBITED $50
“Rental Revenue” – CREDITED $50
If you look at the export and this was the only transaction that happened on 11/29, you would see total debits of $150 and total credits of $150.
Sales invoice revenue is typically recognized immediately. But, because you can have OPEN sales orders (for "will call" orders, special orders, etc), the principle described above applies to sales as well.
If the field "Export Front Counter PrePayments As Deposits?" in the Store Manager File, Hours Tab is unchecked, or if this field is left blank, the receipt will not be exported until the contract is closed. This is helpful for some stores that do not deposit checks left by their customers until the contract is closed.
Work Order Expense
This field applies to all posting codes related to inventory.
If you are using a merchandise item for an internal repair, only the Inventory and Work Order Expense accounts will be exported. (there is no revenue on an internal work order).
To recap:
If you sell an item to a customer on a work order, the Inventory/Purchases COGS accounts will be used to record the reduction in the cost of your inventory.
If you use an item on an internal work order, the Inventory/Work Order Expense accounts will be used to record the reduction in the cost of your inventory.
You have the option to NOT track this information via a setting in the Store Manager File, under the Setup 3 Tab, named "Do NOT Export Internal WOs"
Warranty Repair
This field applies to all posting codes related to inventory.
If you are using a merchandise item for an warranty repair, only the Inventory and Warranty Repair accounts will be exported. (there is no revenue on an internal work order).
To recap:
If you sell an item to a customer on a work order, the Inventory/Purchases COGS accounts will be used to record the reduction in the cost of your inventory.
If you use an item on an internal work order, the Inventory/Work Order Expense accounts will be used to record the reduction in the cost of your inventory.
If you use an item on a warranty work order, the Inventory/Warranty Repair accounts will be used to record the reduction in the cost of your inventory.
Again, you have the option to NOT track this information via a setting in the Store Manager File, under the Setup 3 Tab, named "Do NOT Export Internal WOs"
Internal Labor Credit
For Internal Labor on a work order, specify the GL Expense account that should be debited.
Specify the GL Account that should be credited when a work order is created for an item that is being repaired for internal use. The offsetting expense (debit) will be the account specified in the "Work Order Expense" optional account.
To recap:
If you put labor on an internal work order:
The work order expense account will be debited
The Internal Labor Credit account will be credits
Don't want to record Internal Labor Credit? Set it to the same account as the Work Order Expense account.