Merchandise Inventory

Contents
2-3 from the main menu
The merchandise file is where you store all of your merchandise items. Upon entering the merchandise file maintenance program you will be presented with a list screen. This screen shows the Manufacturer, Alternate Description, Part #, Quantity on Hand (based on the store selection in the upper left hand corner of the screen), retail price, SKU, and UPC code.
There are two ways to add new merchandise to the merchandise file. You can click on the Add Item button then be presented with a screen of all of the fields in the merchandise record that you can fill in as needed. Or, you can click on the Quick Add button to be presented with an abbreviated screen of only the most important fields of a merchandise record. Instructions for both methods are below.
A merchandise item consists of a general record and one or more detail records for each store that carries the merchandise item. The general section sets all variables for a merchandise item that are 'global' in nature, like manufacturer, part number, and group. The merchandise detail section is where you can set fields for cost, retail price, and quantity on hand.
In a multi-store environment, if you intend to sell merchandise that you do not normally stock in your store, you should set up the item in your store anyway, and set the quantity to 0. When selling these items, either transfer the necessary inventory to your store prior to creating the contract or invoice, or overbook the item and transfer the inventory afterward. If you do not set up merchandise that is not commonly stocked, the act of transferring merchandise to your store from another store will automatically create a store record for you. You cannot sell merchandise out of a store that you are not located in.

The Merchandise List Screen
You can use this screen to edit a merchandise item by double clicking on the item. You can also add merchandise from this screen or export a list of merchandise items to Excel.
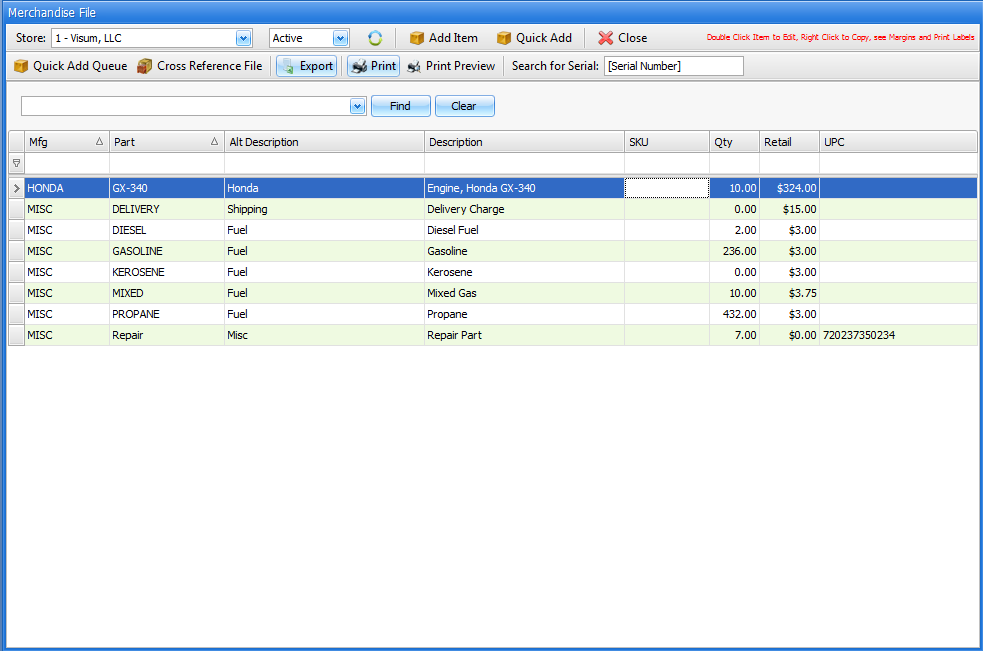
Different areas of this list screen are:
Store
You can choose to display all merchandise or only those that "belong to" a certain store.
Active/De-Active/All
In the upper left corner, you may choose to see "active", "de-activated" or "all" records. If you choose "All", the far-right "Active" column in the list will be visible, otherwise this "Active" column will not be visible.
Add Item
Click on this button to add a new customer
Quick Add
Use this function to add a merchandise item, but only fill in the most important fields. See below section for using Quick Add functionality.
Wild card search function
The field to the left of the Find and Clear buttons will search for any string of characters in any of the columns on the screen. It is an interactive search, meaning the results will be displayed as you type.
Column Search Fields
The blank field on top of each column can be used to search for results within the appropriate column. This search function looks for matches based on the start of the string of characters. For example, if you were searching for the word "smith", typing "smi" would help you find results, but "ith" would not
Column headings functions
•If you left click on a heading, the records in the column will sort ascending or descending (alternating with each left click)
•If you right click on a column, you will be presented with options to:
oSort Ascending
oSort Descending
oClear Sorting
oGroup By This Column
oShow Group By Box
oRemove This Column
oChoose Which Columns to Display
oBest Fit THIS Column
oBest Fit ALL Columns
oFilter Results in this Field using 13 methods (Equals, Does Not Equal, Greater Than, Less Than, etc.)
oHide the Auto Filter Row
•If you "hover" over the column heading, a tiny filter will show in the upper right corner of the column name, where you can then filter the column based on real time results of the column
Export
Click on this button to export the current list of records on the list screen to a screen that can generate an Excel spreadsheet.
Click on this button to print a list of records that resembles the current list screen. You will be prompted for a printer before the list prints.
Print Preview
Click on this button to preview a list of records that resembles the current list screen. From the preview screen you can print the list, email it, or create a PDF.
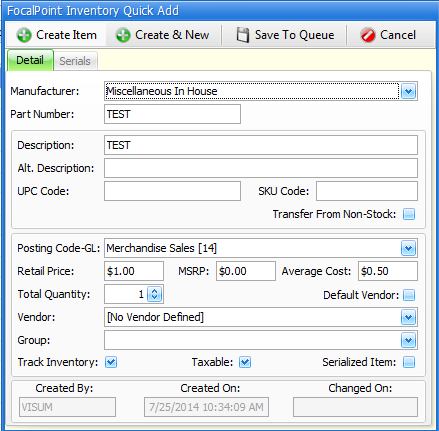
Using the quick add function will allow you to quickly add merchandise by presenting you with only the most common fields needed to add a merchandise item. once you have filled in the appropriate fields on this screen, you may either save the item or save it to a quick add queue, which is like a holding area for new merchandise additions that can be reviewed for consistency and accuracy before actually adding the merchandise items to the merchandise file. the quick add screen and quick add queue screen are shown below. You may hover your mouse over any area on either of these screens to view specific field information.
Create Item Click on this button to immediately save the merchandise item.
Create & New Click here to immediately say if the new item and begin the creation process again.
Save to Queue Click here to save the item to the Quick Add Queue, where the addition can be reviewed for accuracy and consistency before actually adding the item to the merchandise file
There are two TABS in this function. The "Serials" tab is only available if you have flagged this item as a "Serialized Item" using the check box in the lower right-hand area of the Detail screen.
Details
Manufacturer Each merchandise item should have a manufacturer and part number. The appropriate manufacturer for this item. If you need to add a new manufacture, go to the Manufacturer File, 2-8 from the main menu.
Part Number Each merchandise item should have a manufacturer and part number. Enter the part number for this item in this field.
Description / Alt Description There are two description fields for a merchandise item. The first "Description" field can be used for searching and will also be the field that is displayed on transaction documents. The "Alt. Description" field is used for searching purposes only.
UPC Code Enter a UPC code for the merchandise item by scanning a barcode on the merchandise item using a barcode scanner or by typing in the UPC code manually. Please note that all UPC codes must follow the Universal Product Code Standard as explained here:
http://en.wikipedia.org/wiki/Universal_Product_Code
If your Vender does not adhere to this standard or does not provide one, you can generate your own internal UPC within FocalPoint to be used and it will not conflict with an actual product UPC that has been registered with The Global Language of Business. These standards are in place to confirm proper barcode printing within the size restrictions of Price and Bin labels along with increase the reliability of reading UPC codes and preventing duplicate UPC codes being used by multiple vendors.
SKU Code A SKU is another high identifying code that is used in many high - retail or hardware store environments. This field may be used at your discretion.
Transfer from Non-Stock This field is used when transferring nonstock items to your merchandise file. It is not accessible by end-users.
Post Code-GL Select the posting code that will be used for tracking revenue, inventory, and the cost of goods sold information.
Retail Price Enter the retail (selling) price of the item in this field.
MSRP You may use this field to optionally track the suggested retail price from the manufacture for this item.
Average Cost Enter the appropriate average cost for this item in this field.
Total Quantity You may enter a quantity on hand in this field if desired.
Default Vendor If you check the default vendor check box, the vendor you select in the next field will be used for the "Preferred Vendor" in a merchandise record. If you leave this check box unchecked, the vendor you select in the next field will be used for the "Vendor 1" in a merchandise record.
Vendor Select a vendor for this merchandise item. Vendors can be added to FocalPoint via #7 from the main menu.
Group Select a group for this merchandise item. Groups can be added in the Group File, 2-6 from the main menu.
Track inventory Normally this field will be enabled, but for inventory that you do not track inventory on (LP Gas, Safety Sheets, Labor, etc), uncheck the box associated with this option. When you sell this item, the inventory will not be relieved. This field is normally an alternative to setting your quantity level to 99999 so that you don't get overbooked messages.
Taxable If this merchandise item is normally taxable, enable this flag. If the customer you are selling this item to is tax exempt, no tax will be calculated.
Serials
Serialized merchandise records are "whole goods" that are for sale only (like chain saws, for example). If you track serialized items that are normally only SOLD from your merchandise file, enable this field. You will be prompted to add your serial numbers in the "Serials" tab of the screen. Your quantity on hand for this merchandise item will adjust as you add serial numbers..
Serialized merchandise records are "whole goods" that are for sale only (like chain saws, for example). If you track serialized items that are normally only SOLD from your merchandise file, enable this field. You will be prompted to add your serial numbers in the "Serials" tab of the screen. Your quantity on hand for this merchandise item will adjust as you add serial numbers.
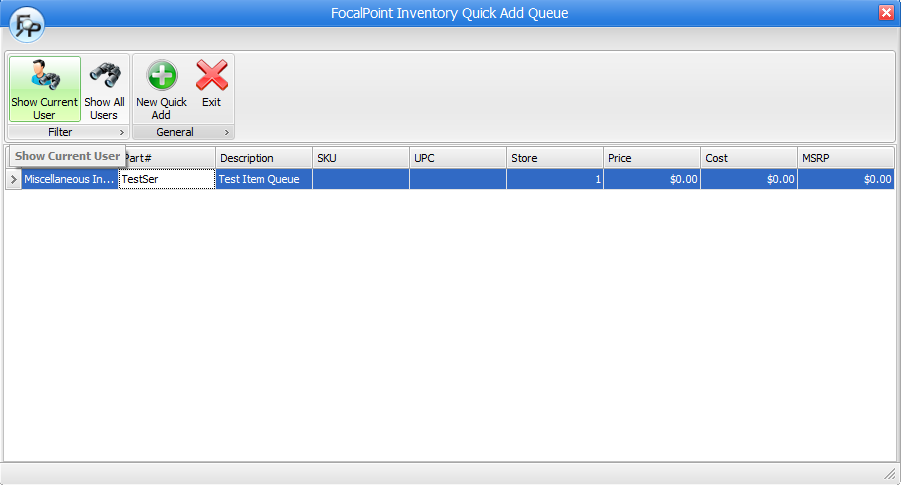
Quick Add Queue
Use the Quick Add Queue as a holding area for new quick add merchandise items to be reviewed for consistency and accuracy before adding the merchandise to the merchandise file.
Show Current User Serialized merchandise records are "whole goods" that are for sale only (like chain saws, for example). If you track serialized items that are normally only SOLD from your merchandise file, enable this field. You will be prompted to add your serial numbers in the "Serials" tab of the screen. Your quantity on hand for this merchandise item will adjust as you add serial numbers.
Show All Users This button will show all items in the queue from all users.
New Quick Add Use this button to create a new merchandise item via "Quick Add".
Quick Add List Screen This list screen will show all of the merchandise items currently in the Quick Add Queue. Double-click on any of these items to modify the item. After you double-click on an item, you can save your work for later, click on a "Create Item" button to move the item from the queue to the merchandise file, cancel your changes, or delete the item from the queue. |

Editing Merchandise Items or Adding Merchandise Items using the conventional method
If you double click on an item from the list screen, or clicked on Add Item from the list screen, you will access the screens below. The merchandise record is broken into several sections, or "tabs", as defined below. This help file has a separate section for each "tab". You may expand any of the sections below (one section for each "tab") to view specific field information.
At the top of all of these screens you can see identifying fields for the merchandise item.

Save
Click here to save your record
Save & New
Click here to save your record and start adding a new record.
Print Bin Label
Click here to print a been label for the merchandise item you have open.
Print Price Label
Click here to print a price label for the merchandise item you have open.
Delete
Click here to delete a merchandise item that has never had any activity associated with it.
Manufacturer
Every merchandise item needs to have a manufacturer assigned to it. You can add manufacturers "on-the-fly" or in the manufacture file, 2-8 from the main menu.
Part Number
Each merchandise item is to have a part number assigned to it. Because of the unique ID in the upper right-hand corner of the screen, you may have identical part numbers in FocalPoint (although having identical manufacturer and part numbers in FocalPoint would be highly unrealistic).
Group
Select the appropriate group from the drop down list that this item belongs to. You can also add a new group from this field, or leave the group field blank (although assigning groups to merchandise item is highly recommended for reporting purposes).
Description / Alt Description
You may enter up to two descriptions for any merchandise item. Either of these descriptions will be searched when searching for merchandise by description. The primary description will show on printed documents.
SKU
If the item you're adding has a SKU assigned to it, you may enter here.
Current UPC
This field will represent the current UPC code of the item. You cannot add or change the UPC code from this field. To add or change a UPC code, you must do so in general tab in the lower right-hand corner.
All UPC codes must follow the Universal Product Code Standard as explained here: http://en.wikipedia.org/wiki/Universal_Product_Code. If your Vender does not adhere to this standard or does not provide one, you can generate your own internal UPC by using the Generate UPC button within FocalPoint to be used and it will not conflict with an actual product UPC that has been registered with The Global Language of Business. These standards are in place to confirm proper barcode printing within the size restrictions of Price and Bin labels along with increase the reliability of reading UPC codes and preventing duplicate UPC codes being used by multiple vendors.
Active
With this flag checked, this item will be available for sale. Otherwise, this item will not appear on any search screens, nor will you be able to put it on a contract or sales invoice.
This tab is used to add or edit general information about an item. You cannot add an item without a Manufacturer, Part # and Description.
Pricing
Current Store Retail This field is not accessible from this screen, rather it is maintained from the Merchandise Detail Screen.
Multi-Store Default Enter the default price that should be used when setting up detail (store) records for this merchandise item. The actual selling price can be changed at any time for any store.
Markup Cost This field is used in conjunction with the Percent of Cost Markup field on this screen. If you enter, for example, 50 in this field and then press TAB, and if the Percent of Cost Markup field is set to something other than 0, the multi-store default price and the retail price in the detail record will change to the Percent of Cost Markup multiplied by 50.
Cost Markup Percent This field is used in conjunction with the MU Cost field. If you enter, for example, 1.5 in this field and then press TAB, if the MU Cost field is set to something other than 0, the multi store default price and the retail price in the detail record will change to the MU Cost multiplied by 1.5 (or 150%).
Margin Enter a number representing your desired margin for this item. If the "Use Margin for Retail" function is enabled (above), the retail price will be recalculated once you TAB out of this field. FocalPoint will calculate the retail prices as 1+(Margin/100)*Cost. For example, if you enter a '75' in this field, then press TAB, if your cost is set to 2.00, your new retail price will be 1.75*2.00, or $3.50.
MSRP You may use this field to optionally track the suggested retail price from the manufacture for this item.
Pricing Levels
You have the ability to set up to 5 "price breaks" in the Merchandise File. Normally the fields would be filled in order of lowest quantity to highest quantity (5, 10, 20, 50, 100, for example). Enter the quantity level that needs to be reached to receive a price break, then enter the adjusted retail price should that quantity level be reached.
Quantity Enter the quantity where the price break will start. For example, if you enter "10", then any quantities of 10 or more sold will adhere to this price level.
Price Break You may either set a price or a discount. This field is to set the price.
Discount You may either set a price or a discount. This field is to set the discount.
Order Options
Re-Order Status You may set this item to be Re-Orders Allowed, Do Not Re-Order, or Canceled.
Order as Type Specify how you would normally buy this item, Single, Case, or Gross quantities.
Order as Quantity If ordering as something other than a single quantity, specify how many are in a case or gross when you order this item.
Order Code Further, you have the ability to specify codes when ordering items other than single quantity. Using this field, specify Can Break, Cannot Break, Rounded, or Surcharge if Broken.
ImageYou can associate an images with this merchandise item by clicking on the Import button and selecting an image from your PC or any network folder. Once the image is selected, FocalPoint will store a copy of the image on the server so that it can be viewed from any PC in FocalPoint in the future.
Item Options
Type Identify this item if it's purpose is to be used for merchandise to be sold (over the counter), a part to be used to repair items (in the shop), or Both, or Miscellaneous.
Track Inventory Normally this field will be enabled, but for inventory that you do not track inventory on (LP Gas, Safety Sheets, Labor, etc), uncheck the box associated with this option. When you sell this item, the inventory will not be relieved. This field is normally an alternative to setting your quantity level to 99999 so that you don't get overbooked messages.
Serialized Item Serialized merchandise records are "whole goods" that are for sale only (like chain saws, for example). If you track serialized items that are normally only SOLD from your merchandise file, enable this field. Afterwards, click on the "See Serial Records" button at the bottom of the screen. Now add all of your individual serial numbers associated with this merchandise item by clicking on the Add Record button. Your quantity on hand for this merchandise item will adjust as you add serial numbers.
Taxable If this merchandise item is normally taxable, enable this flag. If the customer you are selling this item to is tax exempt, no tax will be calculated.
Figure Commission Enable this field if this merchandise item should be included when calculating salesperson commissions
Print on Monthly Bills If the merchandise item is on a rental contract that reaches its monthly billing cycle day, enable this flag if this merchandise item should print on the monthly bill. Otherwise, this merchandise item will not print on any invoice except the invoice that closes the contract (the final invoice).
Bill Each Month You can set up merchandise to bill EVERY TIME a monthly bill is created. Enable this field to do so.
Use Margin for Retail This field is used in conjunction with the margin field (below). Enable this field if you want to use the "Margin" functionality described above.
Allow Discount With this field enabled, any discounts for the customer or at the contract level will be applied. With this field disabled, discount functionality will ignore this item.
Special Tax Exempt If a customer is only tax exempt on certain merchandise items then check the “special tax exempt” check box on this screen, along with a “special tax exempt” check box in the appropriate customer file record.
Used Merchandise Check this box if you wish to flag this merchandise as "used"
Miscellaneous Item Check this box if this item is used for selling items that you do not track individually. In the Quick Sale function, if you sell the same item multiple times on one order the items will auto combine. If the item is a "Misc Item" then it will not combine automatically.
Details
Make If this merchandise item has a Make, you may enter it here.
Model If this merchandise item has a model, you may enter it here.
Color If you want to track the color of this merchandise item, enter the color in this field.
Web URL You may enter a web address or a network address in this field, and wherever you see the Web Address Link button, you will be able to have easy access to whatever address is in this field from many order processing screens. External website addresses should be in the format http://www.coolwebsite.com, internal network links should be in the format \\pcname\sharedfolderwherefileis.
Accounting
Posting Code - GL Use the drop down list to select the appropriate post code for the item. During initial set up, leaving the posting code to Merchandise Revenue is fine. If you suspect you will want to track separated revenue streams in QuickBooks (or Peachtree) for different types of items (like Party vs General Equipment for example), give us a call and we'll help you set up additional posting codes that you can use when setting up rental items.
Tax Code This field should only be populated if this item should always be associated with a particular tax code. Select the appropriate tax code from the drop down list.
Vendors
Preferred Vendor Select the vendor from the drop down list if this is the only vendor that should be used when purchasing this item.
Vendor 1, 2, 3, 4 You may store up to 4 vendors for each item for the purpose of purchasing. Select vendors from the drop down list as appropriate.
Vendor 1 is #1 You can create a purchase order while selling an item. It's pretty easy to do, but during this process you will need to decide if you are going to add this item to an existing purchase order or create a new purchase order. If you choose to create a new purchase order, the Vendor listed in Vendor 1 will be used. If you do not have a Vendor 1, the Preferred Vendor will be used. If you don't have an allowed vendor or a vendor 1, a PO will not be created and you will receive a warning message stating so.
UPC NumbersThis section will show you a list of UPC numbers associated with this merchandise item. You may Add UPC numbers by clicking on Add UPC. If you need to generate a UPC code because the UPC code you want to use is invalid, you may generate a UPC code for FocalPoint use.
All UPC codes must follow the Universal Product Code Standard as explained here: http://en.wikipedia.org/wiki/Universal_Product_Code. If your Vender does not adhere to this standard or does not provide one, you can generate your own internal UPC by using the Generate UPC button within FocalPoint to be used and it will not conflict with an actual product UPC that has been registered with The Global Language of Business. These standards are in place to confirm proper barcode printing within the size restrictions of Price and Bin labels along with increase the reliability of reading UPC codes and preventing duplicate UPC codes being used by multiple vendors.
|
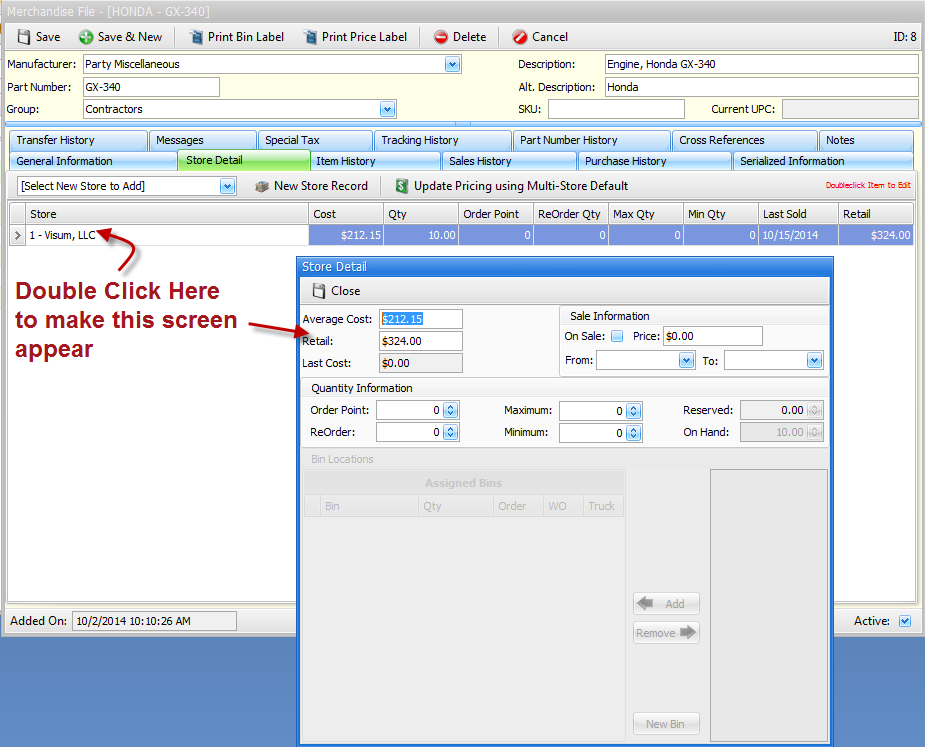
The store detail screen will list detail records for all stores where the merchandise is currently stocked. By double clicking on the "store" field on one of the store lines on this screen, a secondary screen will appear for you to maintain the store's record. To add a new record, Use the drop-down field to select the new store to add the detail record to, then click on the New Store Record button, and the same screen will appear, only blank. You can also click on Update Pricing using Multi-Store Default button to set prices on the detail item.
Fields for Store Detail screen are as follows:
Average Cost This field represents the average cost of the item base on all purchasing activity. This field may be modified should you choose not to use FocalPoint's Purchase Order functionality.
Retail Price The retail price field is used when selling this item.
Last Cost This field will show you the last cost for the item
Sale Information
To set a sale price for an item, you can check the "On Sale" check box, enter the sale price, and use the date fields to determine the starting and ending dates of the sale.
Quantity Information
Order Point Enter the quantity at which point the Suggested Order report should display this item as something you need to order
Re-Order Qty Enter the quantity that should be ordered once the order point is reached.
Maximum Qty Used in conjunction with Auto PO functionality (controlled on the setup 3 tab of the store manager file). This is the qty that is placed on the PO if the PO is created automatically
Minimum Qty Used in conjunction with Auto PO functionality (controlled on the setup 3 tab of the store manager file). This is the qty that is used to scrutinize the current quantity on hand.
A brief note about Auto PO's - If the auto PO function is enabled in the store manager file, when you're selling an item, FocalPoint acts like this: •If the merchandise item you are selling is already on an open PO, the Auto PO functionality is skipped •If there is a vendor in the Vendor 1 field, this vendor will be used to create the auto PO •If the Vendor 1 field is blank, the Preferred Vendor is used to create the auto PO •If both of these vendor fields are blank, the Auto PO functionality is skipped. •If the Maximum Quantity OR the Minimum Quantity is set to 0, the Auto PO functionality is skipped. •If you made it this far, then when selling an item, FocalPoint compares the current quantity on hand (adjusted for the current sale) against the Minimum Quantity. If the quantity on hand is less than the Minimum Quantity, then a PO is created for the appropriate vendor, and the Maximum Quantity is added to the PO.
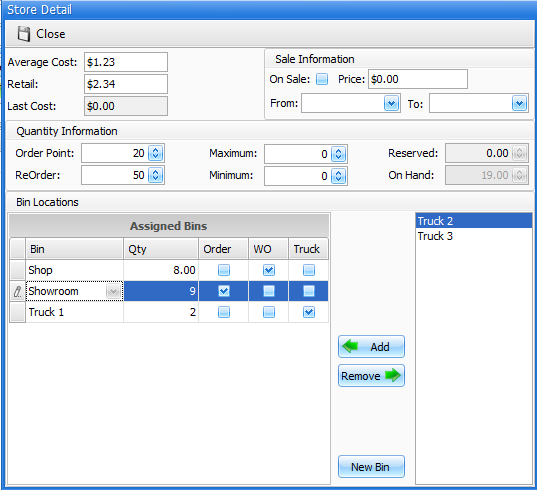
Reserved Quantity Represents the quantity on reservations.
Q: Why is this important? A: If you put a merchandise item on a reservation, the quantity is not relieved from inventory until the reservation is converted to an order.
On Hand Represents the quantity you have on hand. This quantity cannot be changed if the merchandise is serialized or if Bins are being used for the item.
Bin Location
You may set multiple bin locations for a store detail record.
New Bin Click this button to add new bins for use on this merchandise item or any merchandise item.
Bin list (right side of screen This is a list of bins available for use in the store you are in.
Add and Remove Use these buttons to allows usage of bins for the merchandise item.
Quantity You can adjust the quantity in each bin by adjusting this field. Once you start using bins for a merchandise store record, you no longer have access to the On Hand field above. As you adjust bin quantities, the On Hand quantity updates with the total quantity for all bins.
Order/WO/Truck check boxes You may set ONE bin that will default for orders, ONE bin that will default for work orders, and as many secondary bins (typically used for truck stock) as you wish. The "Order" bin will always be depleted when you sell merchandise on an order. The "WO" bin will be depleted by default, but you will be prompted for other bins when you select the merchandise item on the work order. |
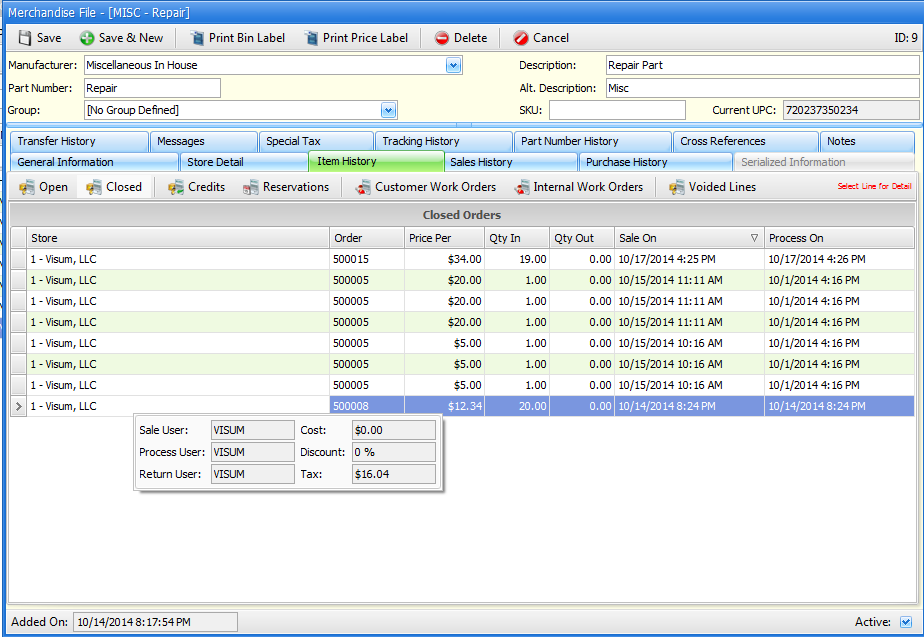
When you click on this tab, you will see a list of current open orders for this item. Click on one of the buttons above (Closed Orders, Credits, Customer Work Orders, Open Orders, Reservations, Internal Work Orders or Voided Lines) to see sales history.
|
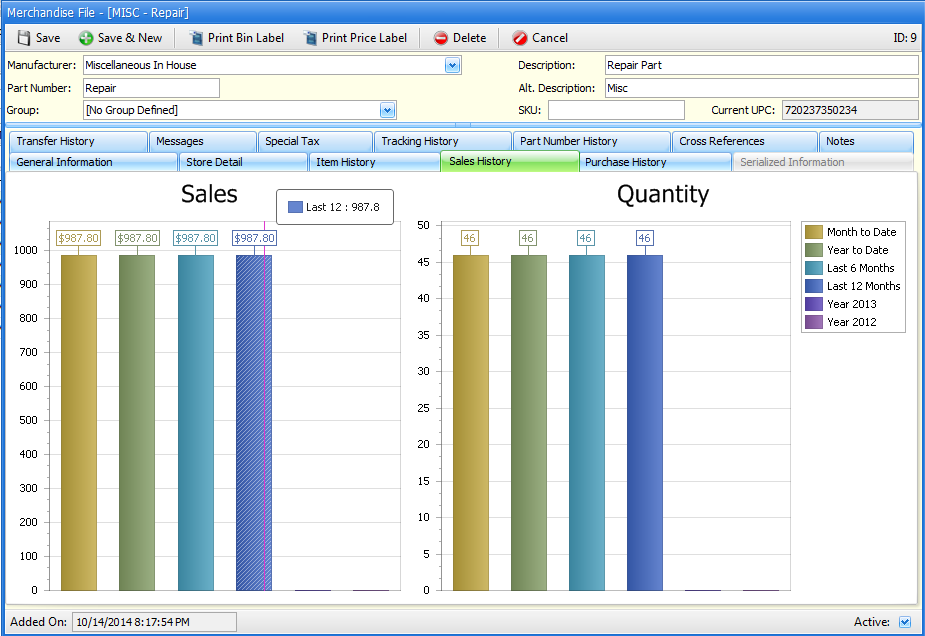
Month to date, Year to date, Last 6 months, Last 12 months, Last Year and Two Years Ago This screen is graphical, showing sales dollars and sales quantities for various time periods.
|
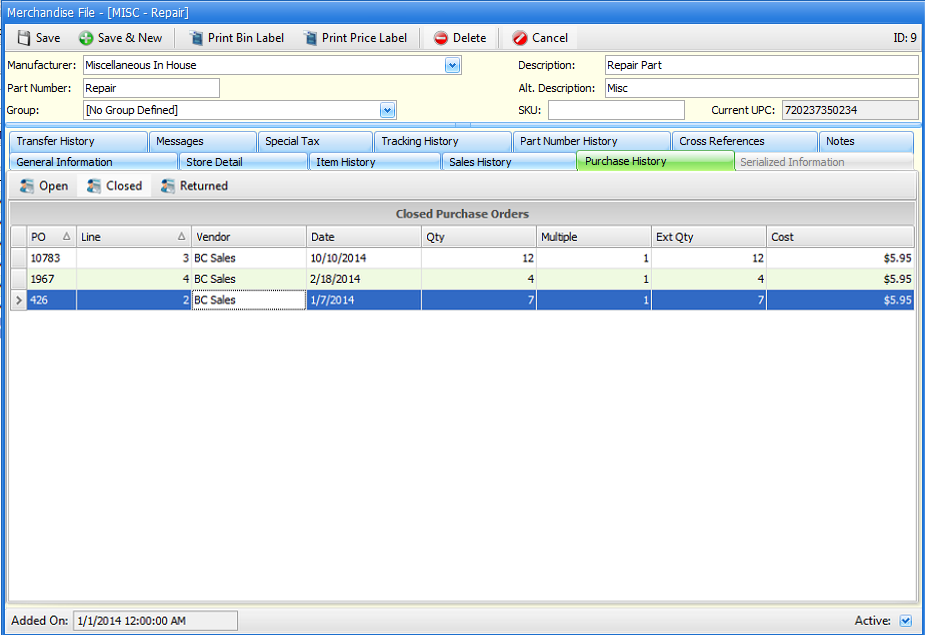
All information on this screen is relevant to purchase orders in FocalPoint. You can use the buttons in the upper left corner to see Open, Closed or Returned PO's.
|
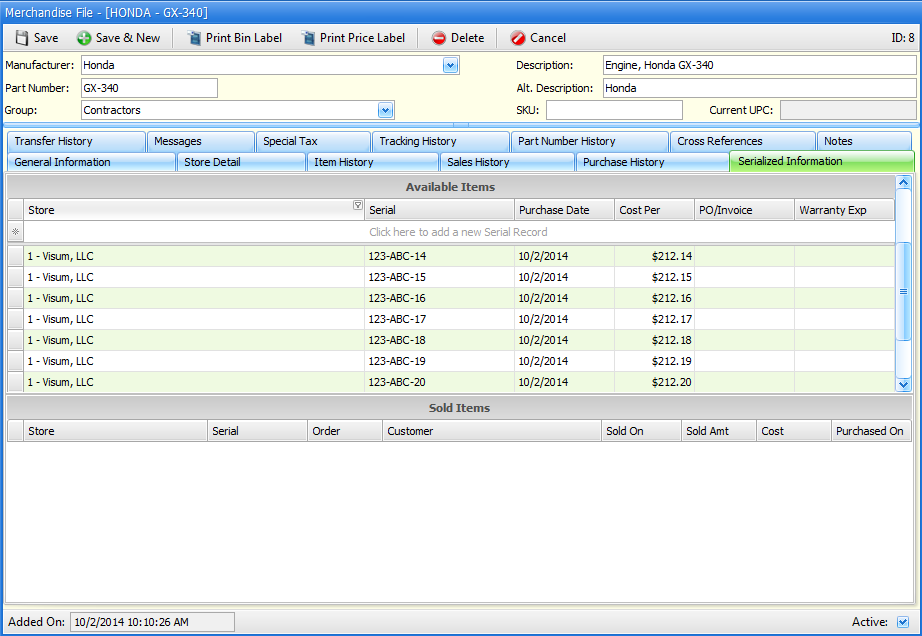
The top half of the Serialized Information screen shows items available for sale. The bottom half of this screen show serialized items sold.
|
The transfers screen will show transfer activity for this item. Use the From Current Store or To Current Store buttons to see transfer activity to or from the store you are currently working with. |
You can set up messages for a merchandise item in FocalPoint that will either show on the screen when the item is selected or print on a contract or invoice.
To enter a message that should show on screen when an item is selected for a contract or invoice, click on the Create Message to the left of the screen. Your cursor will then be taken to the Screen Message area and you may type in messages to show on screen. There is no need to "save" after entering messages. Your messages will be saved when you save the merchandise record.
Likewise, to enter a message that should show on documents (such as rental contracts and sales invoices), click on the Create Message to the left of the screen. Your cursor will then be taken to the Print Message area and you may type in messages to show on orders. There is no need to "save" after entering messages. Your messages will be saved when you save the merchandise record.
You can also maintain merchandise messages in the Merchandise Messages maintenance function, 2-E from the main menu. |
If this item is subject to special taxes set up in the zip code file, select the state(s) where this special tax is applicable. More information about special tax setup can be found in the Special Tax Setup section of this help file. |
This tab will show all increases and reductions to this item based on the store you are logged into. The "Type" column describes the circumstances under which the adjustments were made. |
Use this tab to store old part numbers associated with this merchandise item. You may add records by typing in the top field (See "Click Here to Add New Part Number") or delete records as needed by right-clicking on the item and clicking "Delete". When you search for merchandise, you will be able to find the merchandise item by any of the part numbers. |
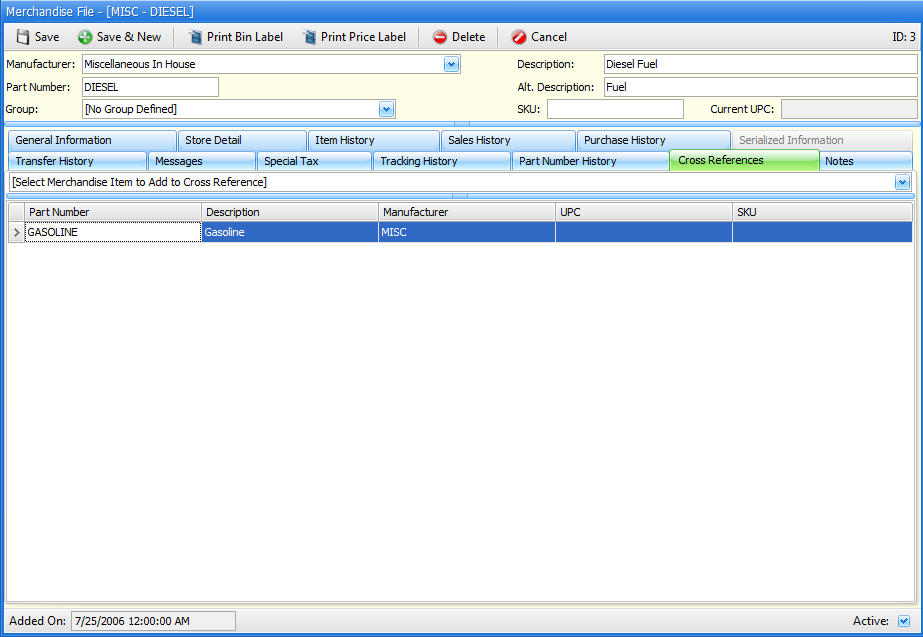
Use this screen to quickly cross reference a different merchandise item to the item you are currently working with. Use the blank field to select a merchandise item to add to the cross reference. Right click on a record to delete it.
|
Notes may be added to merchandise records. These notes are for internal purposes only. |